
When you have an online store, you need to ensure the products, checkout, policies, and blog pages are fully functional. These are some of the most important sections of your store. Therefore, you need to ensure that they are highly responsive.
The checkout page is what determines whether an order will be fulfilled or not. If the cart and checkout pages are hard to navigate through, people will leave your store without making any purchases.
The default WooCommerce checkout configuration is fine, but you can make some modifications to make it more appealing. To customize the checkout fieds conveniently, you can also use the Checkout Manager for WooCommerce Plugin. In this article, we will learn more about how to modify the WooCommerce custom fields’ checkout page.
How Do WooCommerce Checkout Process Work?
Just the same way you go out to the supermarket, place items in the trolley, and go to the counter to make some payments is how the checkout process occurs.
- You browse through the various product categories, find a product, and click on the Add to Cart CTA.

- You will be redirected to another page that shows all the products that you have added to your cart.
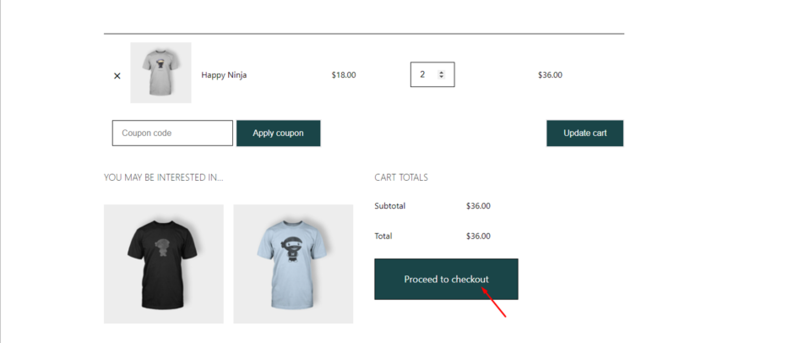
- Once satisfied, click on Proceed to checkout to add the various details.
- You can shop as many products as you want before you check out. When the products are added to the cart, they won’t disappear.
If that outlook doesn’t seem pleasing, there is a way a store owner can change in the backend. To enable users to buy their preferred products from the wishlist at a later time, you can also try the Wishlist for WooCommerce plugin.
The Default Fields Found on the WooCommerce Checkout Page
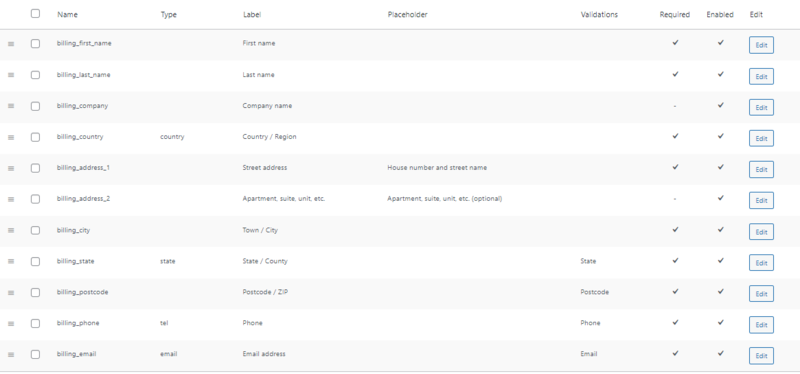
By default, WooCommerce provides these essential fields for your checkout page:


These include your name, company, country, address, town, state, zip code, mobile number, email address, and any other additional details. Once you complete, you can then place an order.
However, that’s just the default checkout template. In most cases, the form takes the layout of the theme used on the website.
Fortunately, you can edit the design, change the call to action text, remove an irrelevant field, change the requirement of a field, add a delivery date option, payment method, and much more. It means there are a lot of options to change WooCommerce checkout fields.
You just need to find out the fields that you need to add, jot them down, and customize them as required.
You can also use the WPMozo Checkout Manager for WooCommerce to customize the checkout page of your store.
How to Customize the Checkout Fields
In WooCommerce, you can customize the checkout fields using WooCommerce checkout manager plugins or coding. It depends on what you prefer most. We will first look at customizing using plugins and then codes.
Customizing the WooCommerce Checkout Fields Using Plugins
There are some plugins that you can use to customize the WooCommerce checkout fields.
1. With Checkout Field Editor by ThemeHigh

One of the most common WooCommerce checkout customizer plugins is Checkout Field Editor. It makes it easy to add or remove fields that you don’t want on WooCommerce.
It allows you to change existing WooCommerce checkout fields or add twenty different types of checkout fields on your checkout page. These include text, number, password, email, phone, radio answers, text area, checkbox, multi-select, time, and much more.
Additionally, you can use Checkout Field Editor to edit, delete, enable, reposition, and validate the checkout fields. This will help to collect the right information.
Steps to Use the Field Editor Plugin
- Open your WooCommerce dashboard, navigate to Plugins → Add New.
- Search for Checkout field editor, install and activate the following.

- Once activated, you will see it on the plugins page. Alternatively, on the left menu bar, click WooCommerce and select the Checkout Form.
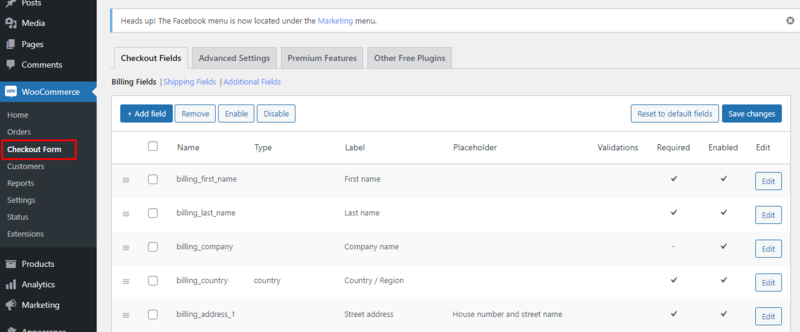
- You will be able to see all the checkout fields found on your checkout page. Click on Edit to change the different fields, labels, placeholders, and validations. You can also enable or disable it. This gives you the ease to modify and change WooCommerce checkout fields in your own way.
- When you click on edit, you will be able to change the different fields as required.

- Once satisfied, you can preview what the checkout form looks like.
This should help you collect the information required from your customers.
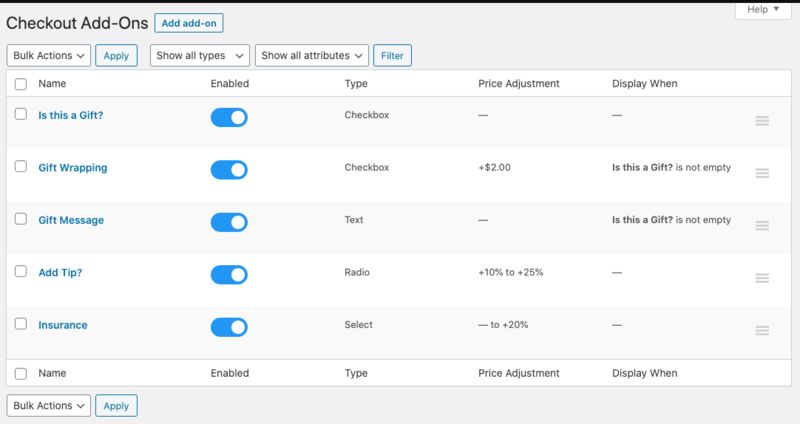
2. With WooCommerce Checkout Add-Ons Plugin
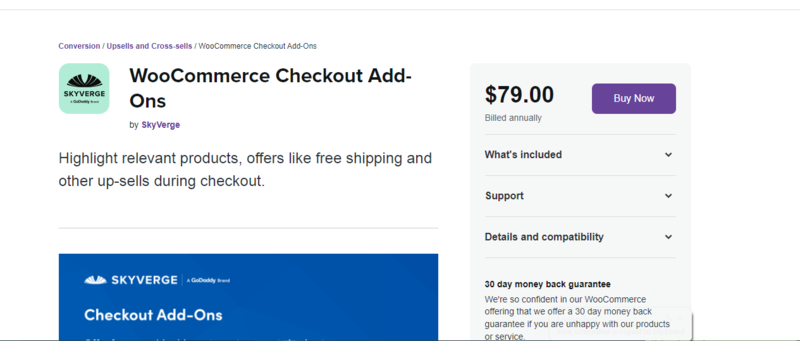
When you have an online store, you need to ensure that it is easy for any buyer to make purchases. If you complicate it, they may get frustrated and leave the cart. This “checkout add-on” extension gives suggestions to the customers on what else they can purchase.
Let’s say someone is buying a watch, it can provide a prompt on whether the buyer would want to add a gift box at $3. The buyer can either decide to add or not. You just have to find what people will be willing to add to their purchase that complements certain products.
If you sell gifts in your store, you can consider having a gift wrapper or gift box option.
Steps to Use the Checkout Add-Ons Plugin.
- First go to the WooCommerce store and purchase the plugin. It costs $79 which is a fair price for the benefits it comes with.
- Install it into your WooCommerce store.
- On the left menu bar, the plugin will appear under WooCommerce.
- Click on Checkout Add-Ons.
- Customize, modify, and change the WooCommerce checkout fields as you wish. It is as easy as that!
The plugin allows you to access order tips, offer free service, and provide gift options to complement the products bought.
Not only that, but you can also create custom field types, add fixed amount costs, create conditional add-ons based on purchased items, and much more.
3. With Flexible Checkout Fields for WooCommerce

The Flexible Checkout Fields for WooCommerce (FCFW) is another ideal plugin that you can use to edit your checkout page. It works similarly to the WooCommerce checkout field editor. However, for this, it offers more options that you can use.
Steps to Use FCFW Plugin
- Open your WooCommerce dashboard. Click on plugin → add new.
- On the search bar, type in the Checkout fields plugin.

- Install and activate the plugin. You will be able to see it on the left menu bar under WooCommerce. Click on Checkout Fields to modify the options.
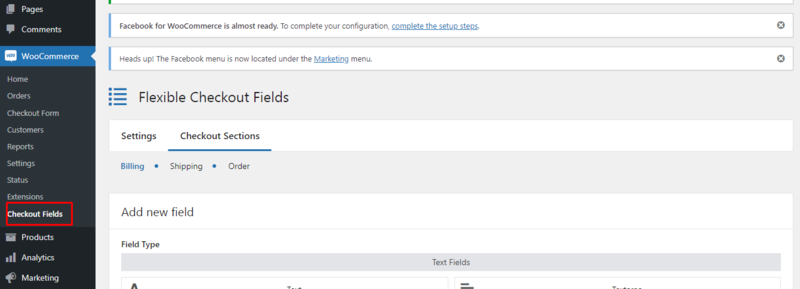
- You can modify based on the billing, shipping, and order options. It allows you to add and remove fields.

- The checkout fields plugin allows you to disable or make the fields optional.
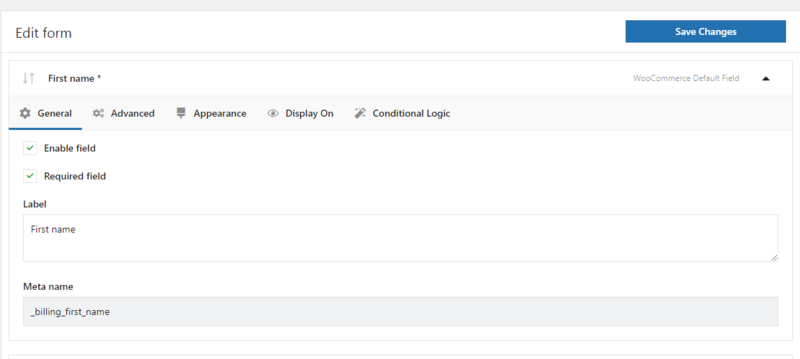
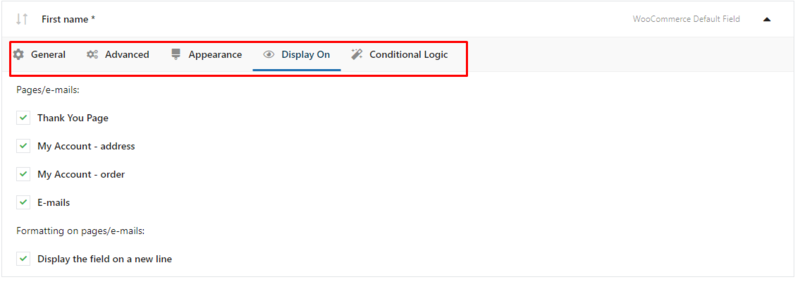
- Once satisfied, you can modify how you want the checkout page fields to appear. You can even choose which pages you would want it to appear on and even have conditional logic. This occurs when someone answers a question, and it has an additional question.
- Once done, remember to save and check how your form looks.
Some Other Popular Plugins to Customize WooCommerce Checkout Fields
There are also some other plugins that you can use to modify the WooCommerce custom checkout fields. These include; WooCommerce one-page checkout, and WooCommerce direct checkout. They work similarly, the same.
How to Customize Fields of the Checkout Page Using Code
If you aren’t a professional coder, you can consider using the plugins. However, if you are confident about your coding skills, you can consider just coding. Code snippets are a great way to change some valuable code to make your website look better.
1. How to Remove a Field in the Checkout Form Page
While coding, you need to be extra careful to ensure you don’t execute a code that can destroy multiple pages. This step is a bit straightforward. However, remember to track all the changes if you would want to change them later on.
- Open your WordPress dashboard, click on Tools → Theme File Editor and select Theme Functions (functions.php file.)
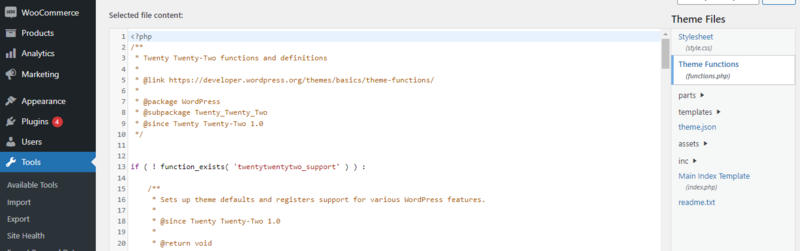
Note: Before you tweak files make sure you’ve created a backup. Or try using a child theme. Alternatively, you can use a code snippet plugin to add code to your site easily.
- You can use this code in the PHP file. However, it will remove all the available fields on the checkout page.
/**
 Remove all possible fields
 **/
function wc_remove_checkout_fields( $fields ) {

    // Billing fields
    unset( $fields['billing']['billing_company'] );
    unset( $fields['billing']['billing_email'] );
    unset( $fields['billing']['billing_phone'] );
    unset( $fields['billing']['billing_state'] );
    unset( $fields['billing']['billing_first_name'] );
    unset( $fields['billing']['billing_last_name'] );
    unset( $fields['billing']['billing_address_1'] );
    unset( $fields['billing']['billing_address_2'] );
    unset( $fields['billing']['billing_city'] );
    unset( $fields['billing']['billing_postcode'] );

    // Shipping fields
    unset( $fields['shipping']['shipping_company'] );
    unset( $fields['shipping']['shipping_phone'] );
    unset( $fields['shipping']['shipping_state'] );
    unset( $fields['shipping']['shipping_first_name'] );
    unset( $fields['shipping']['shipping_last_name'] );
    unset( $fields['shipping']['shipping_address_1'] );
    unset( $fields['shipping']['shipping_address_2'] );
    unset( $fields['shipping']['shipping_city'] );
    unset( $fields['shipping']['shipping_postcode'] );

    // Order fields
    unset( $fields['order']['order_comments'] );

    return $fields;
}
add_filter( 'woocommerce_checkout_fields', 'wc_remove_checkout_fields' );- Once done, remember to update the file for the changes to be saved. Additionally, remember the country field is required, if removed orders can’t be completed.
2. How to Make Any Field Not Required
Certain fields need to be compulsory and others optional. You can use this code to make the changes. Remember that you are editing your current theme, don’t modify others. Only modify the activated one. Let’s say you want to edit the billing field. You can do this.
- Repeat Step 1 of the previous solution to access file editor.
- Paste this code into the functions.php file.
add_filter( 'woocommerce_billing_fields', 'wc_unrequire_wc_phone_field');
function wc_unrequire_wc_phone_field( $fields ) {
$fields['billing_phone']['required'] = false;
return $fields;
}- The code will make the billing phone requirement optional.
3. Change the Labels and Placeholders
This also requires you to modify the WooCommerce checkout page template. In the case that you want to change the labels and placeholder, you can do this.
- Repeat Step 1 of the previous solution to access file editor.
- On the functions.php file, paste this code.
add_filter('woocommerce_checkout_fields', 'custom_override_checkout_fields');
function custom_override_checkout_fields($fields)
 {
 unset($fields['billing']['billing_address_2']);
 $fields['billing']['billing_company']['placeholder'] = 'Business Name';
 $fields['billing']['billing_company']['label'] = 'Business Name';
 $fields['billing']['billing_first_name']['placeholder'] = 'First Name';
 $fields['shipping']['shipping_first_name']['placeholder'] = 'First Name';
 $fields['shipping']['shipping_last_name']['placeholder'] = 'Last Name';
 $fields['shipping']['shipping_company']['placeholder'] = 'Company Name';
 $fields['billing']['billing_last_name']['placeholder'] = 'Last Name';
 $fields['billing']['billing_email']['placeholder'] = 'Email Address ';
 $fields['billing']['billing_phone']['placeholder'] = 'Phone ';
 return $fields;
}- That’s it. You can do that to multiple labels to let them look as you wish.
Conclusion
If you aren’t a programmer, you can consider using the WooCommerce checkout page customization plugins.
They can help you to edit the WooCommerce cart page. There are a wide variety of plugins that you can use, it just depends on the kind of functionality that you need.
However, always be careful when making any changes to the website’s code.
You can modify something that can change the general outlook of your site. Thus, with the right customizations, your customers will find it easy to make purchases.


0 Comments