
A WooCommerce tab manager allows you to customize the tabs on your product pages. Additionally, you can decide to add or delete tabs if the installed tab manager supports this customization.
If you’re looking for a product tabs manager for WooCommerce that offers seamless solutions, then WPMozo Tab Manager can fulfil that requirement.
This tab manager WooCommerce plugin offers essential options you can utilize efficiently.
Below, we will explore five advanced features you can utilize on your WordPress WooCommerce-powered website. Furthermore, we will also go through the step-by-step, detailed instructions to perform all those actions.
Now, without any further delay, let’s get started.
A Quick Look at the WPMozo Tab Manager for WooCommerce
WPMozo Tab Manager is a premium plugin for WooCommerce.
Using this plugin, you can make changes to your product pages tabs right from your WordPress Dashboard. This WooCommerce tab manager plugin adds a menu to the dashboard that you can access at any time.
Furthermore, the plugin doesn’t require following complex steps or needing to know coding in order to utilize its features.
You simply need to access the WPMozo Tab Manager interface, and by following simple clicks and toggles, you can customize the tabs in your WooCommerce product pages. The plugin can also be used as a custom product tabs manager.
This flexibility of WPMozo Tab Manager makes it an ideal WooCommerce tab manager plugin for digital stores of all kinds.
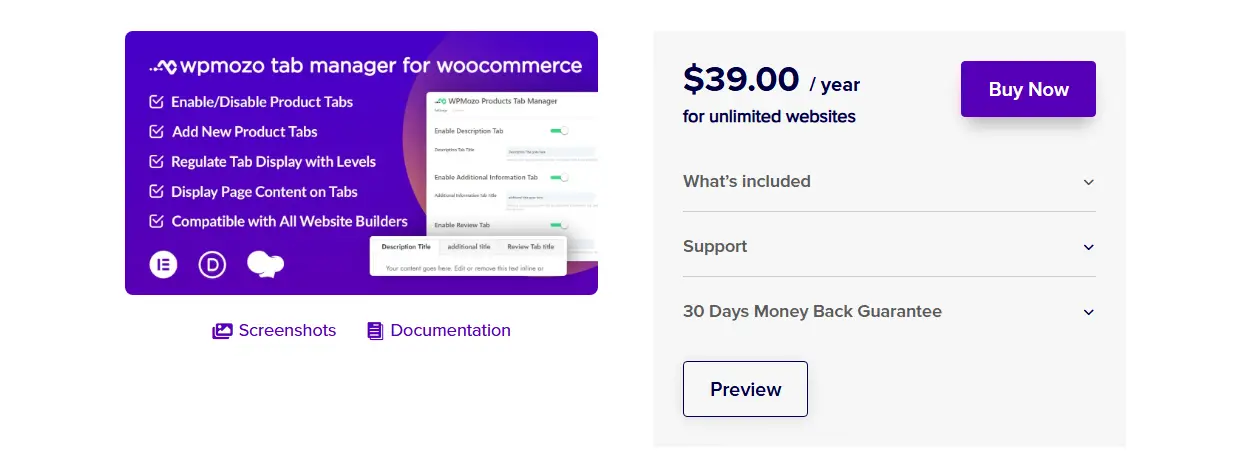
The plugin is available on a single licensing system at US$39/year for unlimited websites.
Under this licensing, you also get 1 year of updates and support. But you can try the plugin risk-free with a 30-day money-back guarantee.
Thus, a perfect opportunity to enhance your store tabs for products.
How to Use It
To use this product tabs manager plugin for WooCommerce, you need to download and install it. So, first visit WPMozo Tab Manager’s official page and download your copy from there.

After downloading the WPMozo Tab Manager files, log in to your WordPress Dashboard, and go to Plugins → Add Plugin → Upload Plugin
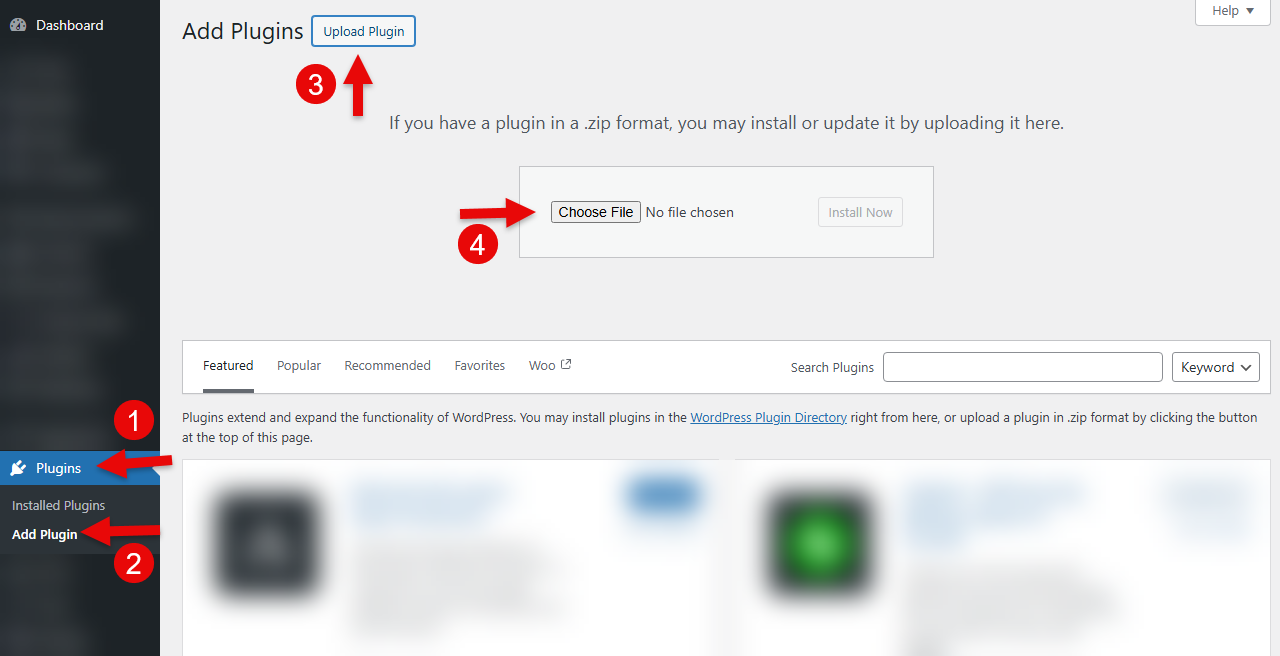
On the upload page, click Choose file, select the downloaded files, and then click Install Now.
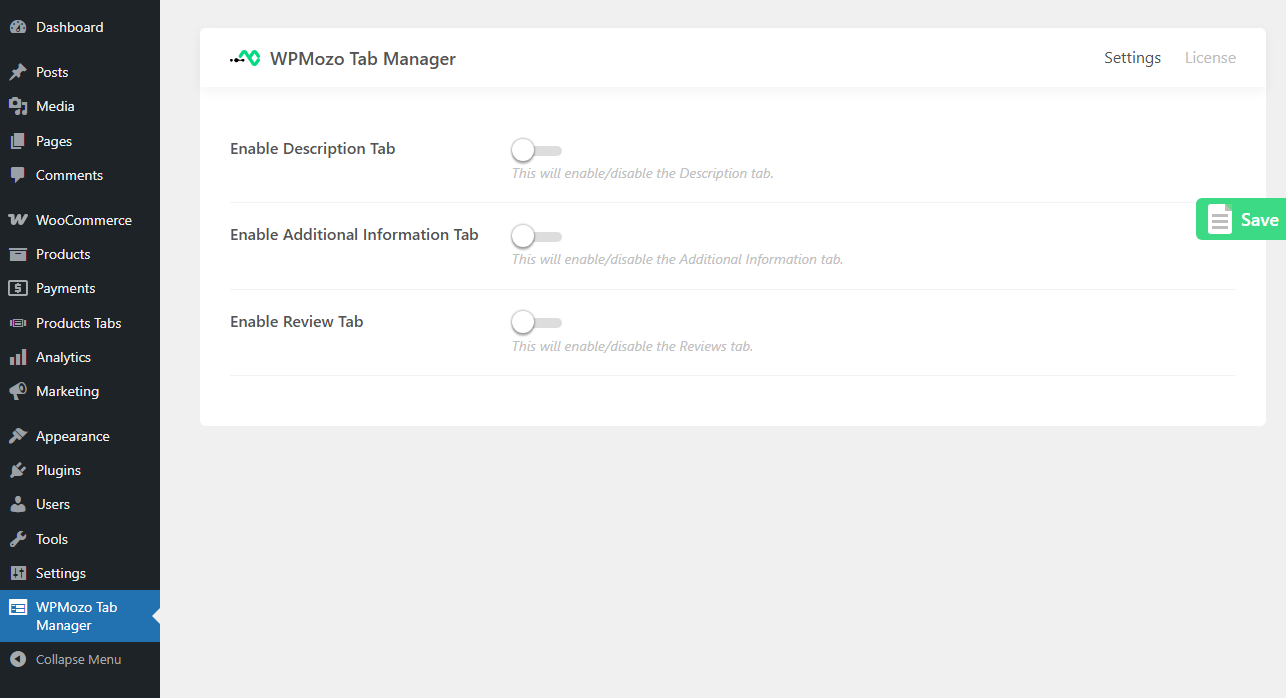
Once the plugin is installed, activate it, and as you do that, you can find the WPMozo Tab Manager option in the WordPress sidebar. When you access it, you will find options like the following:
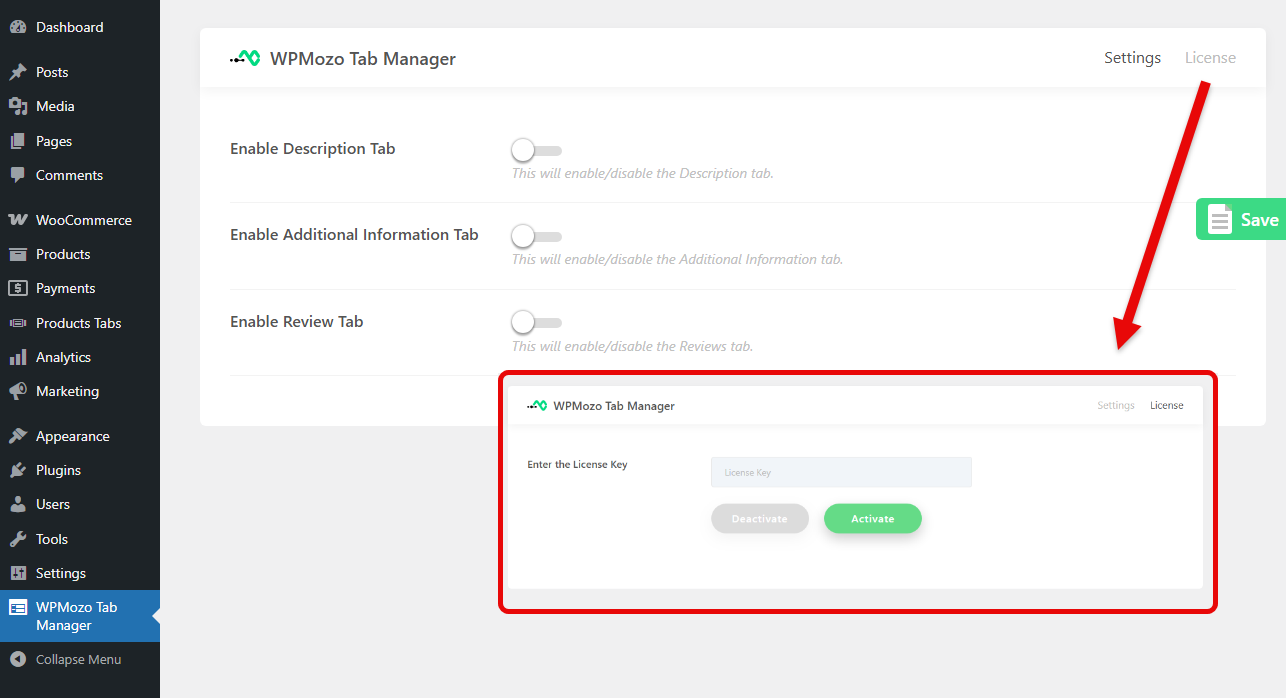
Now, you need to activate the license of your plugin. Therefore, click on the License, and then enter the license key. Once done, you can utilize the available options. You can perform the advanced tasks we will discuss in the next section of this post.
5 Advanced Things You Can Do With WooCommerce Tab Manager by WPMozo
You can perform all of the following advanced things for your products’ tabs directly from the Tab Manager settings.
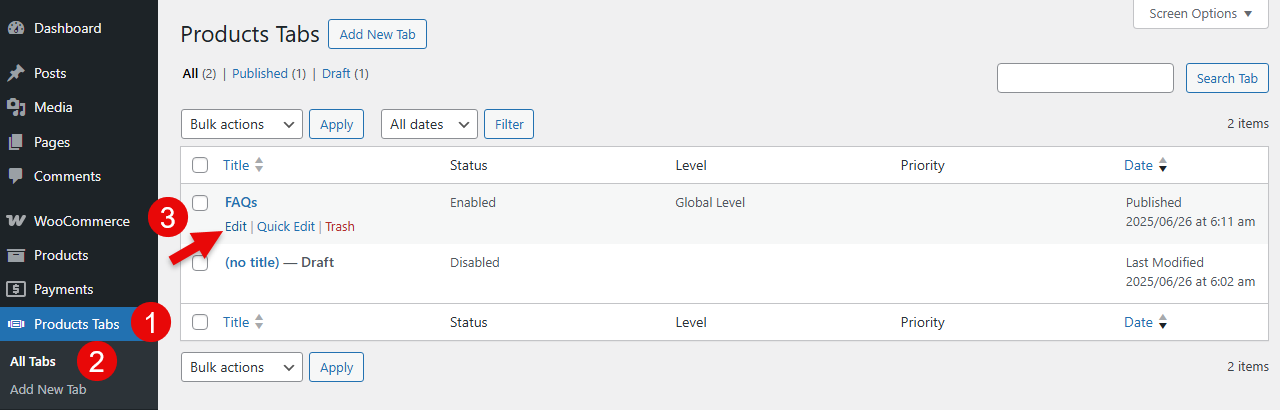
1. Add New Tabs
With the help of this tab manager plugin for WordPress and Woo, the first thing you can do is add new tabs. Or you can say, custom product tabs. When you install WPMozo Tab Manager on your WordPress site, it adds another menu, Products Tabs, in addition to the main menu.
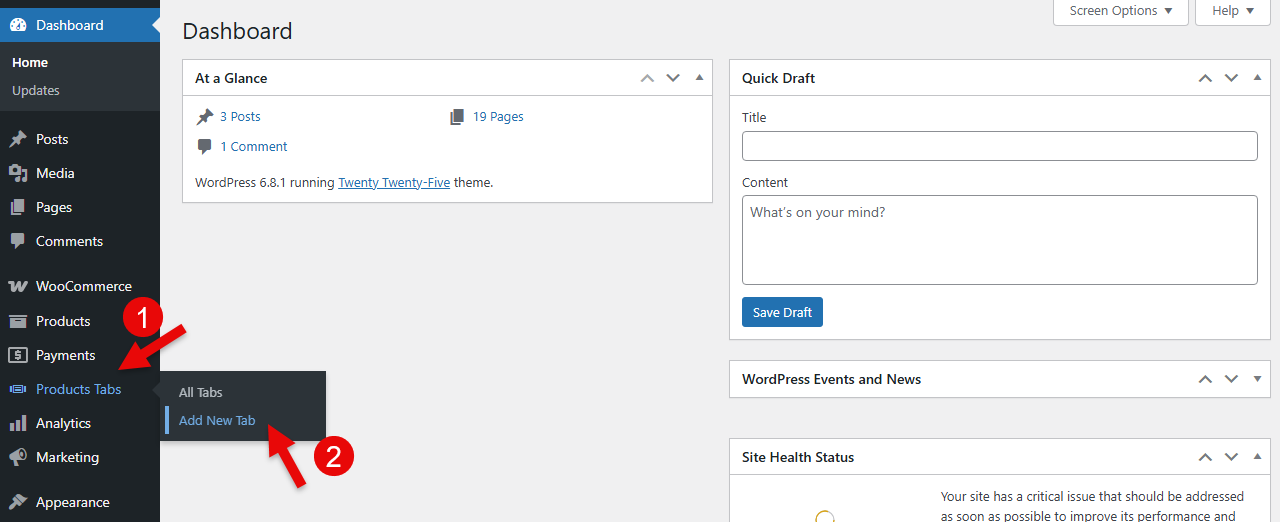
To create your custom tab, click on the Products Tabs → Add New Tab. It will open the WordPress editor where you can add all the details for the tab.
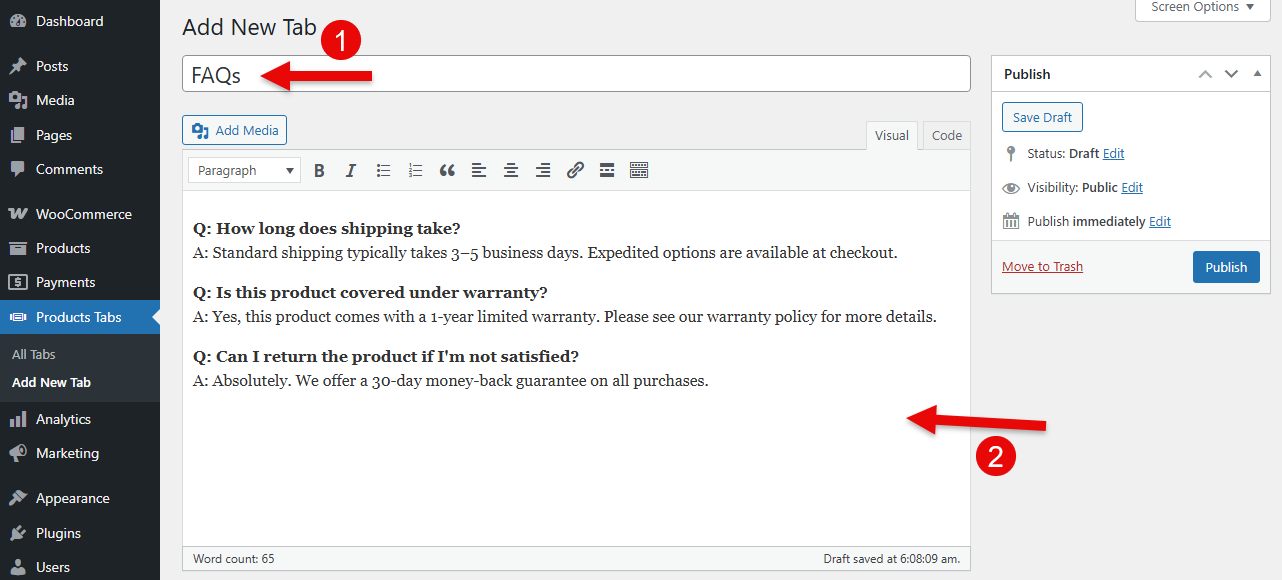
First, you need to enter the title, then you get the TINY MCE editor to add details of your product tab. This lets you add rich content to your tab. Once you are done with the content, go to Status → and toggle it to Enabled.

Then, to display the tab on the product page, click the Publish button. And this will start to show your custom product tab created using the WooCommerce tab manager plugin by WPMozo. This is how the custom tab looks.

In order to customize the content, you simply have to return to the Products Tabs menu and access the edit option for the respective custom product tab.
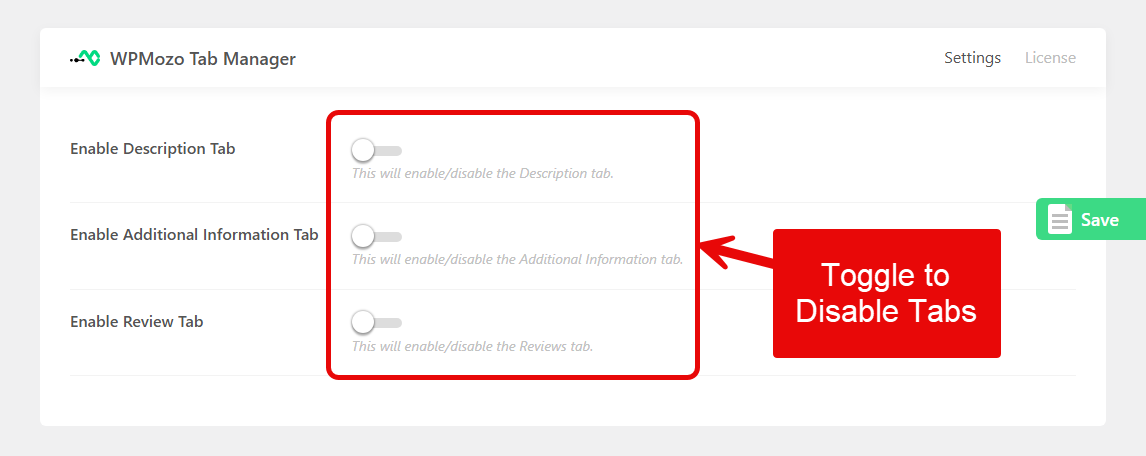
2. Enable or Disable the Default Product Tabs
If you need to do tab customization of the native WooCommerce products tabs, you can use the WPMozo Tab Manager plugin for that as well. Go to the WPMozo Tab Manager option, and click on it.

As it opens, you can select whether to display the default tabs or not. Simply turn off the toggle, and the tabs will be disabled.
In addition to this, if you want to keep the default tabs, you can choose to change their title. Just go to the tab, and there you will find a separate field for the custom title.
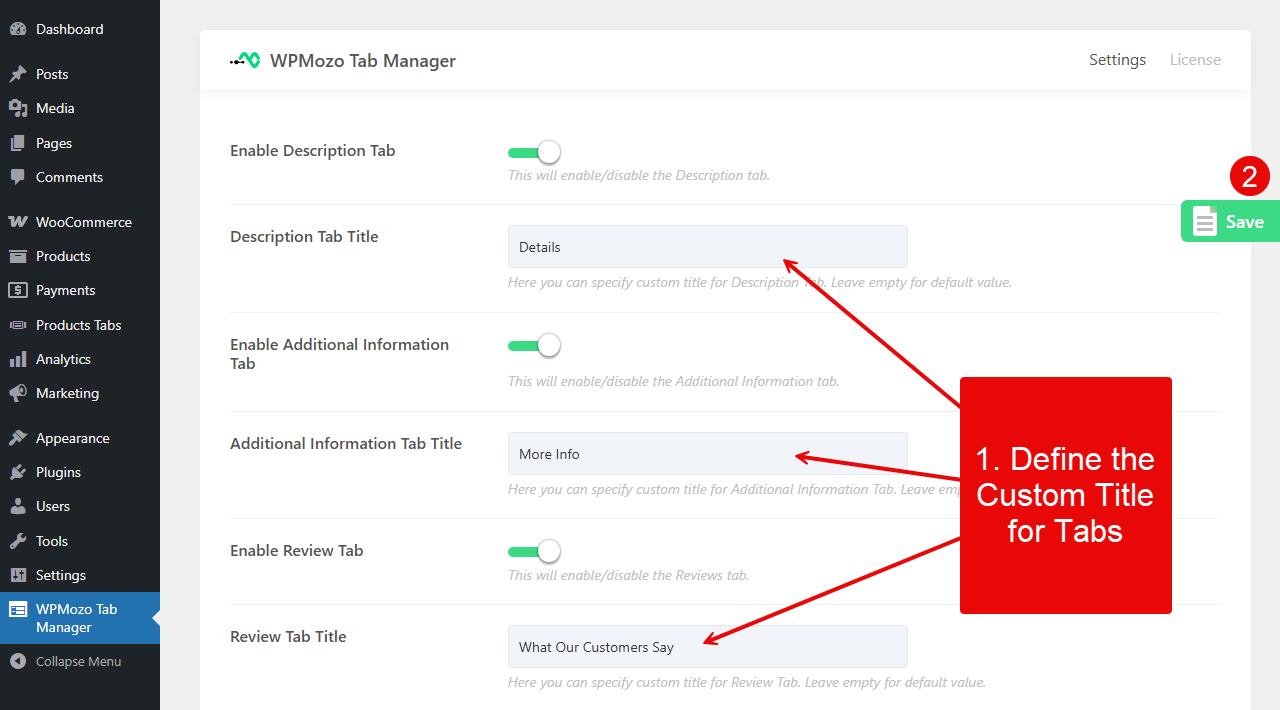
Make your changes, and once done, click Save.
3. Use Elementor Template as Content
You can use the tab manager WooCommerce plugin to display an Elementor template as the content for a particular tab on the Product page. This allows you to have diversity on your product pages and provide customers with an enhanced experience.
To display the Elementor template using this WooCommerce tab manager, you need to edit your custom product’s tab.
Then, scroll down to the Tab Settings → Content Type.
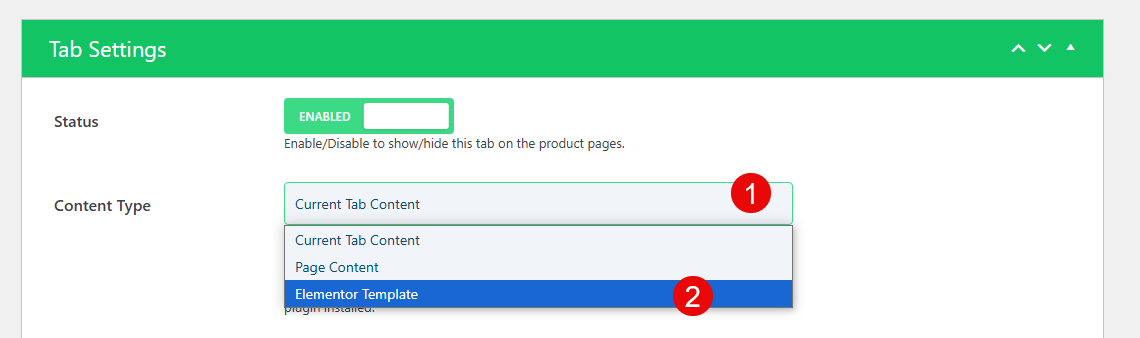
From the available options, select Elementor Template. In addition, you can also use Page Content in the tabs if you like. For that, you simply have to select Page Content in the Content Type option.
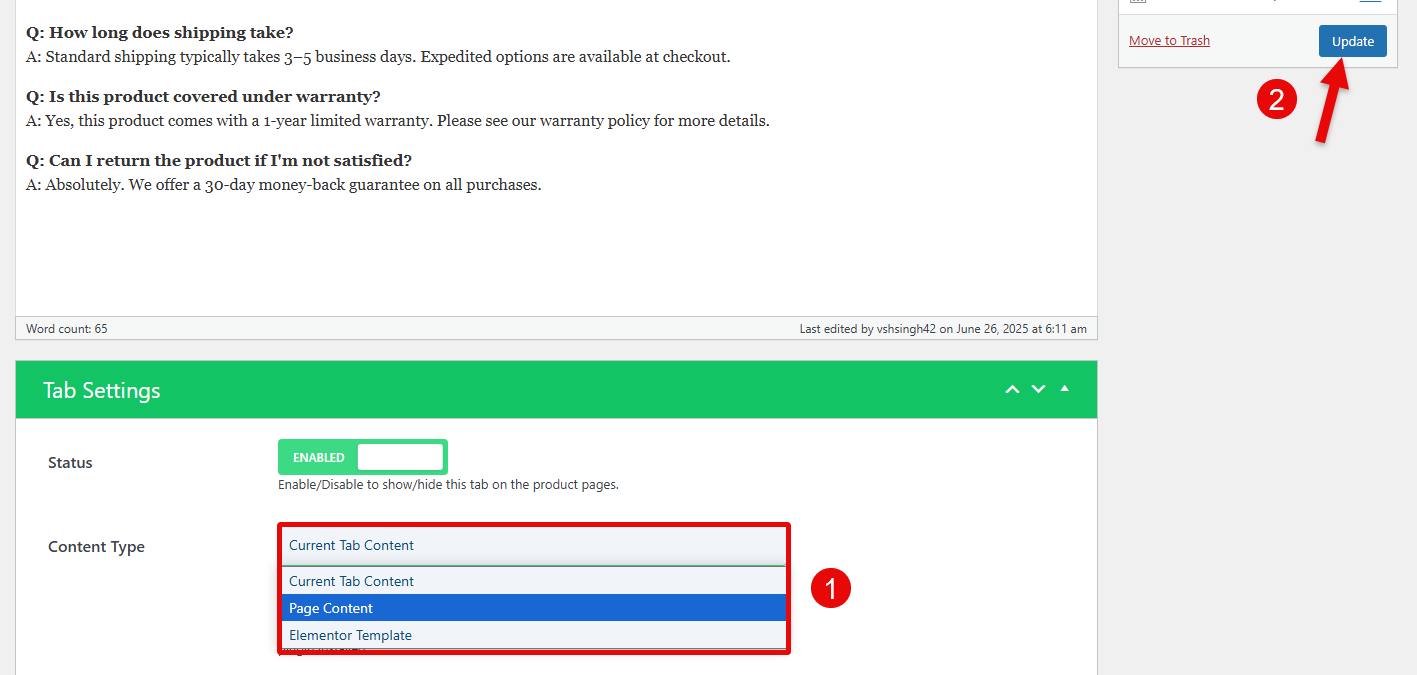
Once done, click on the Update button.
4. Choose Where and Whom to Display the Custom Product Tabs
This custom product tabs manager also allows you to decide where and to whom the custom tabs should be visible. You get the options:
- To decide the level of the tabs to be displayed.
- Select the WooCommerce User roles that can view it.
In order to utilize the function of WooCommerce tab manager, edit your product’s tab, then open the Tab Settings and scroll till the Level and User Role options.
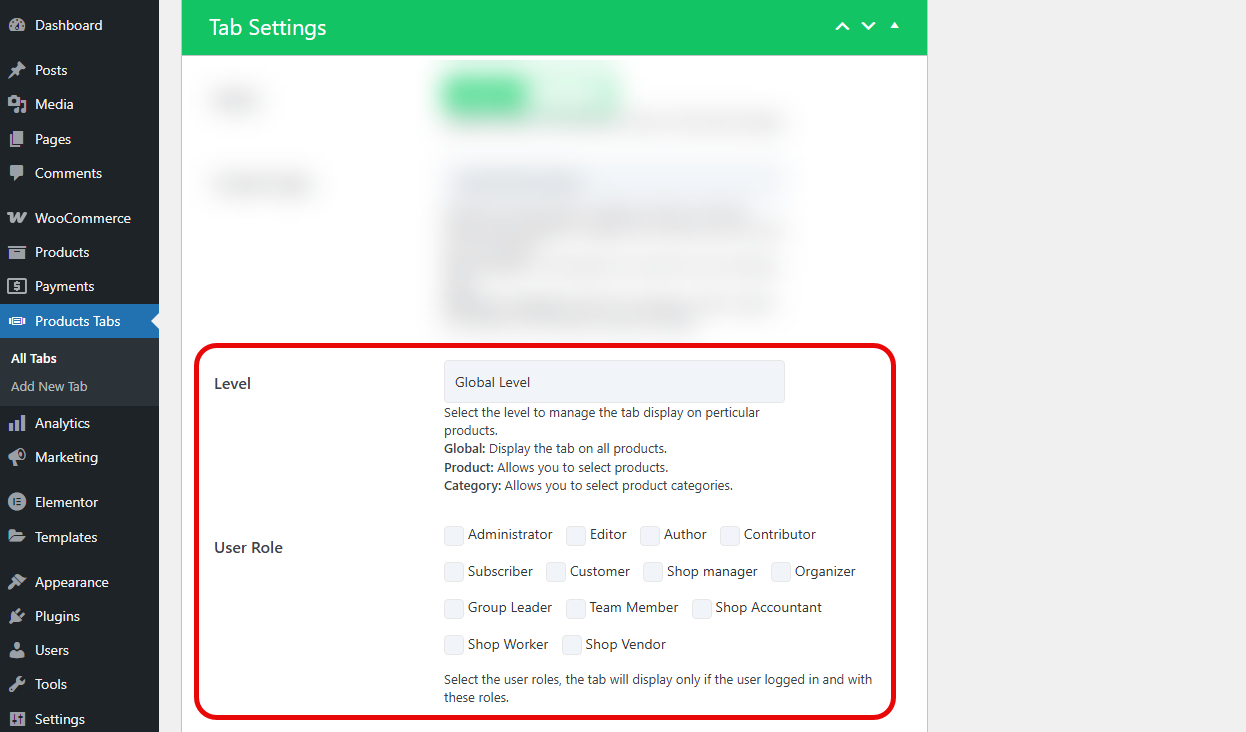
The level option provides you with three choices:

- Global Level
- Product Level
- Category Level
When you select the Global Level, the tab will be visible on all the products. When you select the Product Level option, the tab will be visible on the products you have assigned it to. And when you select the Category Level, it will be applied to all the products under the selected categories.
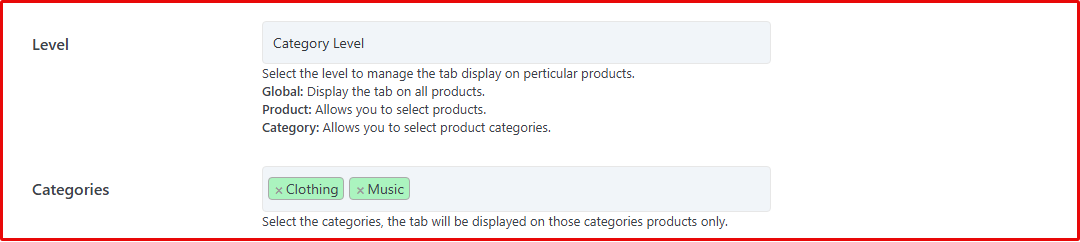
Using the User Role, you can decide to show the tab to the selected users. Under this option, the users you can select are:

- Adminstrator
- Editor
- Author
- Contributor
- Subscriber
- Customer
- Shop manager
- Organizer
- Group Leader
- Team Member
- Shop Accountant
- Shop Worker
- Vendor
Based on your selection, the tab will be visible to them only.
5. Set WooCommerce Tabs Priority
In addition to the above features, the WPMozo Tab Manager plugin allows you to set priority for tabs. If you need to display a particular tab before/after the rest of the tabs, you can easily do that using the Priority function.

In the Tab Settings, you simply need to go to the Priority field and assign the tab its priority number. The higher the number, the later it will appear. The lower the number, the earlier it will be displayed on the product page. By default, the priorities for Description, Additional Information, and Review tabs are 10, 20, and 30.
So, if you set the priority for a tab as 1, it will be displayed first. If you set the priority for the tab as 31, it will be displayed last.
Why Use WooCommerce Tab Manager by WPMozo
The reasons one should use the WPMozo Tab Manager for WooCommerce are simple and clear. You can use it to:
- Easily do the tab customization. No need to use coding.
- Add more information with additional resources like Links, Graphics, and Tables.
- Enhance the user experience while exploring the particular product.
You may find more reasons to use a product tabs manager for WooCommerce; however, all of the above reasons set the floor. These help shop owners maximize their products’ user sessions and effectively sell the benefits they claim.
With the WPMozo Tab Manager plugin for WordPress/Woo, it’s all easier to do as well as manage.
Some Use Cases of Tab Manager for WooCommerce
As WPMozo is an intuitive plugin for WooCommerce, you can use it for different purposes. However, among those, you can surely use it for the following popular ones:
- Shipping & Returns.
- Size Guide.
- Technical Specifications.
- FAQs.
- Warranty Info.
- Gallery.
- Best Offer.
Let’s have a quick look at how each of these looks.
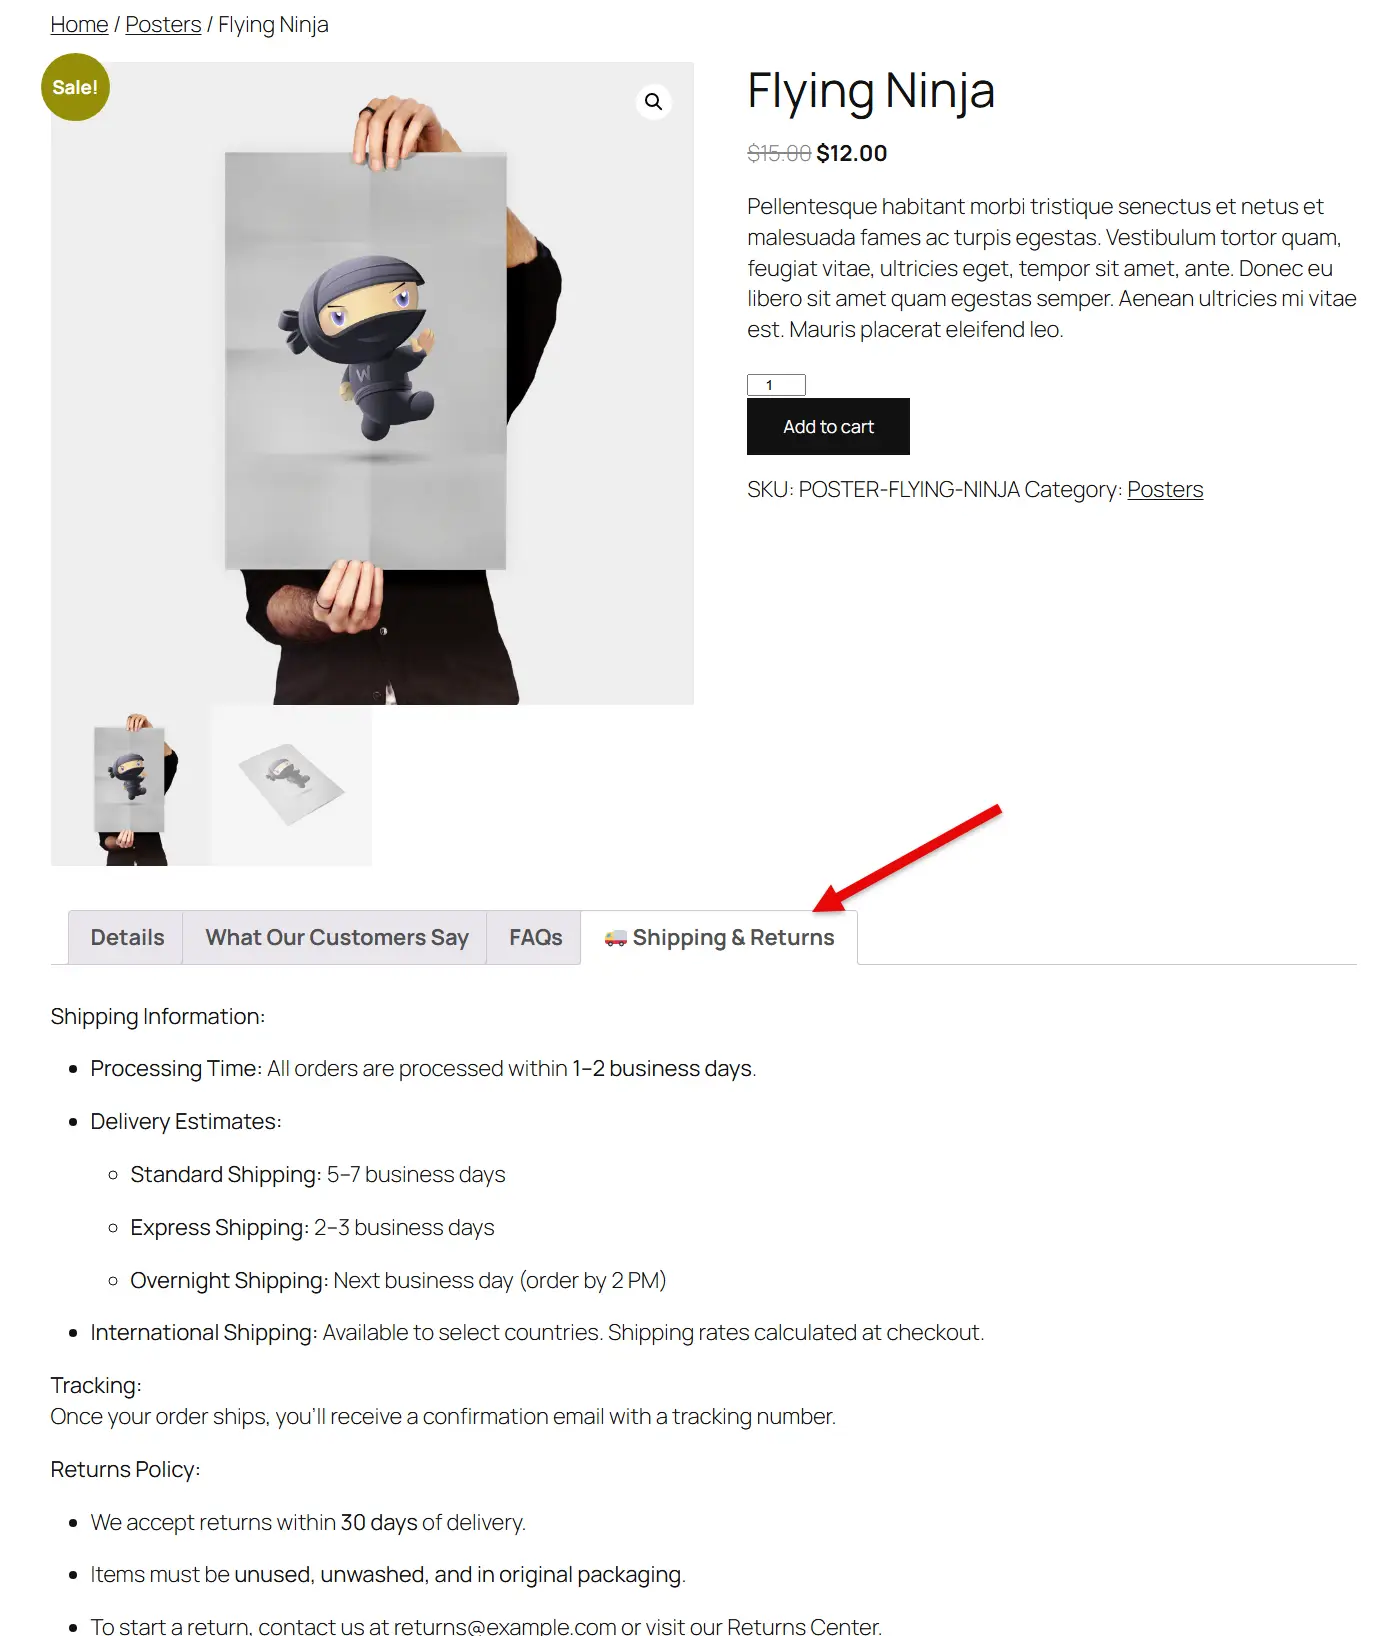
Shipping and Returns Tab
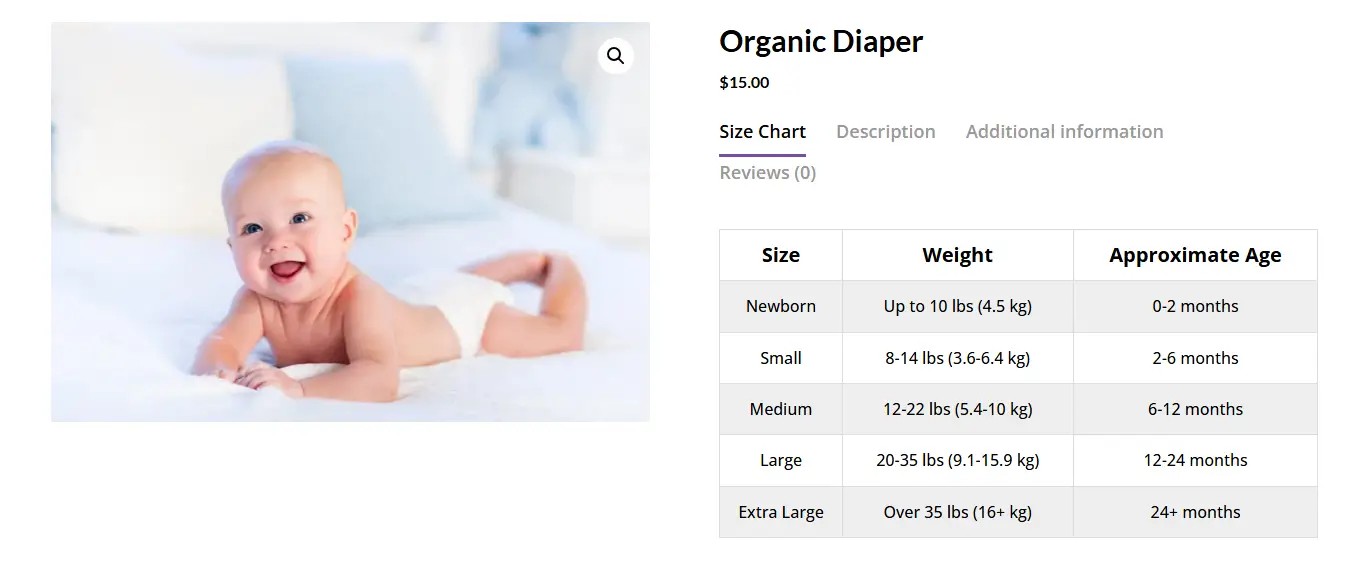
Size Guide Products Tab
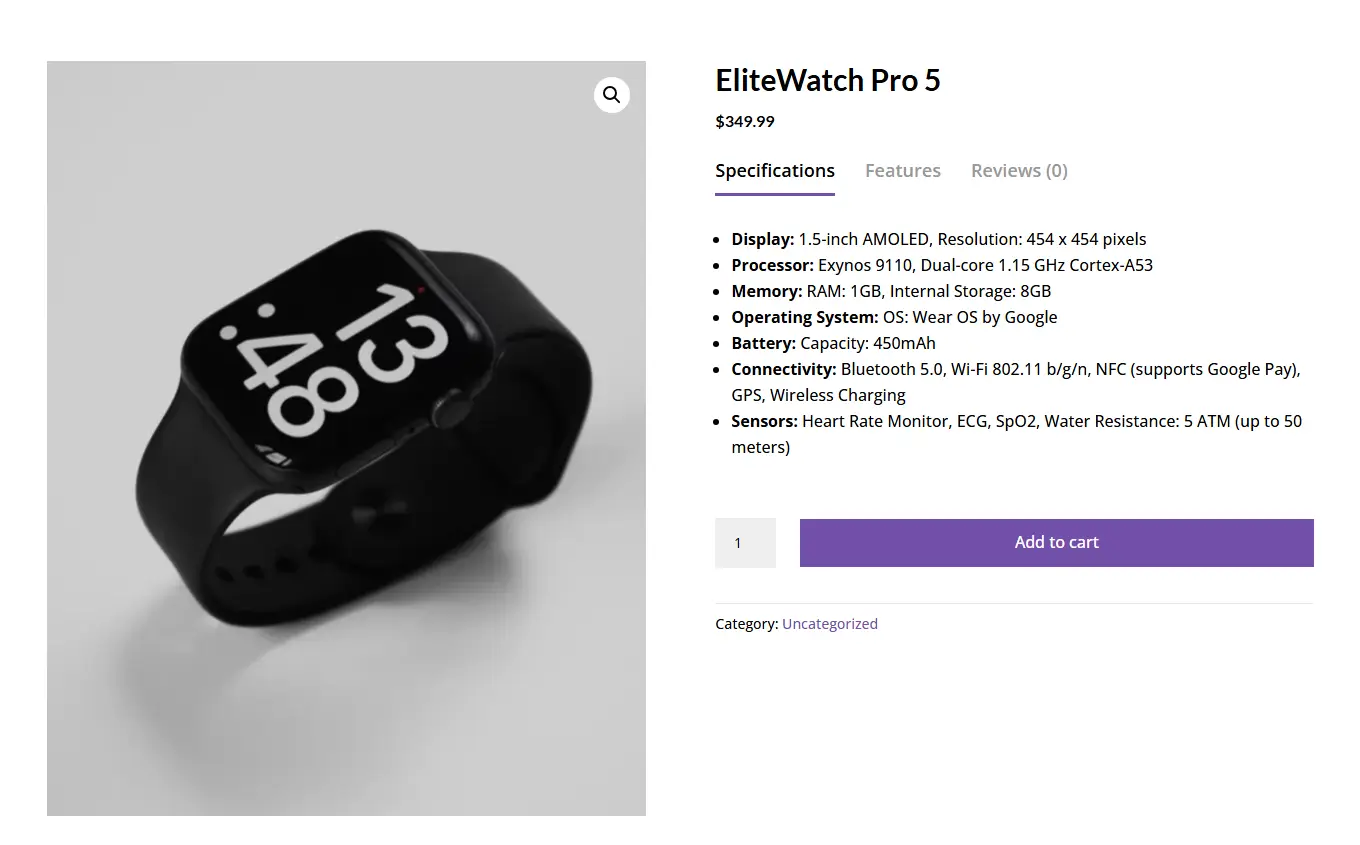
Technical Specifications Products Tab
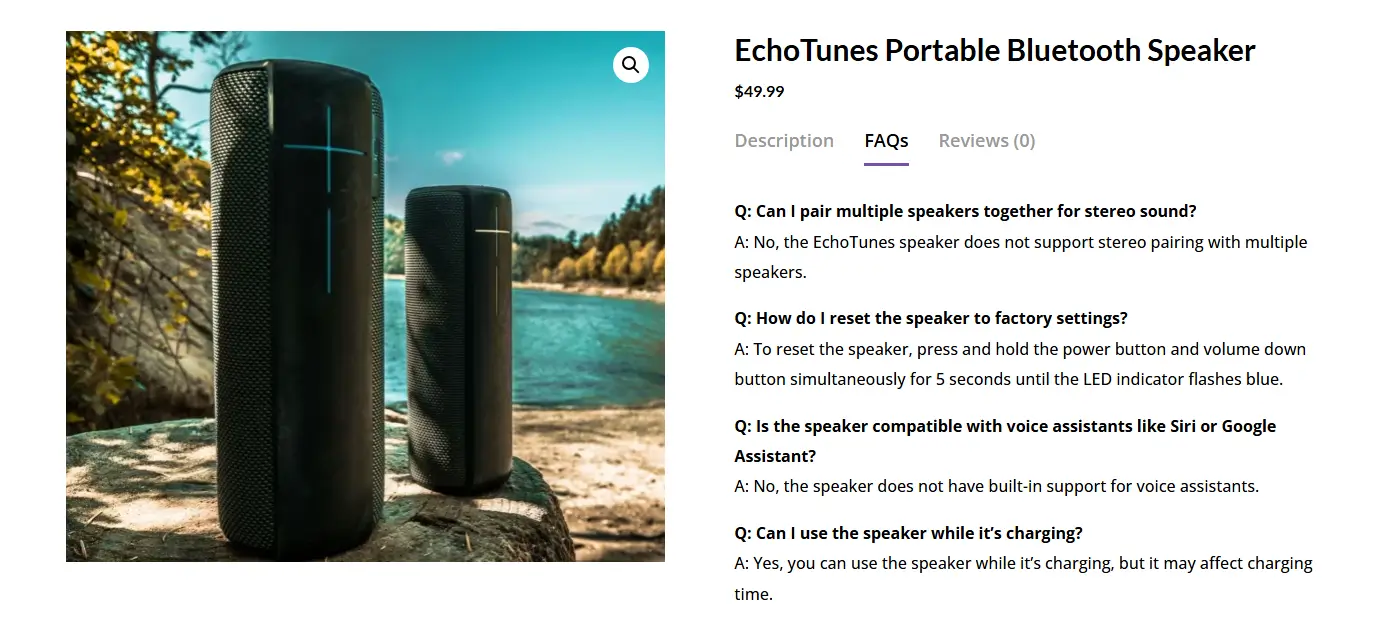
FAQs Products Tab
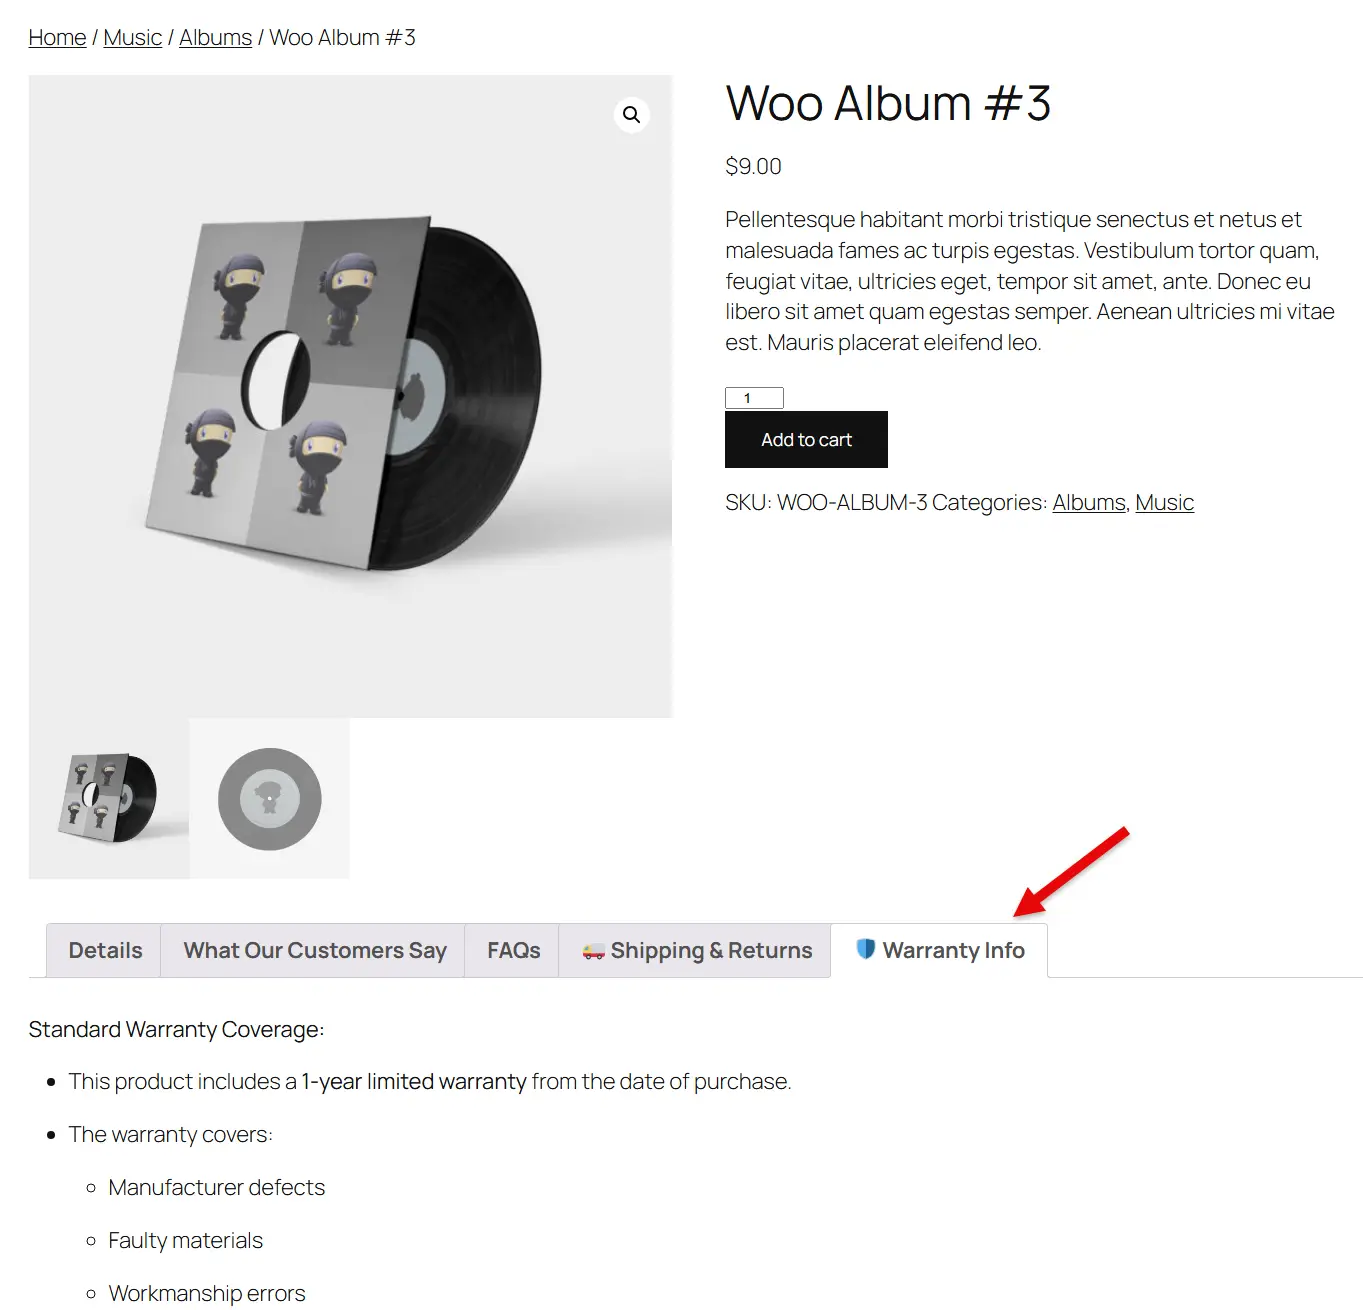
Warranty Info Products Tab
Gallery Products Tab

Best Offer Products Tab

For more user case examples, visit WPMozo Tab Manager’s Live Demo.
Ending Thoughts
With a WooCommerce tab manager plugin like WPMozo Tab Manager, you can easily add new tabs to WooCommerce products. Plus, you can customize the default ones. Above, we looked at what the WPMozo Tab Manager for WooCommerce plugin is and how you can use it. By using its intuitive features, it is possible to enhance the way you show product tabs on the store.
Try the plugin today and efficiently do tab customization. For more information, you can visit the official page of WPMozo Tab Manager.


0 Comments