
Why Customize the WooCommerce Checkout
Most WooCommerce stores accept the default checkout as-is. It works, but it wasn’t designed for any specific store. The default checkout asks for the same information whether you sell t-shirts, custom furniture, B2B services, or restaurant deliveries.
Custom checkout fields solve real business problems:
B2B and wholesale stores need company name, VAT number, business reference numbers, and PO fields. The default WooCommerce checkout makes these afterthoughts buried in the order notes.
Restaurants and food delivery need delivery time slots, contactless preferences, allergen notes, and special instructions. Customers shouldn’t have to email separately to communicate this.
Personalization stores need monogram instructions, gift wrap preferences, gift messages, and custom design choices. These can’t be collected after the order; they’re part of the order itself.
Service-based stores need appointment dates, service preferences, and location-specific details. The checkout becomes the booking form.
Subscription and membership stores need referral source data, member IDs, and plan-specific preferences for retention and marketing attribution.
Beyond adding fields, customization means removing what you don’t need. A digital download store doesn’t need a shipping address. A single-product store doesn’t need a billing phone number that scares away buyers.
The right customization depends on what you sell. The wrong customization (or none) leaves money on the table.
What WooCommerce Allows by Default vs What You Need
WooCommerce’s default checkout offers limited customization:
- Fixed billing fields (name, address, phone, email)
- Fixed shipping fields (same structure as billing)
- One “order notes” textarea for special instructions
- No way to add new fields without code
- No way to remove default fields without code
- No way to rearrange field order without code
- No way to validate fields beyond basic email/text checks
- No conditional logic (show field X only if Y is selected)
- No role-based visibility (show different fields to retail vs B2B customers)
Without a plugin or developer time, customizing the checkout requires editing PHP files in your theme. This breaks with theme updates and requires technical maintenance.
WPMozo Checkout Manager handles all of this through a clean WordPress admin interface. No code required.
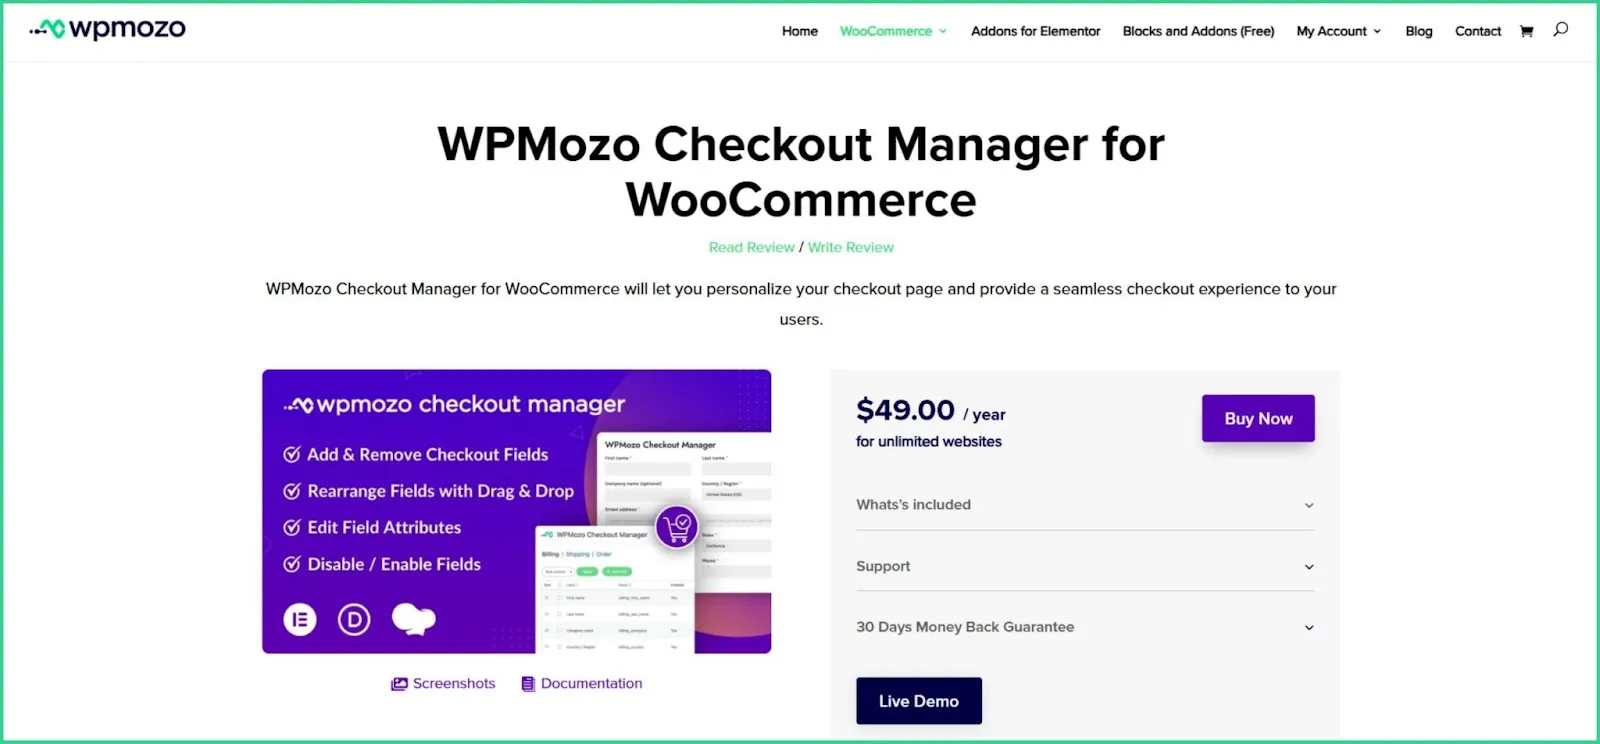
Recommended Solution: WPMozo Checkout Manager
WPMozo Checkout Manager is a WooCommerce checkout customization plugin built for store owners and agencies who need full control without code.
What it does:
- Add unlimited custom fields of any type (text, select, radio, checkbox, date, time, email, number, file upload)
- Remove or disable any default WooCommerce field you don’t need
- Rearrange field order with drag and drop
- Edit field attributes (labels, required status, default values, validation rules)
- Separate configuration for billing, shipping, and order sections
- Works with all major payment gateways (Stripe, PayPal, Razorpay, Authorize.net)
- Compatible with WooCommerce Subscriptions, Bookings, Memberships, and other extensions
Pricing:
$39/year for unlimited websites, $199 lifetime, or choose the WPMozo All Access Pass for access to all WPMozo products. Most competitors charge $25–99/year per site, so agencies managing client stores save substantially.
From Elicus, a WordPress company for over a decade and a top-selling author on the Elegant Themes Divi Marketplace. Our products, including Divi Extended, power 300,000+ websites worldwide.
30-day money-back guarantee. Live admin demo available.
How to Customize WooCommerce Checkout with WPMozo Checkout Manager
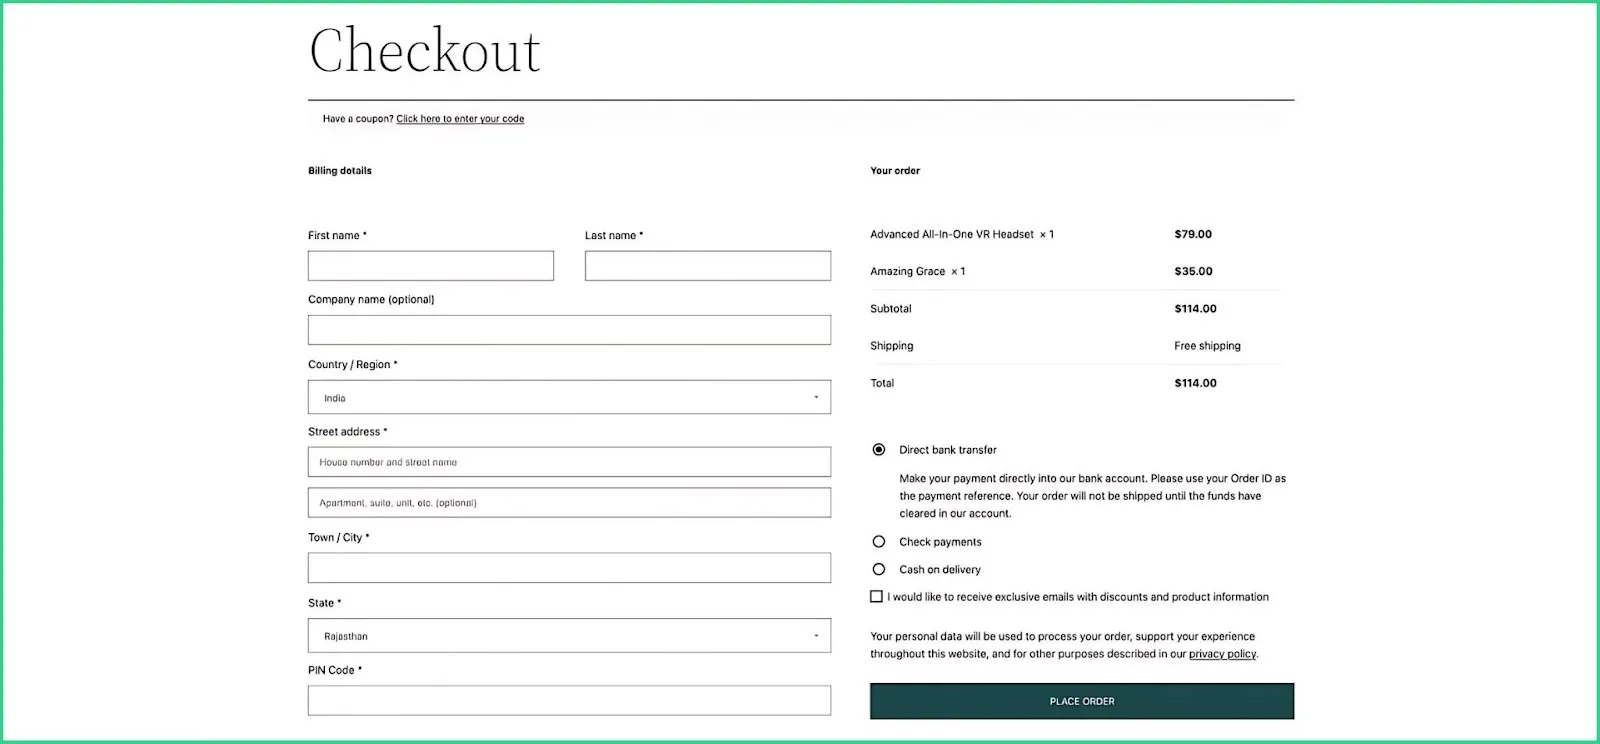
After completing the initial purchasing steps, the checkout page will be the final step where customers type in their payment details, shipping info, and complete their order.
With the WPMozo Checkout Manager tool, you can help create the checkout manager page by toggling different settings and options.
Below, we shared a detailed step-by-step guide on how to add and customize WooCommerce checkout page.
2 Steps to Add and Customize a Checkout Manager in Your eCommerce Website
Make sure WooCommerce is active to make the WPMozo Checkout Page work. Here’s how you can make it work,
Step 1: Install and Activate the WPMozo Checkout Manager Plugin
First, install the WPMozo Checkout Manager Plugin from their Official Page.
The default WooCommerce checkout page looks like the following:
You installed the plugin. Now, navigate it from the WordPress admin panel. You will see the ‘WPMozo Checkout Manager’ menu item on the left-hand sidebar.
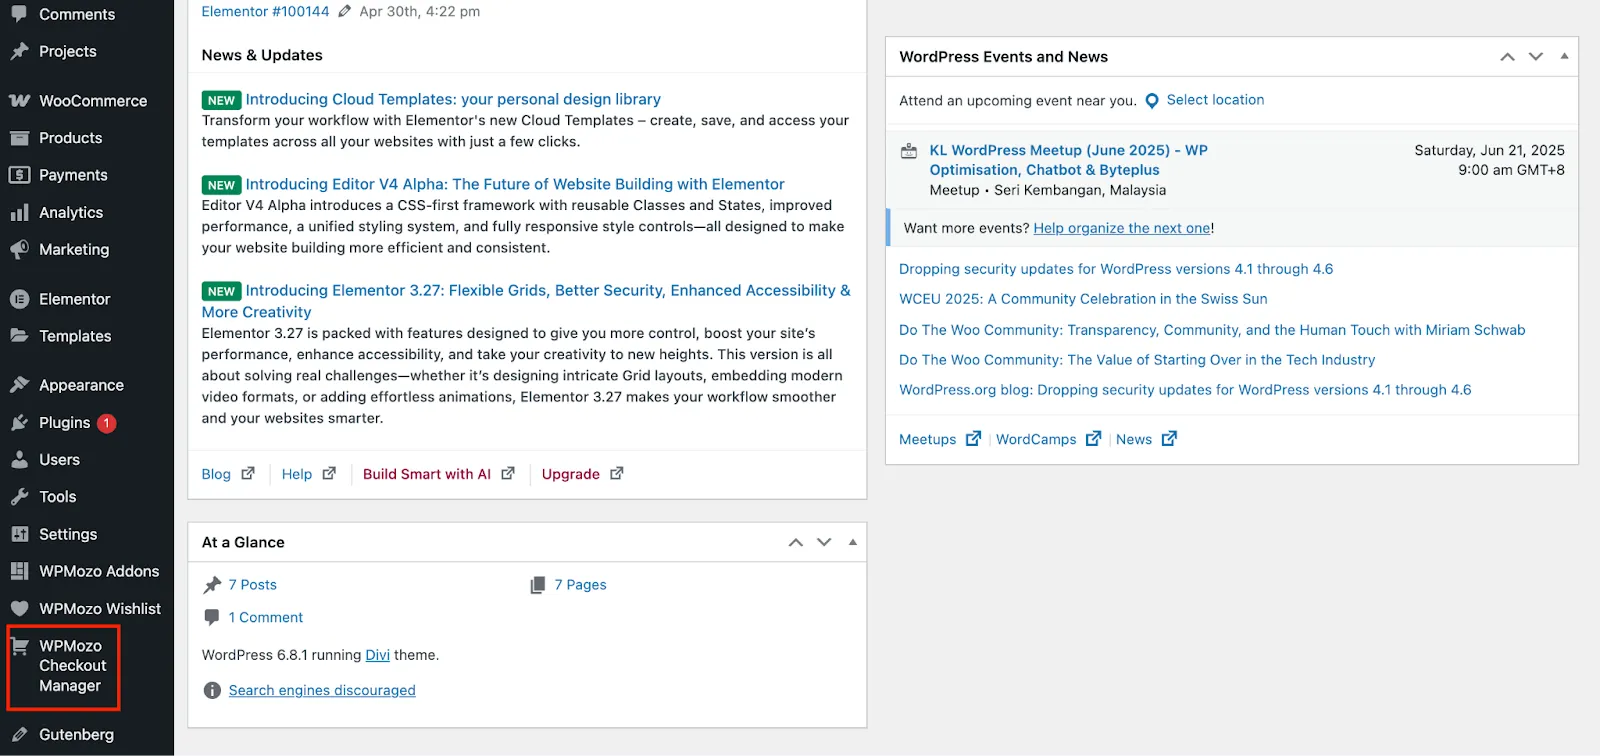
Click on it to access the plugin’s customization options.
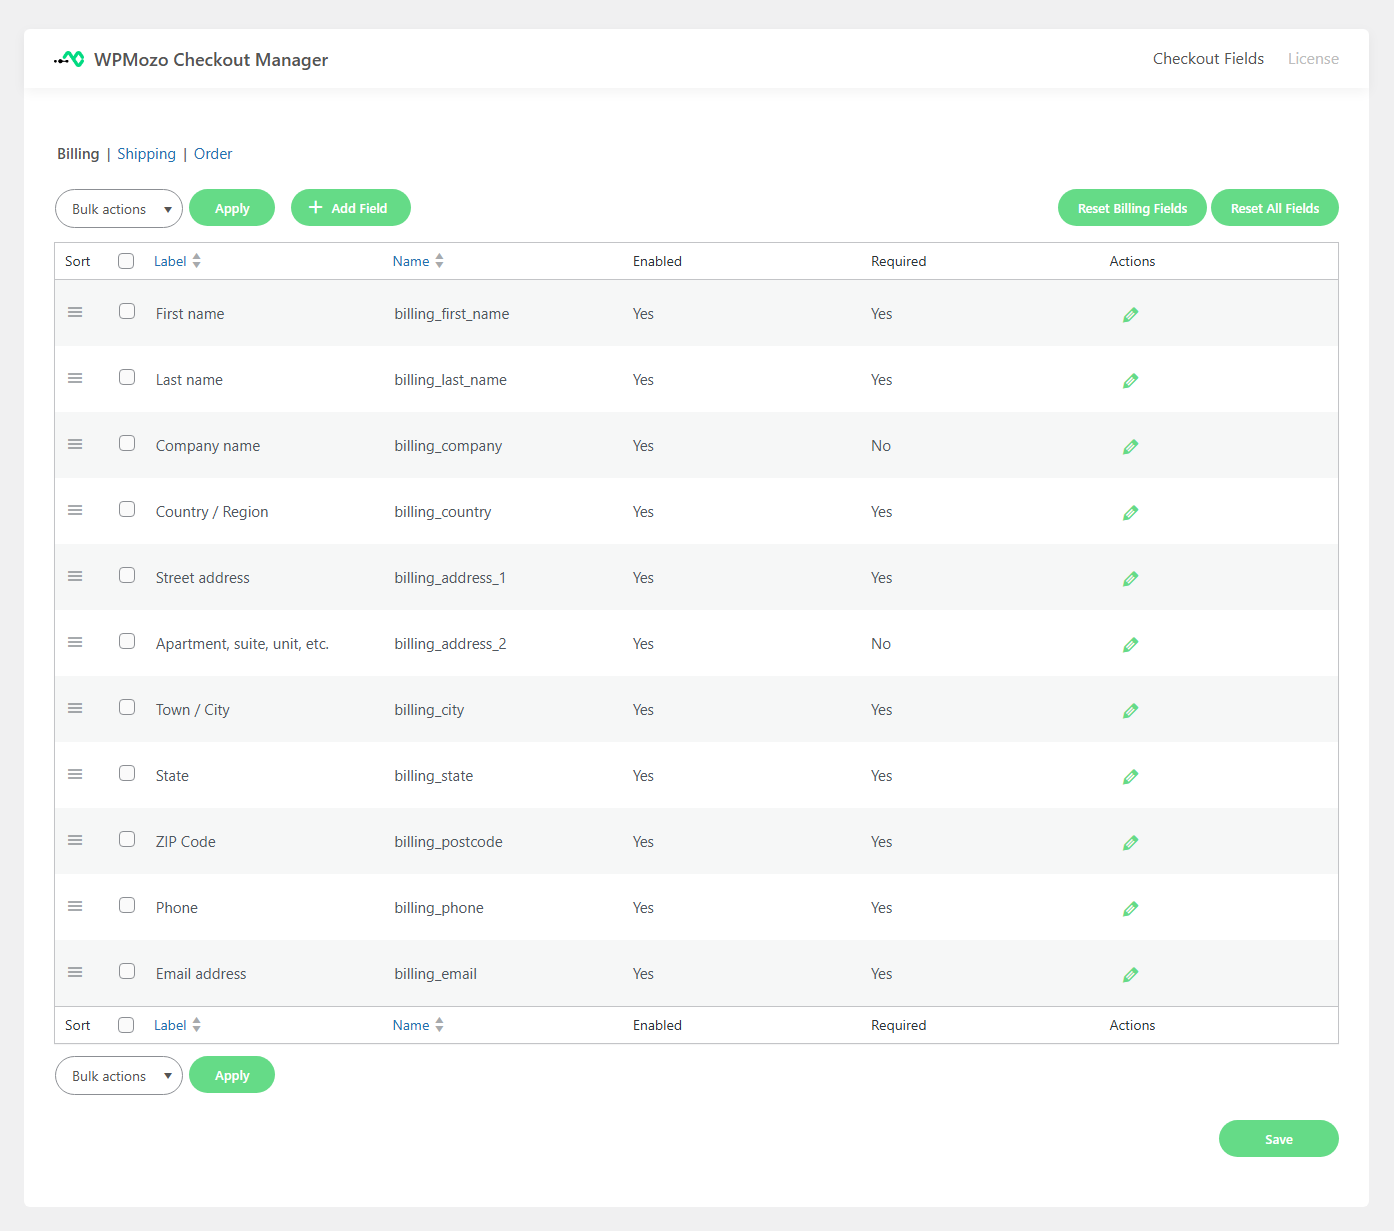
Step 2: Customize the WooCommerce Checkout Page
WPMozo Checkout Manager lets you customize your WooCommerce checkout page in many different ways.
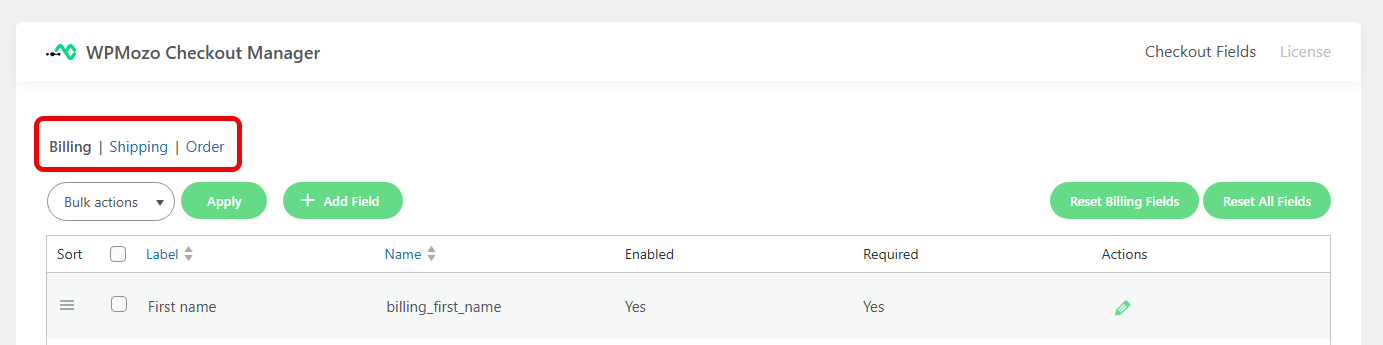
1. Customize the Checkout Fields
You can modify the fields based on these options.
| Customize the Fields | ||
| 1 | Billing | You can customize the billing fields if you want to |
| 2 | Shipping | Customize the shipping fields |
| 3 | Order | Or change the order-related fields to match your business requirements. |
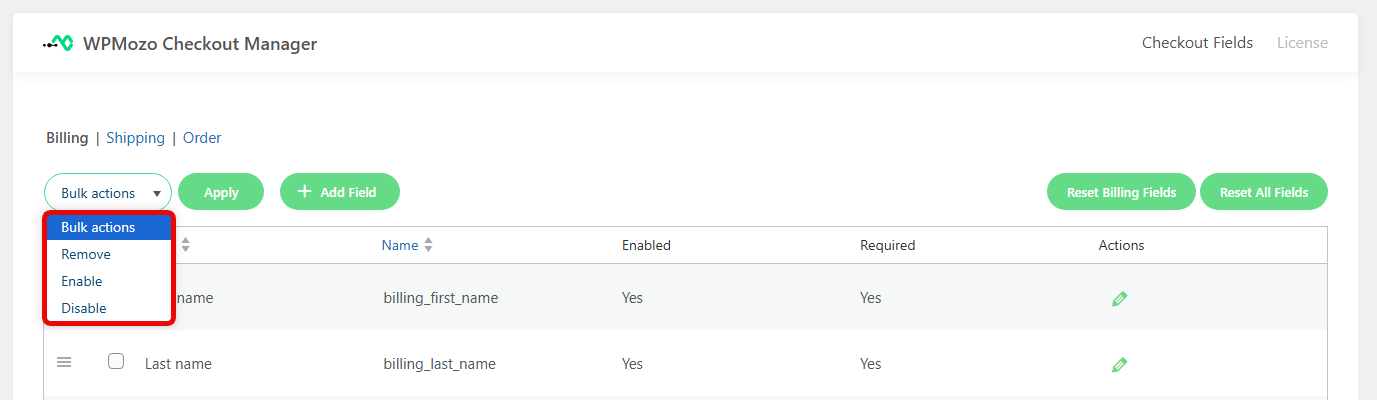
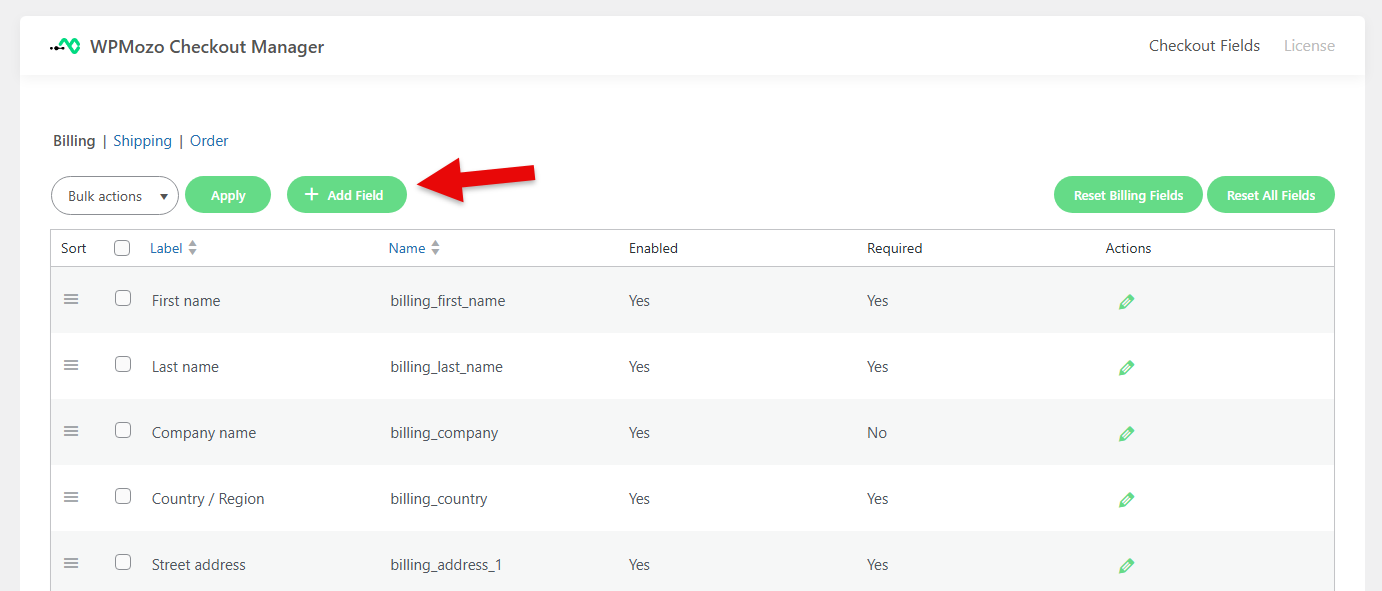
You can take different Bulk Actions based on your preferences.
| Bulk Actions | ||
| 1 | Remove | Remove multiple fields at once |
| 2 | Enable | Enable multiple fields at once |
| 3 | Disable | Or Disable multiple fields at once |
Sort Fields and change their order.
| Sorting Fields | ||
| 1 | Drag and Drop Sorting | Reorder fields simply by dragging and dropping them |
| 2 | Sorting by Field Label | Sort fields based on their labels |
| 3 | Sorting by Field Name | You can also sort fields based on their name, alphabetical order |

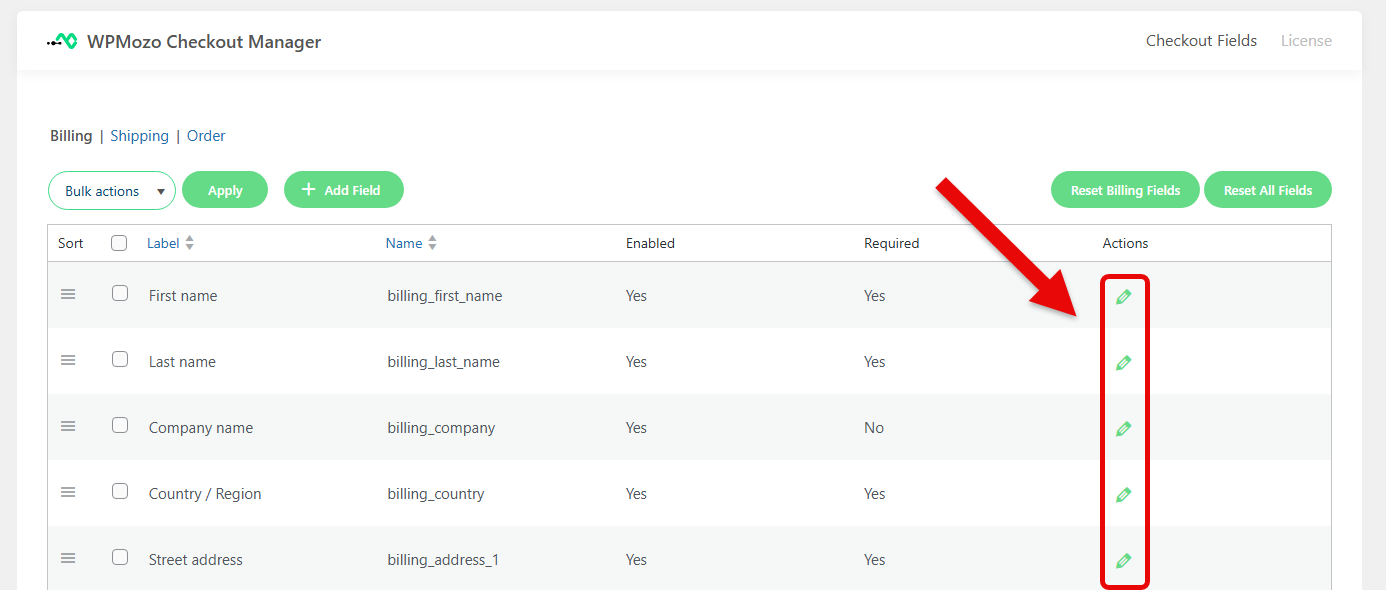
There are different Actions available for each field. To perform any custom action on a field, tap on the “Pencil Icon” on the right side.
Utilize General Options
When you click the icon, an additional page containing the General and Advanced Options will appear on your screen.
Under the General Option, you will find:
- Type: Defines the field type, such as text, dropdown, and checkbox.
- Name: Internal ID of the field used to identify it in the system.
- Label: The name of the field, visible to users.
- Default Value: The pre-filled value that appears automatically, such as “Enabled” and “Required”.
- Placeholder: Greyed-out text within the field that provides guidance.
- Class: Any additional CSS classes assigned to the field for styling purposes.
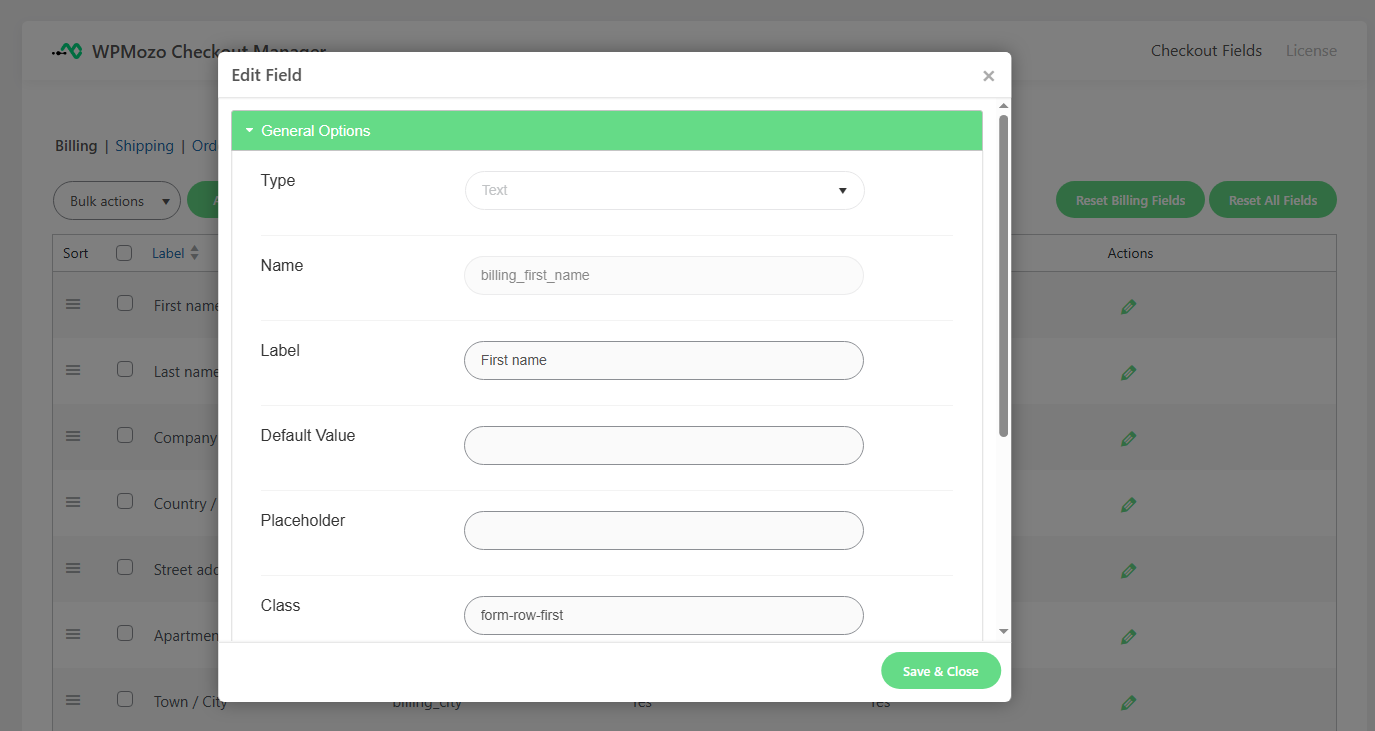
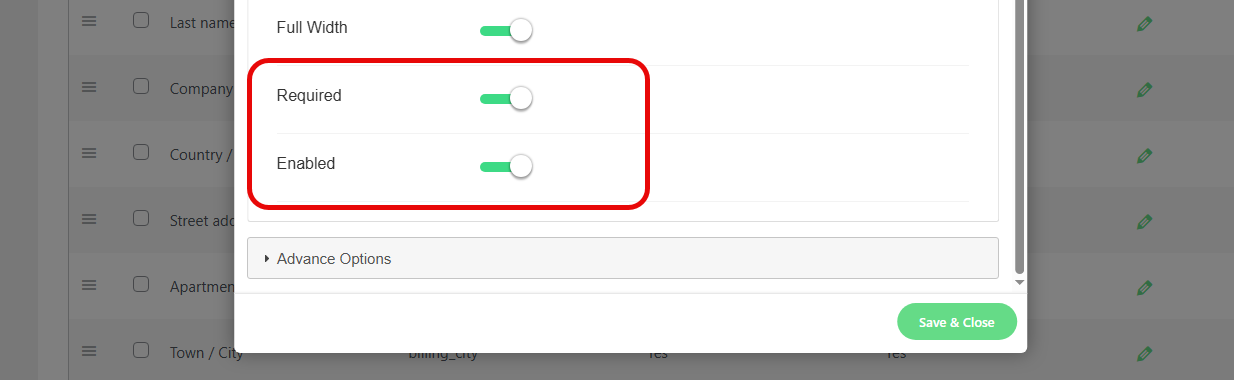
Toggle options are also available for Full Width, Enabled, and Required.
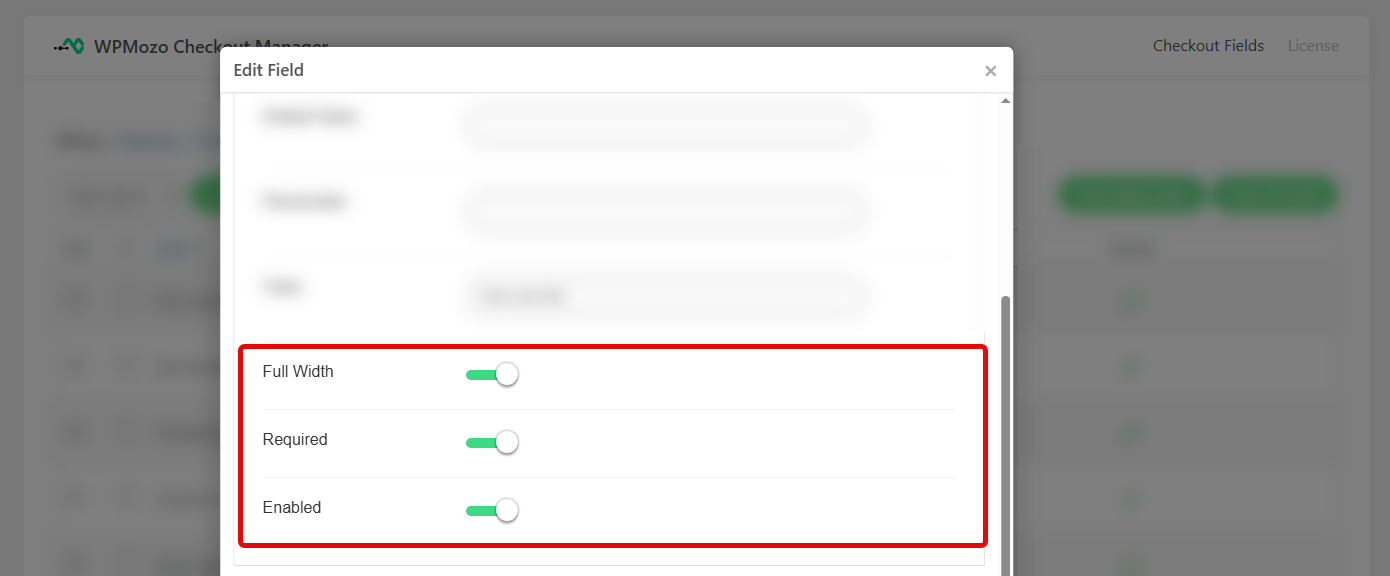
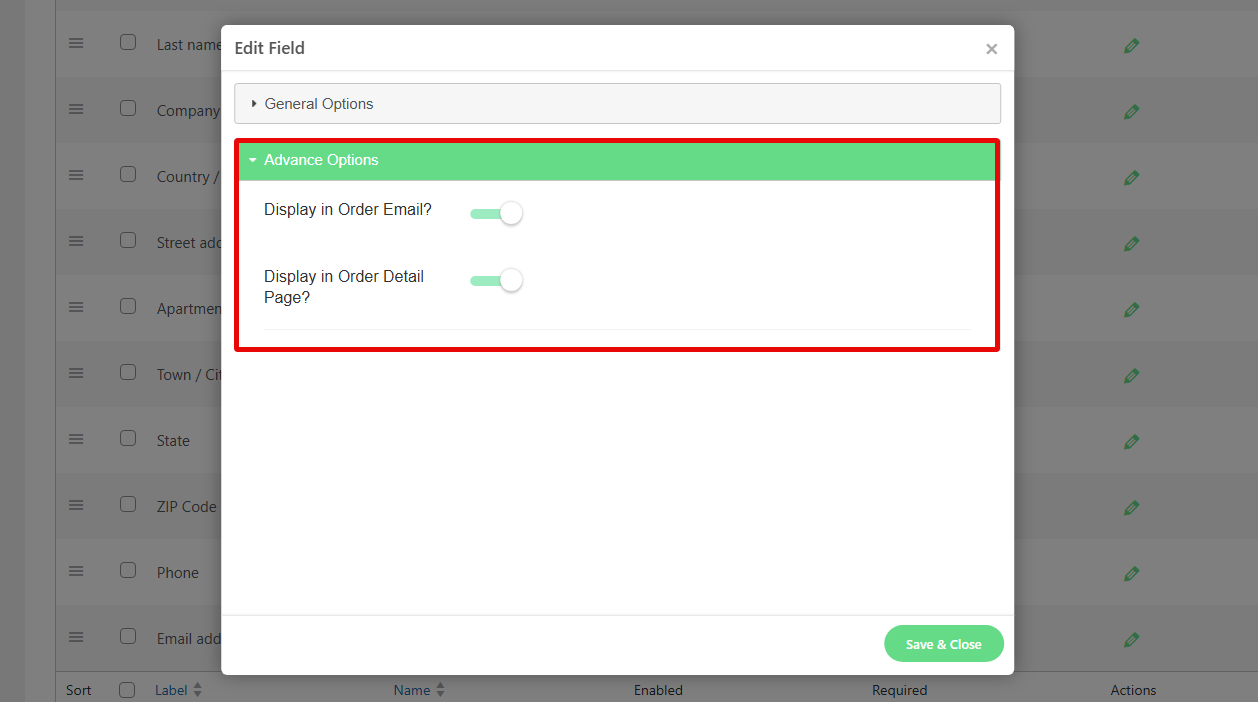
Utilize the Advanced Options
In the Advanced Options, you will find the settings:
- Display in Order Email: If you enable this option, specific data will be included in the email message, which confirms the order.
- Display in Order Detail Page: When this option is enabled, the designated data will be presented for review on the order detail page, allowing users to see comprehensive order information.
2. Modify Your Field Status
You can change the Field Status via the status columns.
| Field Status | ||
| 1 | Enabling or Disabling the Fields | Enabled Column shows the value of each field |
| 2 | Required/Optional | The Required Column shows if the fields are marked as Required or Optional |
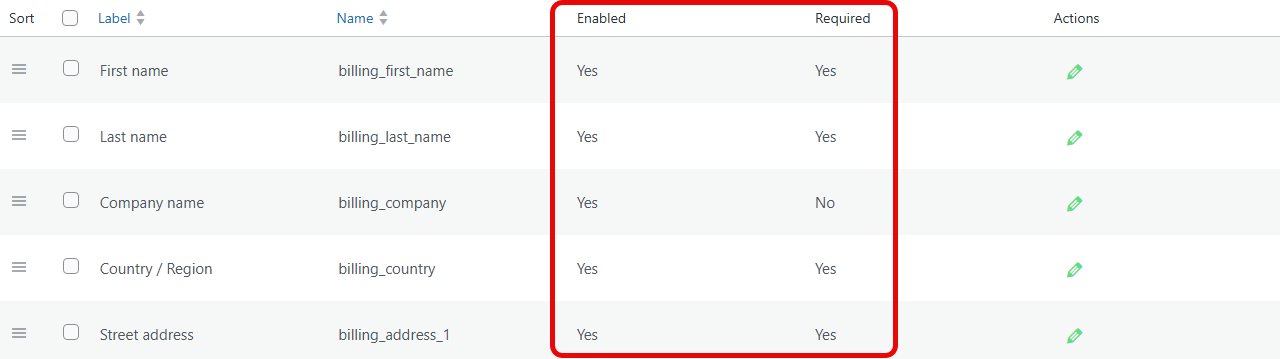
You can change the status of each field using the “Pencil Icon” and hover below.
3. Add a Field
To add a field, click on the “+ Add Field”.
You will see the following options:
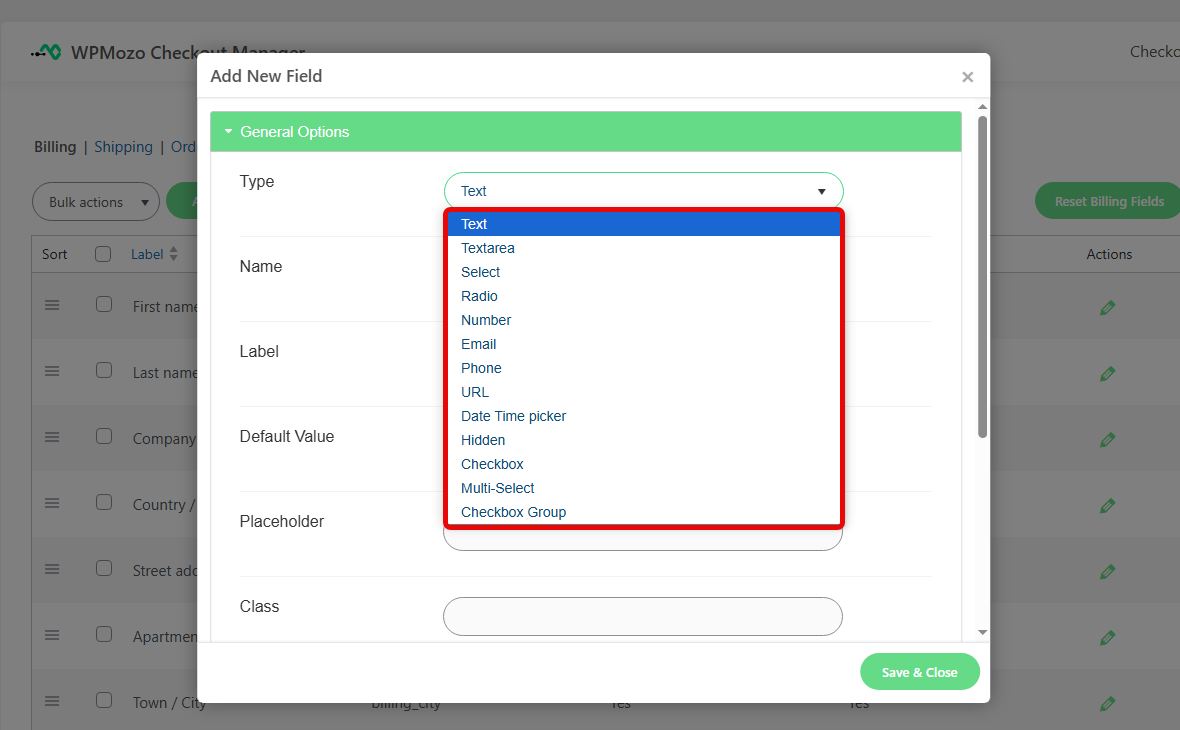
Within the General Options, you will see a series of choices:
- Type
- Text
- Textarea
- Select
- Radio
- Number
- Phone
- URL
- Date Time Picker
- Hidden
- Checkbox
- Multi-select
- Checkbox Group
For the rest of the fields, such as Name, Label, Default Value, or other Advanced Options, change them according to your preferences.
After you finish your modification, click Save & Close to save the changes before leaving the page.
4. Reset Default Order
If you think there was a problem with your Field placements, then you can use the Reset Default Order button.
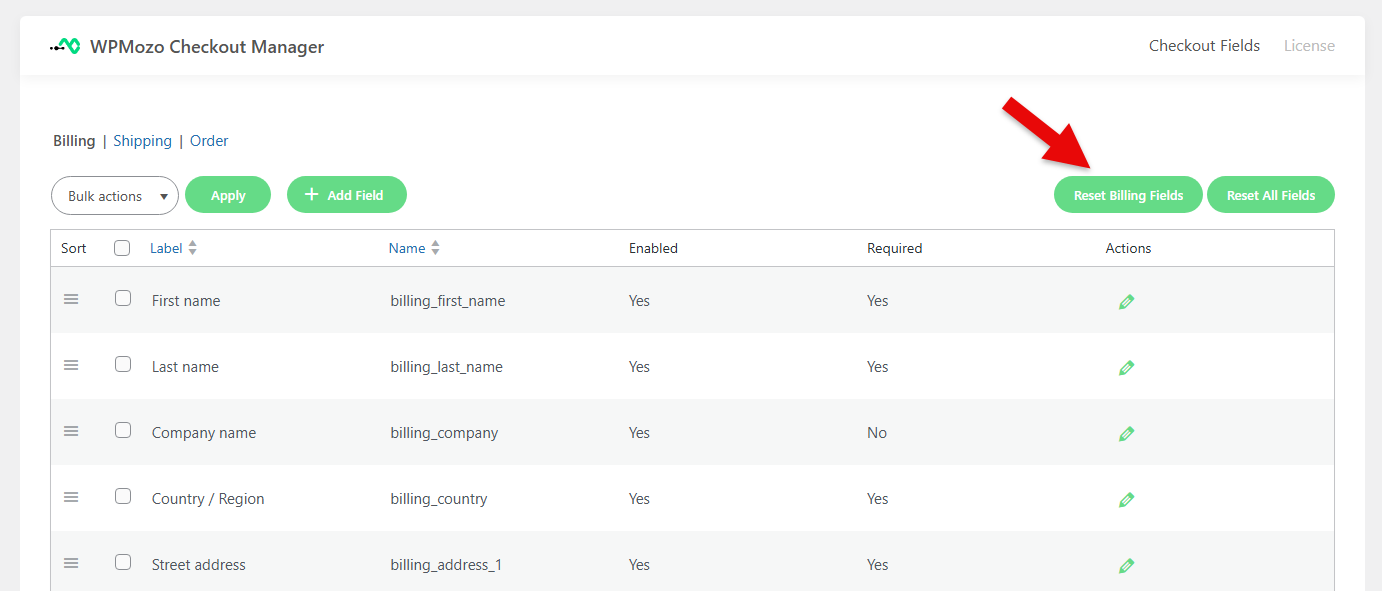
This button will reset the original order of the checkout fields as set by WPMozo Checkout Manager by default.
5. Reset All Fields
If you want to reset everything when you customize the WooCommerce checkout page, consider using the Reset Default Order button.
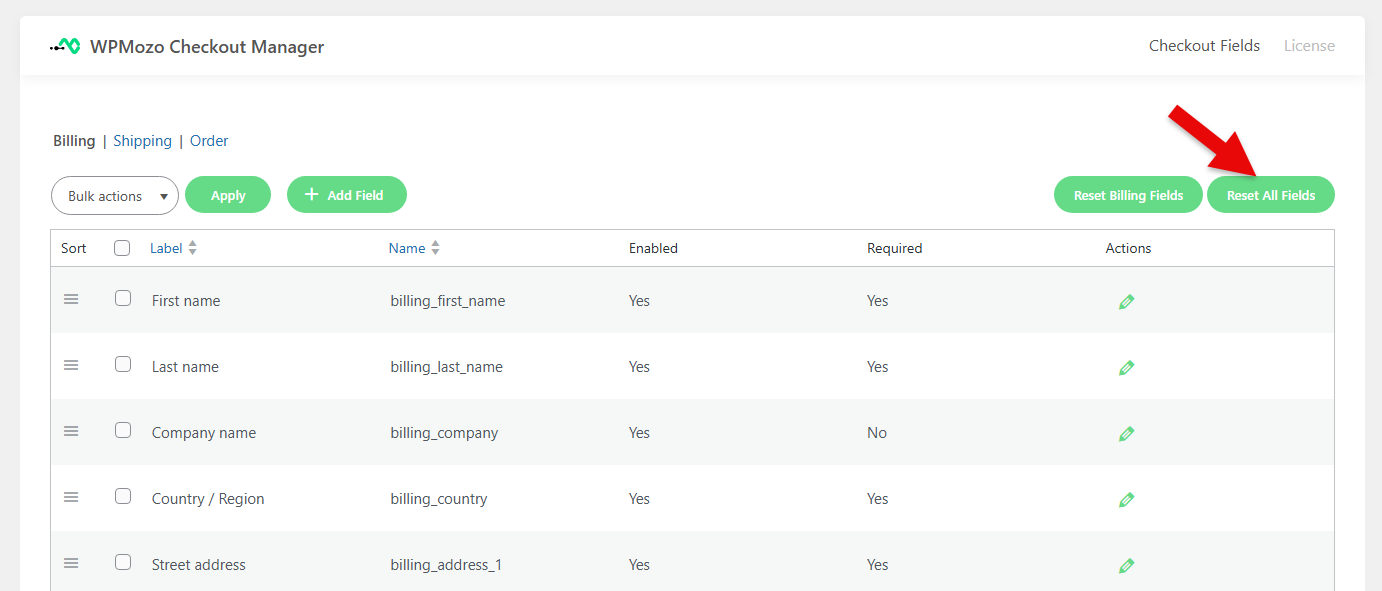
This option removes all customizations and reverts every field to its original state. Think of it like a factory reset for the checkout page, so use it carefully.
Start Customizing Your WooCommerce Checkout
WPMozo Checkout Manager handles every WooCommerce checkout customization through one clean interface. No code, no theme conflicts, no per-site licensing fees. Single license works on unlimited websites.
5 Reasons Why WPMozo Checkout Manager is Suitable Plugin to Customize WooCommerce Checkout Page
WPMozo Checkout Manager changes the checkout page of your online store. You can add, remove, move, or edit the form fields without a single line of code.
1. Comprehensive Field Customization
You can add extra fields to collect any kind of information from your customers by using this feature. It supports many field types, such as text boxes, drop-down menus, checkboxes, radio buttons, date/time pickers, email fields, and number inputs.
Add detailed information about your business needs while keeping the checkout process simple.
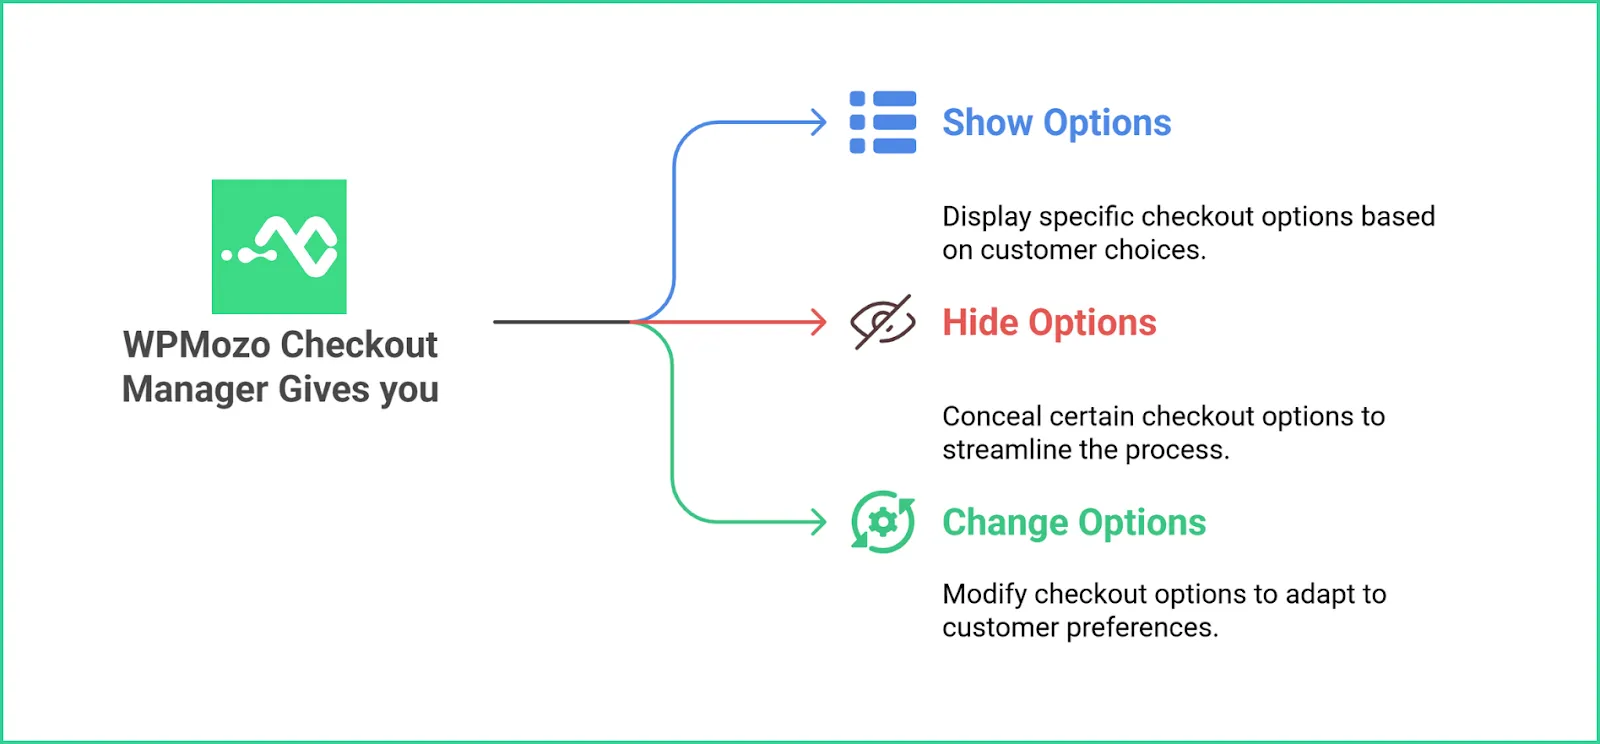
2. Logic for Dynamic Checkout Forms
One of the best things about WPMozo Checkout Manager is how flexible it is. It lets you create checkout forms based on what the customer chooses. You can show or hide certain options, or even change them.
3. Integration with WooCommerce and WordPress
WPMozo Checkout Manager works smoothly with the latest versions of WooCommerce and WordPress. You don’t need to do any complicated setup. It’s ready to use as soon as you install it.
It also works well with most themes that support WooCommerce. Your custom checkout fields will function properly no matter what design you use.
4. Customizable Thank You Page
The thank you page is a chance to make a great impression after someone buys something from your store. With WPMozo Checkout Manager, you can customize this page to make the experience even better.
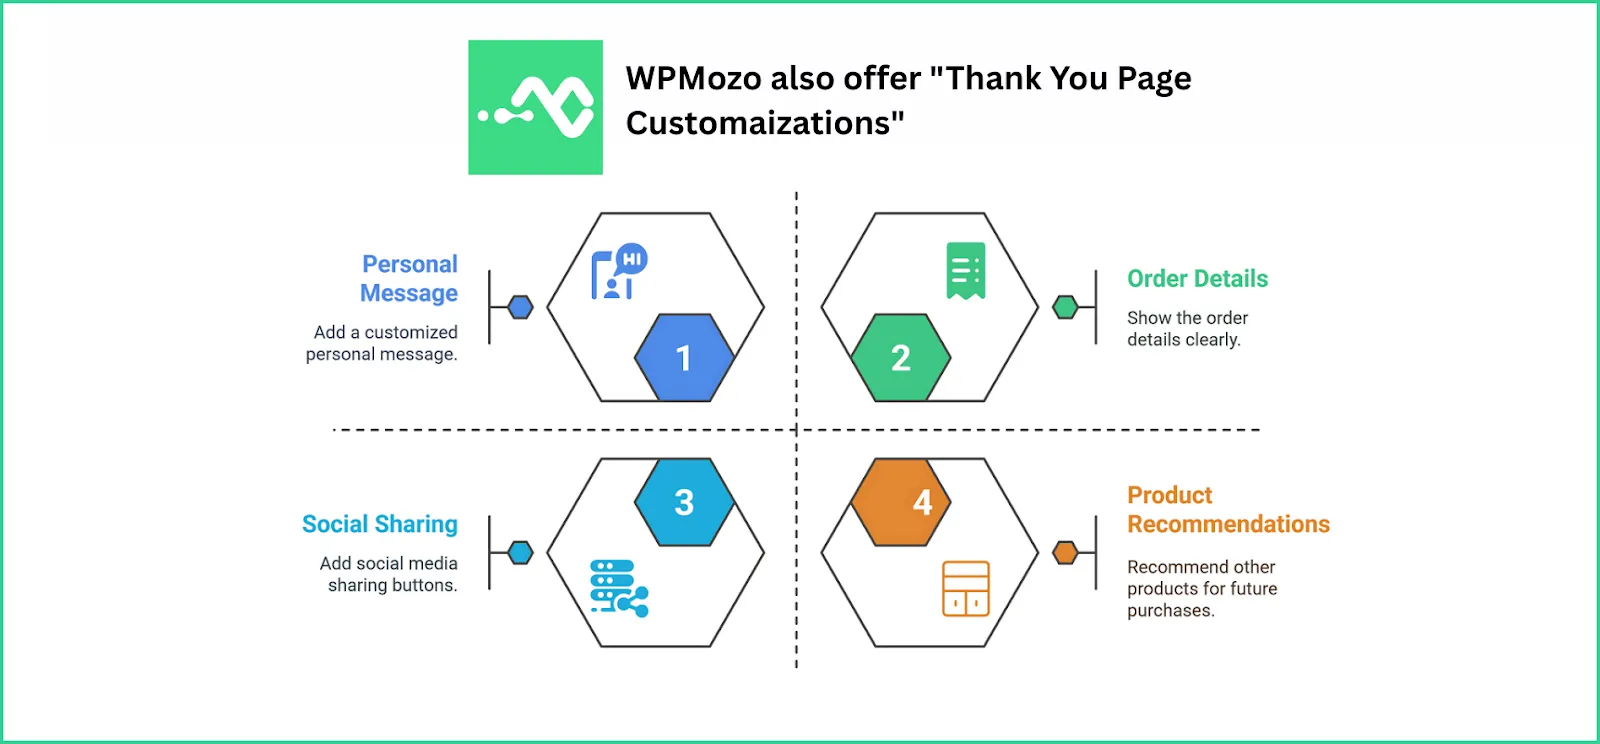
You can add a personal message, show the order details clearly, add buttons for social media sharing, or even recommend other products for the future.
5. Improved Mobile Checkout
As mobile shopping keeps growing, the checkout process must work well on smartphones. WPMozo Checkout Manager assures your checkout fields are easy to use on all devices.
The plugin automatically adjusts the layout for smaller screens. By optimizing for mobile, you make it easier for customers shopping on the go.
FAQs
Does the WPMozo Checkout Manager take up extra space on my website?
No, WPMozo Checkout Manager is designed to be lightweight. It optimizes its code to use minimal resources, so it won’t slow down your site. After installation, your site’s loading speed and performance will remain unaffected.
What should the checkout page look like?
Your checkout page should be simple, and focused on making the purchase process smooth. It should only include the essential fields, with a clear flow and payment details. WPMozo Checkout Manager creates this ideal layout by removing unnecessary fields, organizing the rest in a logical order.
Is the WPMozo Checkout Manager mobile-friendly?
Yes, the WPMozo Checkout Manager is fully mobile-responsive. It adjusts to different screen sizes and devices. This mobile optimization keeps your conversion rates high across all devices.
Make Your Checkout Pages Stand Out Using WPMozo Checkout Manager
Improving your WooCommerce store goes beyond just making the checkout process look good. You will need to make sure the final part of your buyer’s journey remains smooth, without any issues.
WPmozo Checkout Manager helps you to achieve that!
By giving you control over all the important elements of a checkout page, it lets you customize field layouts, add or remove fields, set conditions, and optimize the user experience without touching a single code.


0 Comments