
WordPress provides you with the powerful capability to set up a multisite network. It is a smart and flexible solution to manage multiple websites efficiently. It can be useful if you manage various client sites, run a blog network, or create a multisite network for large organizations.
This post will cover everything from enabling multisite features in WordPress to configuring Network settings. After reading this post you will be equipped with sufficient knowledge to manage multiple WordPress websites easily.
Before going through the step-by-step setup process, let’s understand the use of a WordPress multisite network.
What is the Use of a WordPress Multisite Network Setup?
You don’t need to set up a WordPress multisite network every time, but certain scenarios require it. Let’s overview them.
- Educational Institutions can use WordPress multisite network setup to manage multiple websites of different departments to maintain consistency across the entire name and reputation.
- Blog Networks can utilize it to manage and maintain all the individual blogs separately. The blogs feature independent design and content while being part of the same parent network.
- Franchises and chain stores can maintain individual sites for different locations while keeping master control over the network.
- Large corporations business can fragment and manage sites for various departments, teams, and projects for a streamlined workflow.
- Businesses focused on global audiences in different countries can use and manage multilingual websites under a single network.
- E-commerce businesses can manage and market their products through different product lines using multiple websites.
Now that we have a good idea of the scenarios in which a WordPress multisite network setup configuration may be helpful, let’s move on to the setup guide.
Step-by-Step Guide for a WordPress Multisite Network Setup
If you think doing a WordPress Multisite Setup is a big deal. Not at all. You can follow these simple steps to get it done easily.
1. Prerequisites to set up a Multisite Network in WordPress
A good WordPress hosting is important for creating a multisite network. You can go for a shared hosting service to manage a couple of websites with low traffic. But we recommend you subscribe for a dedicated or VPS hosting to manage those multiple sites smoothly.
2. Choosing a Domain Structure
There are two ways to set up a multisite network in WordPress. You can use either sub-domains or sub-directories for all the multiple websites under the main parent domain. It’s confusing and will lead to certain questions in your mind. We will simplify it and help you decide which one you should prefer.
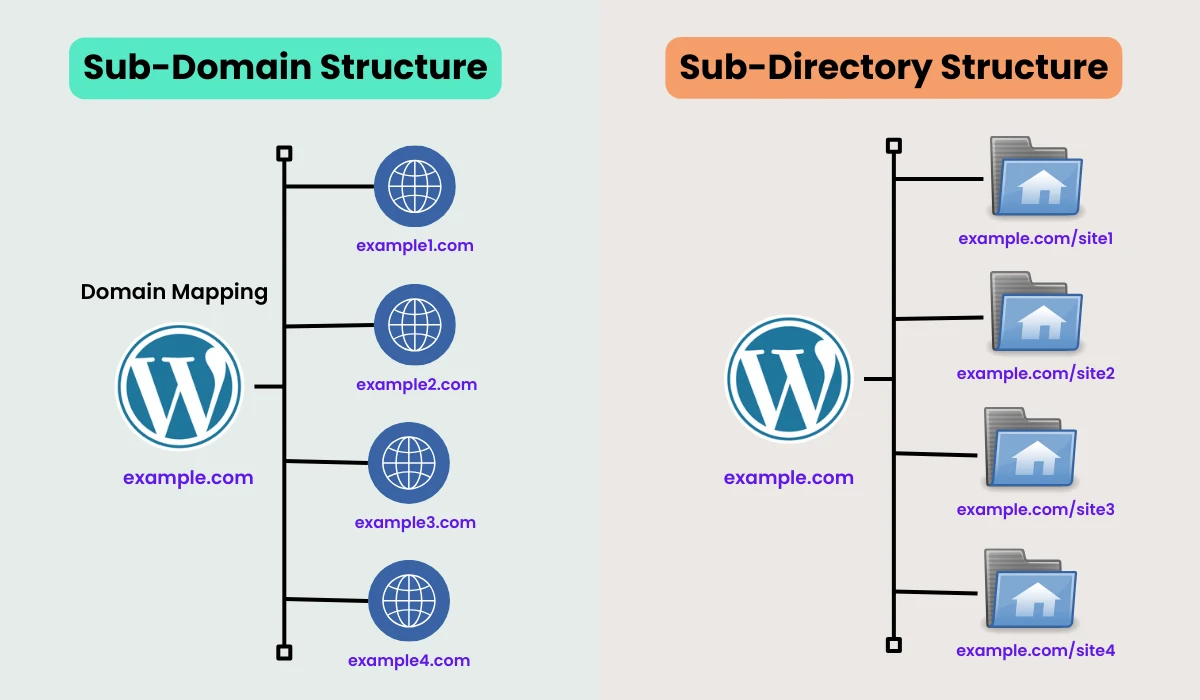
Sub-domain Structure
In the sub-domain structure, all the websites are created as sub-domains.
Example: site1.example.com, site2.example.com.
This sub-domain structure comes with numerous benefits.
- It makes it easy to understand and manage multiple websites with the same domain name in the URL.
- Multiple sub-domains can target different keywords and audiences with consistent brand popularity.
This is best for businesses that want a clear separation between their websites. For example, a company can isolate its blog or customer portal from its main website.
If you need separate sites to serve different purposes and audiences, it is better to have a sub-domain structure. If quick easy setup and unified domain authority are your priority and you don’t want to mess with DNS configurations, then you can go with a sub-directory structure.
Sub-directory Structure
In the Sub-directory structure, all the websites are created as sub-directories of the parent domain.
Example: example.com/site1, example.com/site2
It comes with advantages like:
- Easy setup and does not require any DNS configuration.
- Your network shares its domain authority across all websites, providing great SEO benefits for your website.
What Should I Choose: Sub-directory or Sub-domain?
The selection of domain structure for your multisite network completely depends on your requirements. It is better to have a sub-domain structure, if you need separate sites to serve different purposes and audiences. If quick easy setup and unified domain authority are your priority and you don’t want to mess with DNS configurations, then you can go with a sub-directory structure.
If you choose a sub-domain structure for your WordPress multisite network, creating a custom domain for each site is also an essential prerequisite.
Now you have a better idea about these structures and you can decide what to choose in the fourth step of this tutorial you will need to select a domain structure
3. Enable WordPress Multisite Feature
WordPress includes this feature, which users can access after completing a normal installation. You only need to enable this Multisite Network feature to use it.
Always create a full backup of your WordPress website before enabling this feature.
Connect to your website using an FTP client or cPanel. Open and Edit the wp-config.php file. Add the following code before the “/* That’s all, stop editing! Happy publishing. */” into it.
define( 'WP_ALLOW_MULTISITE', true );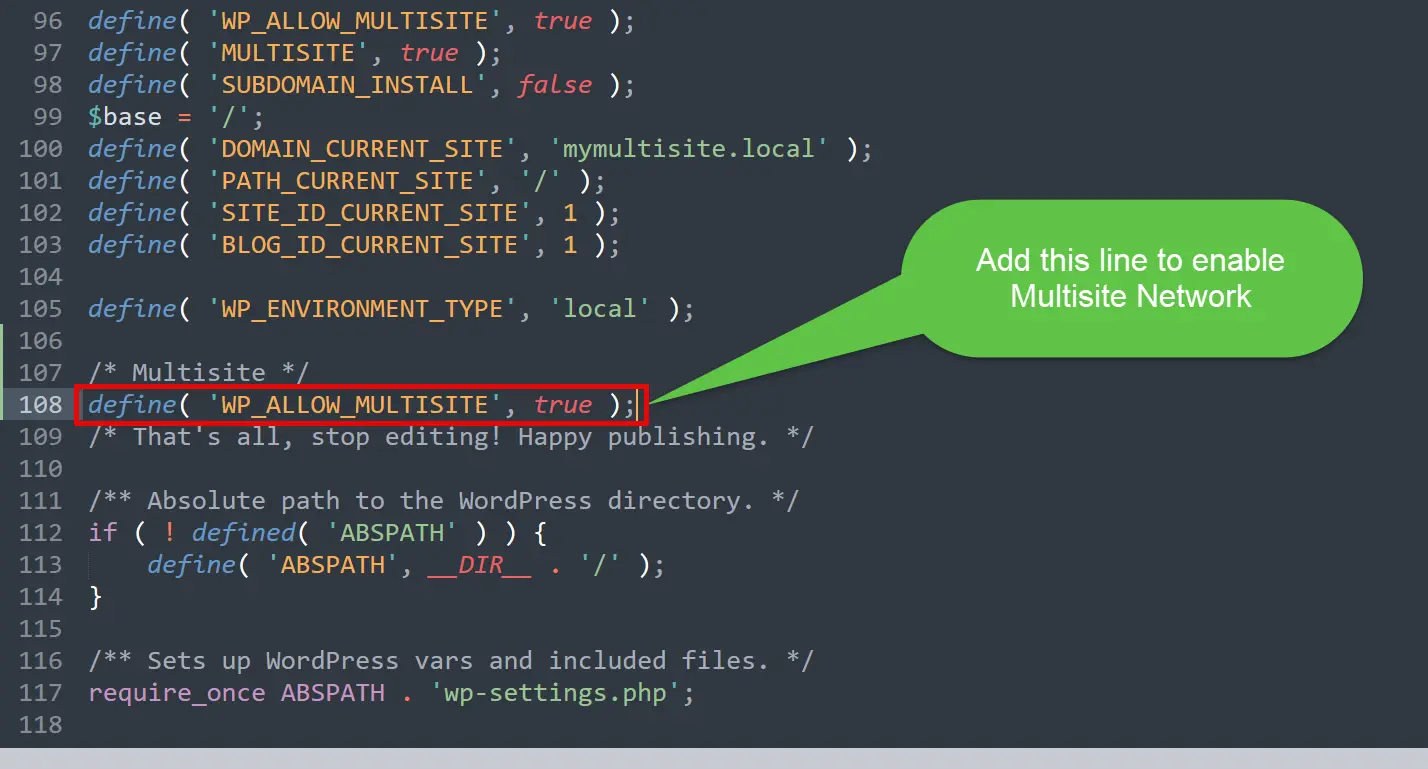
After adding the code save the wp-config.php file and upload it to the server. Now your website is ready for the setup and you can proceed with further setup.
4. Setup Your WordPress Multisite Network
Ready to set up the Multisite Network on your WordPress website after enabling it? Let’s start doing it.
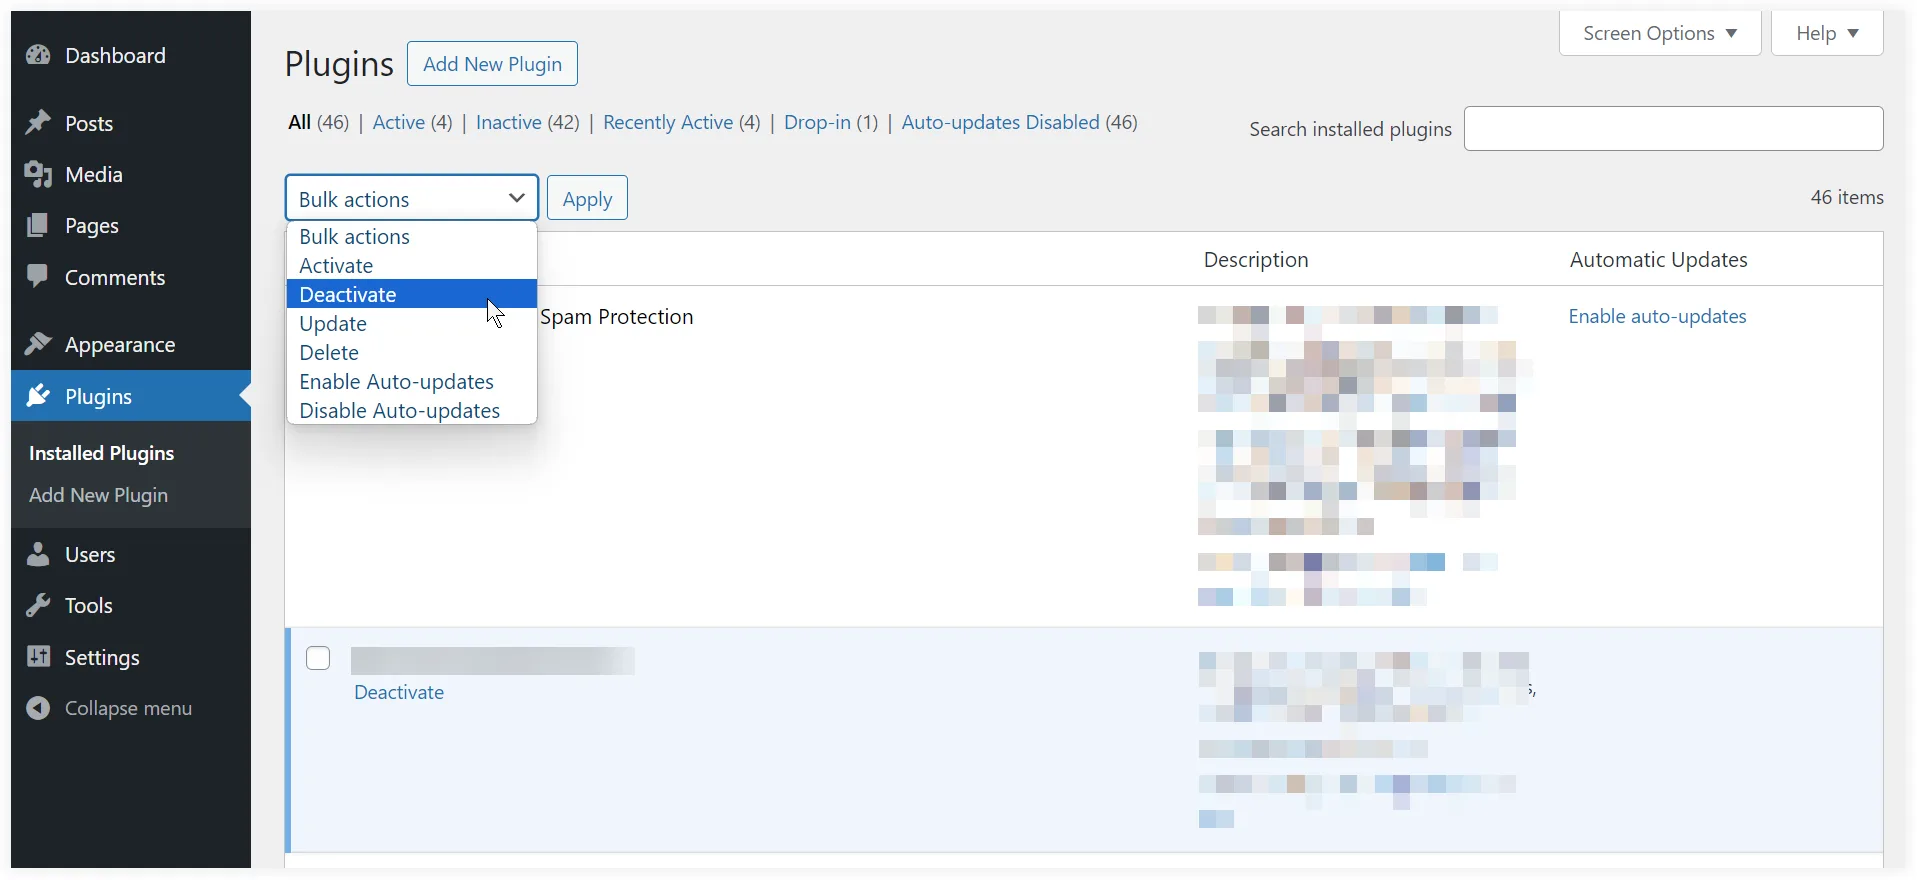
If you installed a new WordPress website then it’s ok but if you are using an existing website, deactivate all the installed plugins.
Select Plugins in the WordPress dashboard. Click Installed Plugins. Select Deactivate from the Bulk Actions drop-down. Click Apply. Now all your installed plugins are temporarily deactivated.
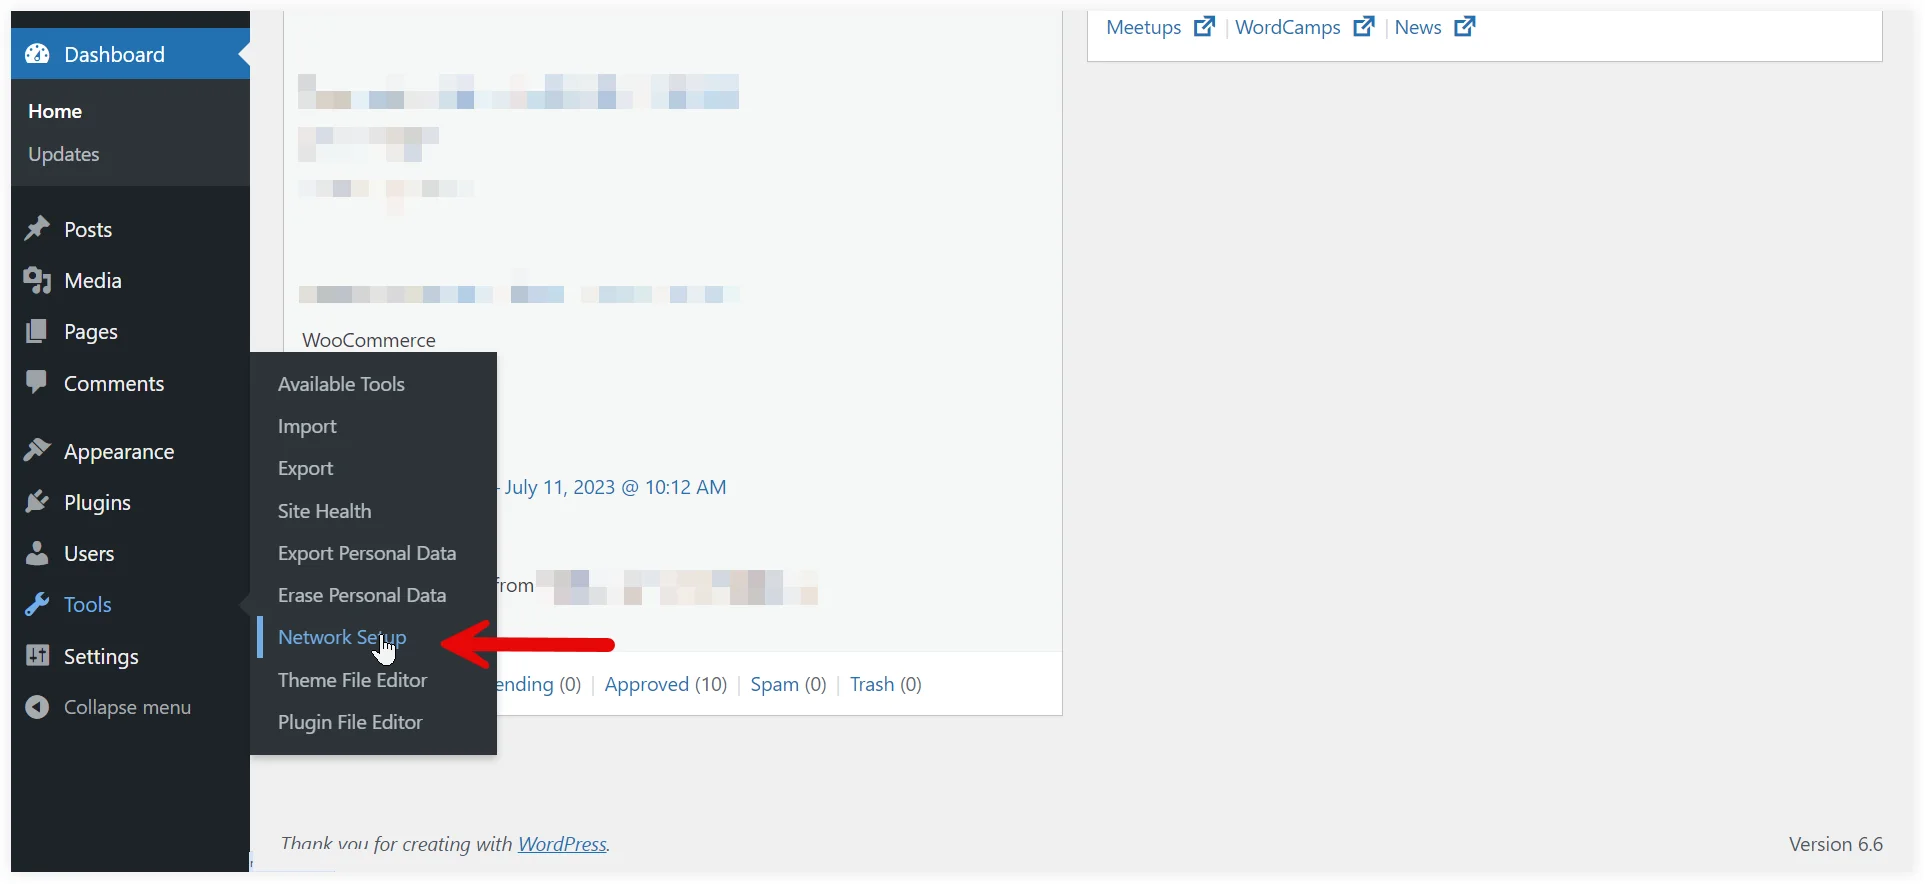
Move to the Tools and then select the Network Setup option.
Proceed with the next options and configure the multisite structure of your network.
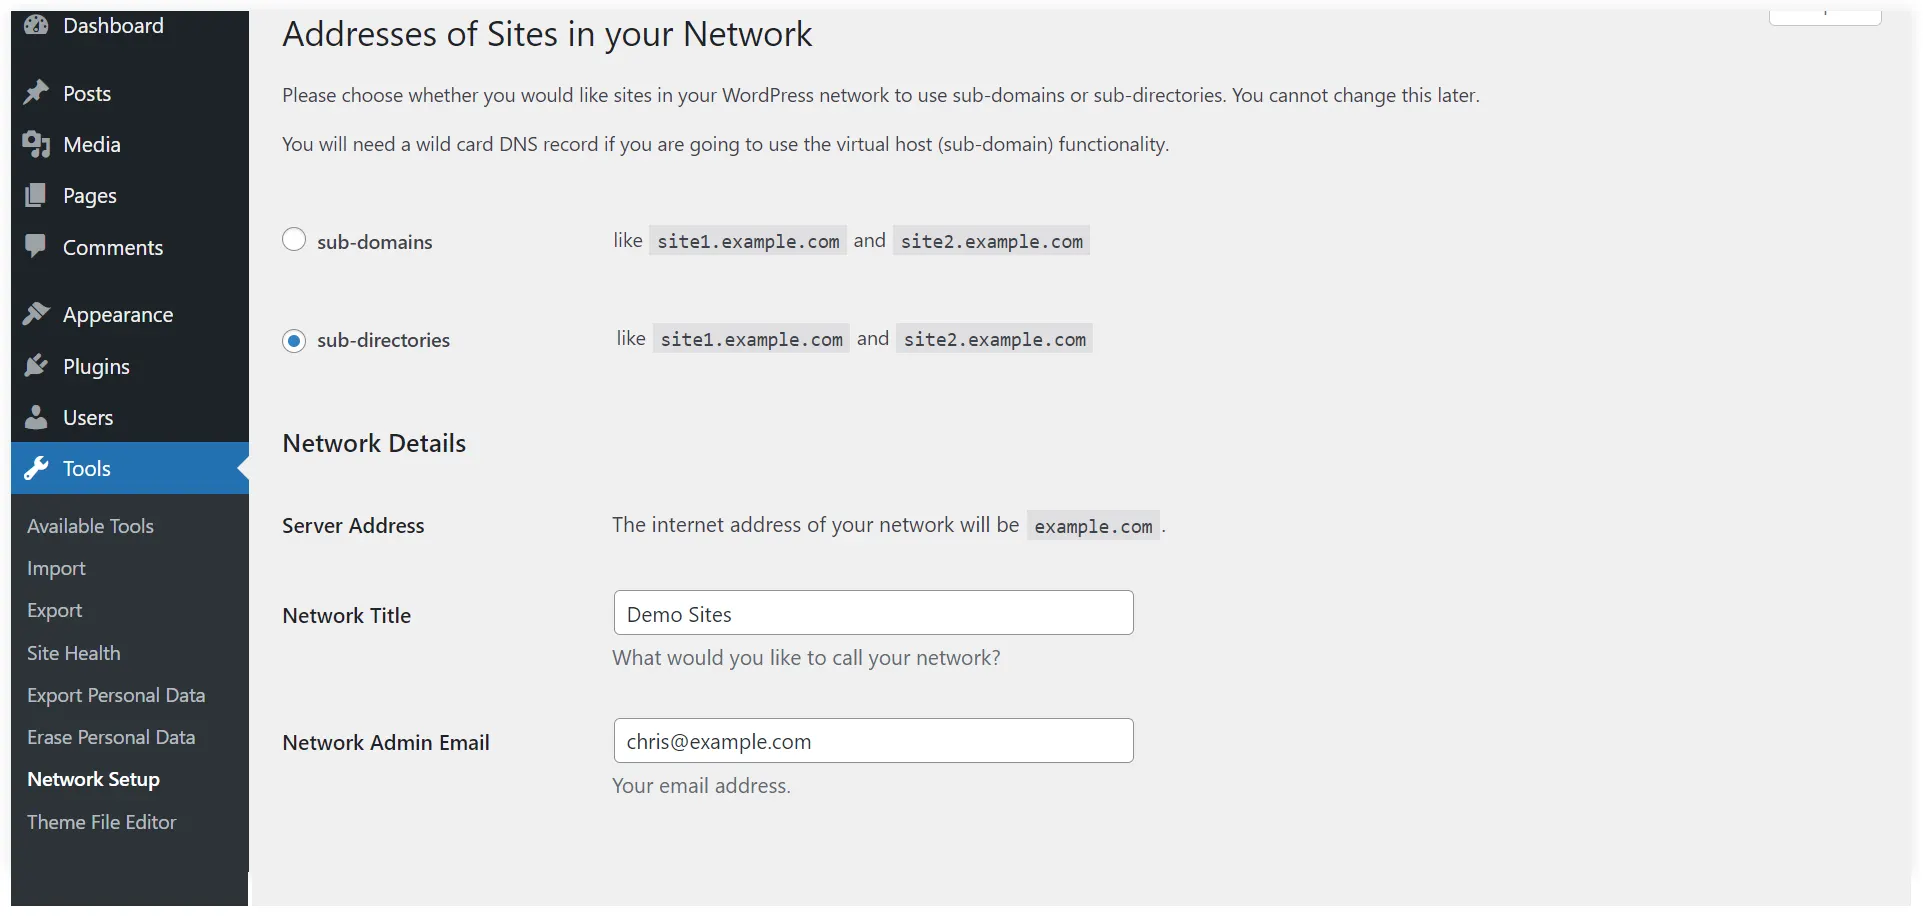
Select the multisite structure of your network. If you choose sub-domains, you need to configure the wild card domains. In our case, we are selecting the sub-directories options.
Also, mention a suitable Network Title and insert the correct email in the Network Admin Email field. Click on the Install button.
A piece of code will be displayed that you need to add in wp-config.php and .htaccess files. Copy and paste these codes using an FTP client or cPanel File Manager.
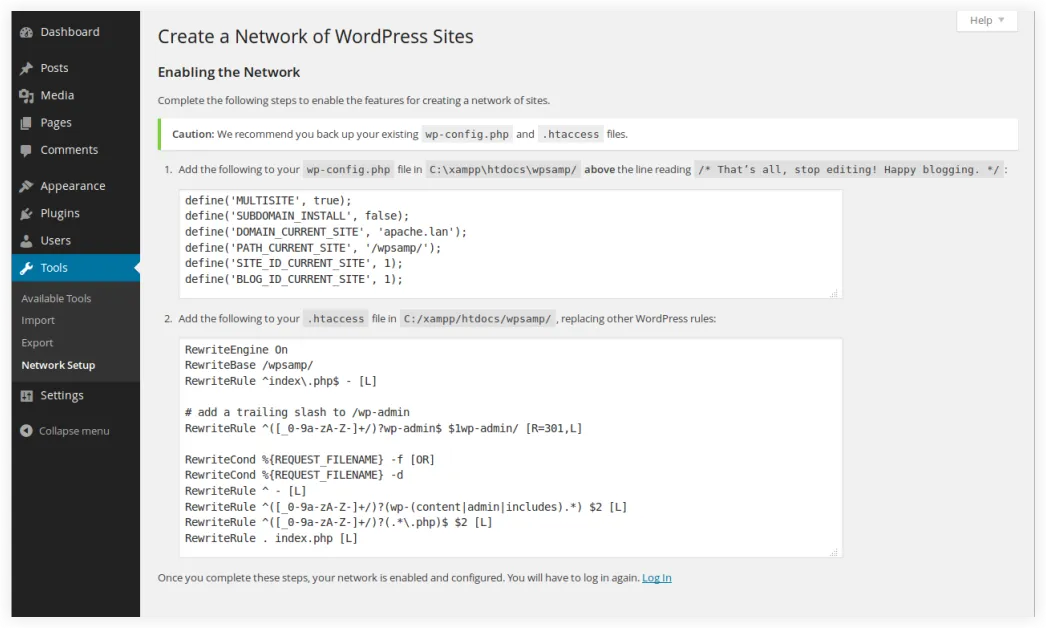
First, edit the wp-config.php file and paste the first code below the line you entered in the previous step.
define( 'WP_ALLOW_MULTISITE', true );Then edit the .htaccess file and replace the existing WordPress rules with the second piece of code.
Save both the edited files and upload them back to the server. You now need to log back into your WordPress website to access the multisite network.
5. Configure Network Settings on the Website
After setting up the multisite network, we can proceed to configure network settings on our WordPress website.
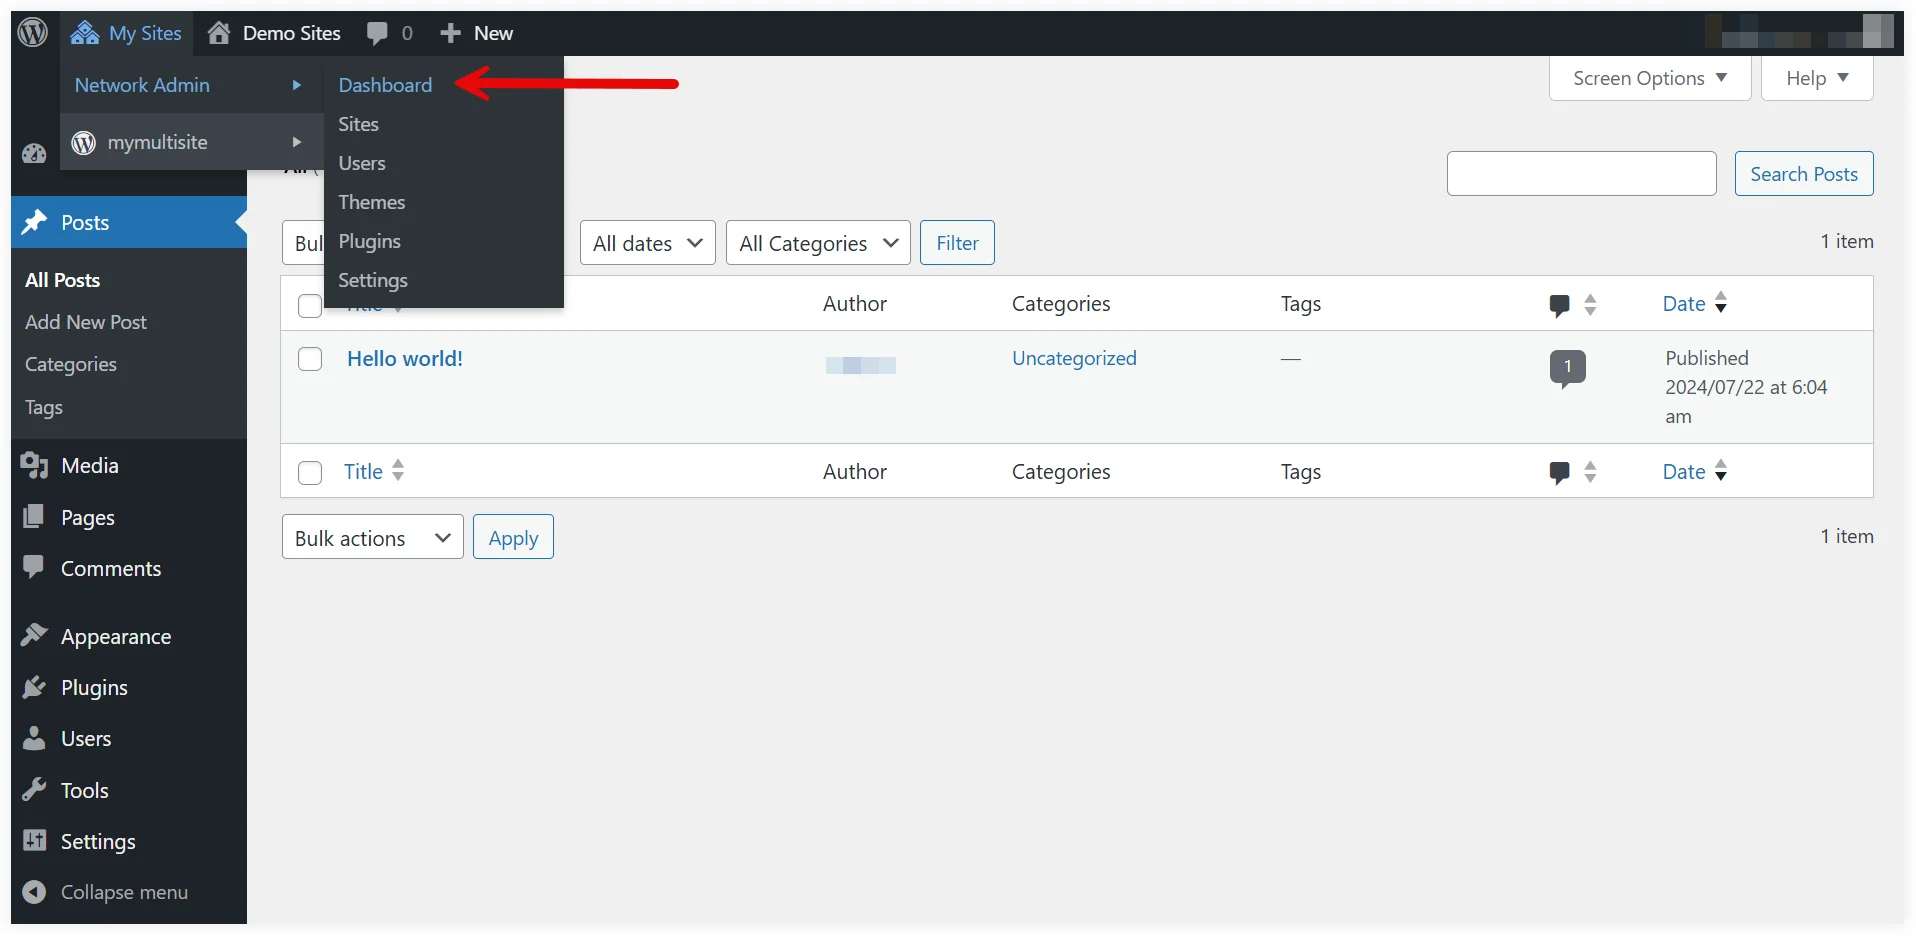
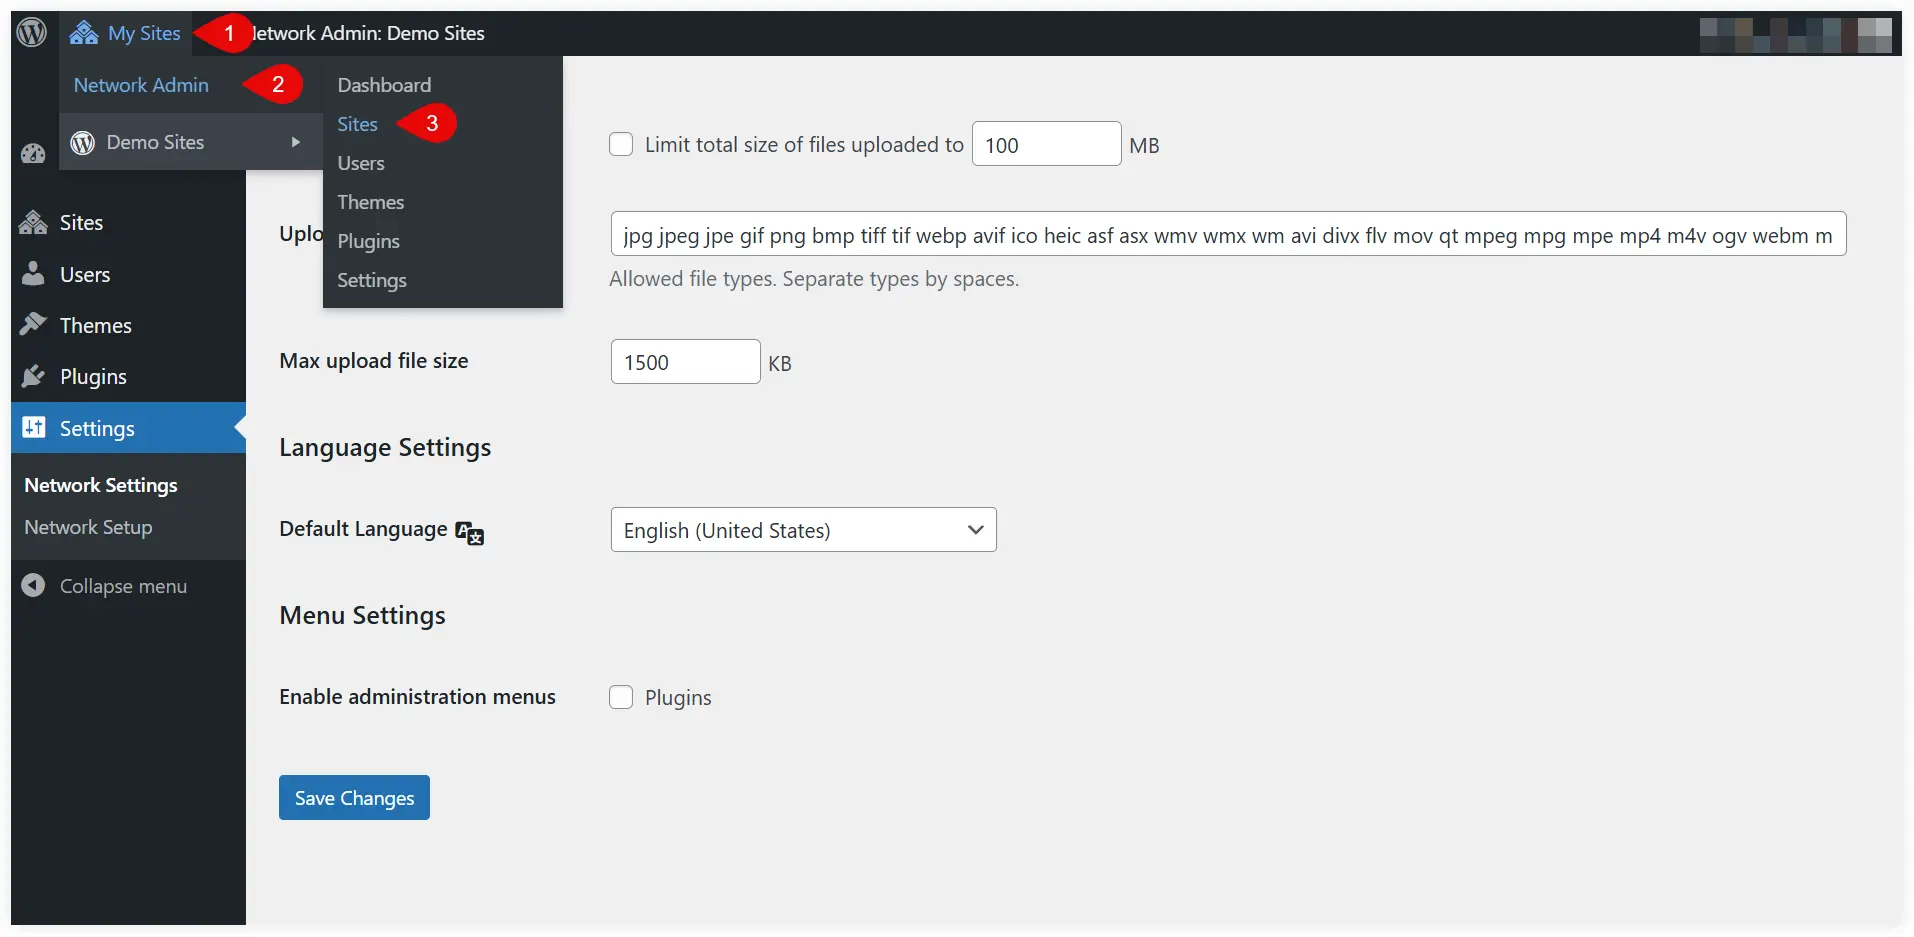
Login to your WordPress dashboard. Let’s change the view to ‘Network Dashboard’ Settings to add new sites, configure the multisite network and similar settings.
To do that hover on the My Sites >> Network Admin and select Dashboard.
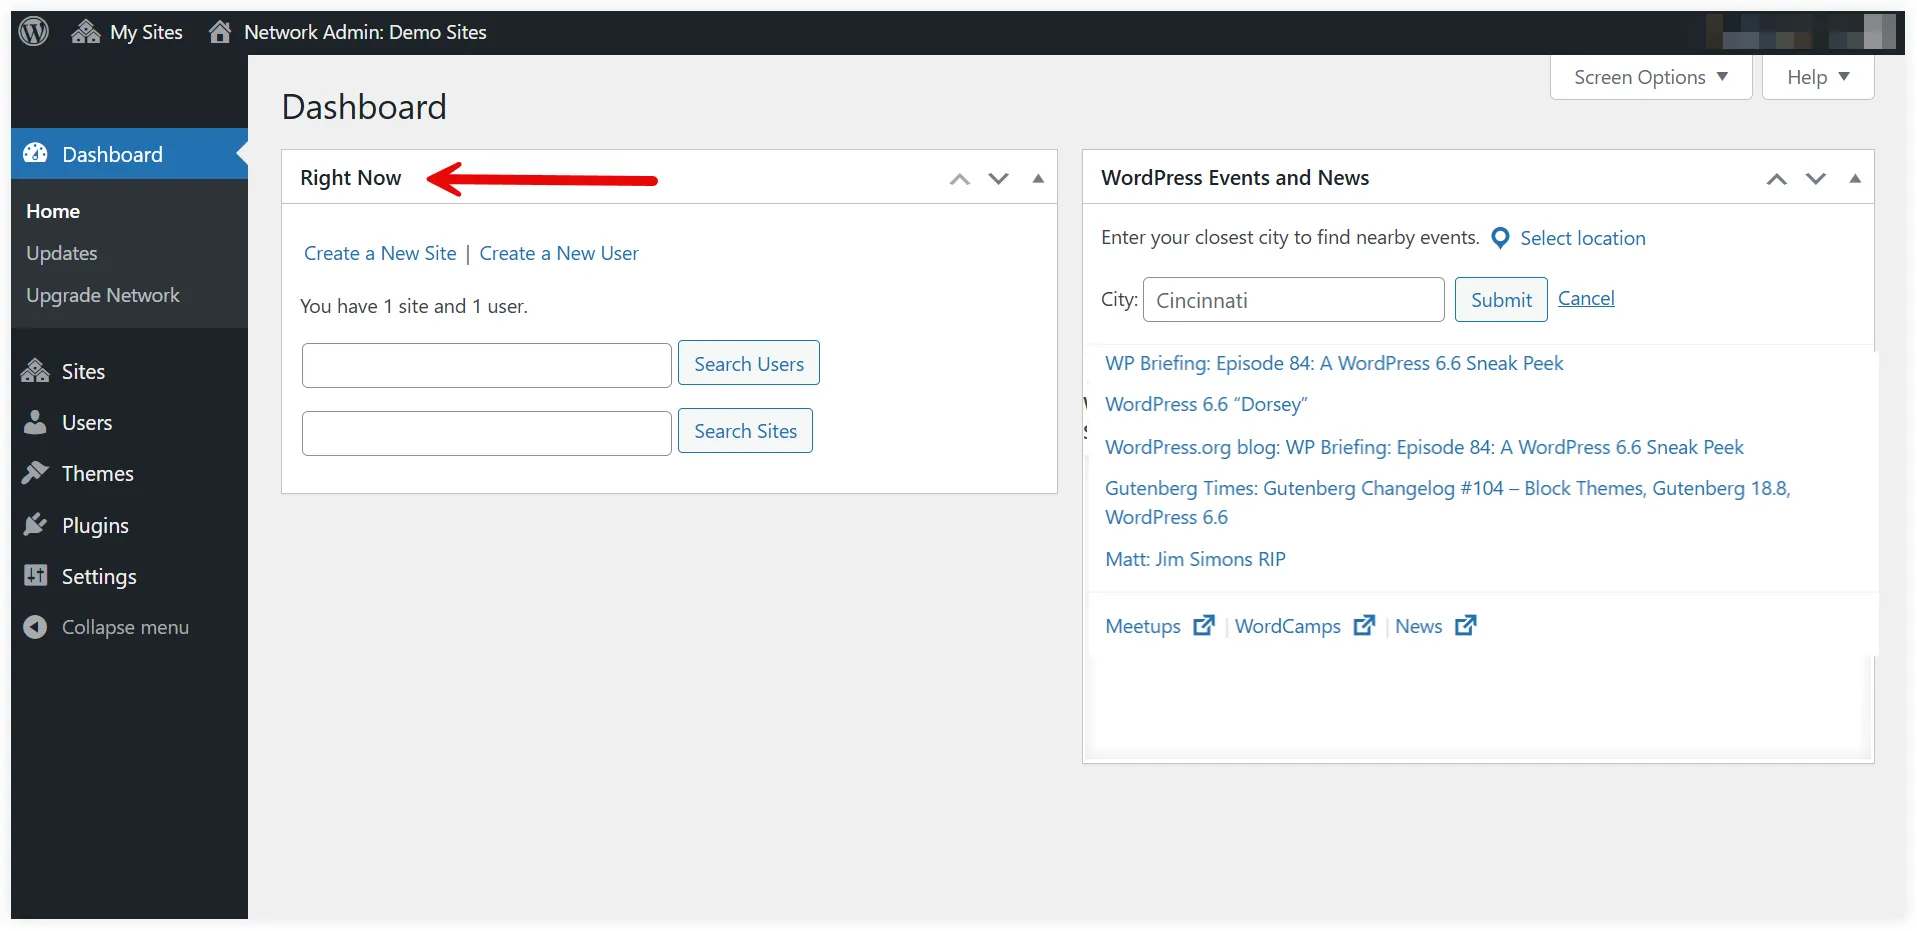
Your multisite network dashboard will appear. This ‘Right Now’ dashboard will help you to add new sites and users to the network.
To access and configure the network settings click on ‘Settings’. Network Settings contain several settings that we will see one by one.
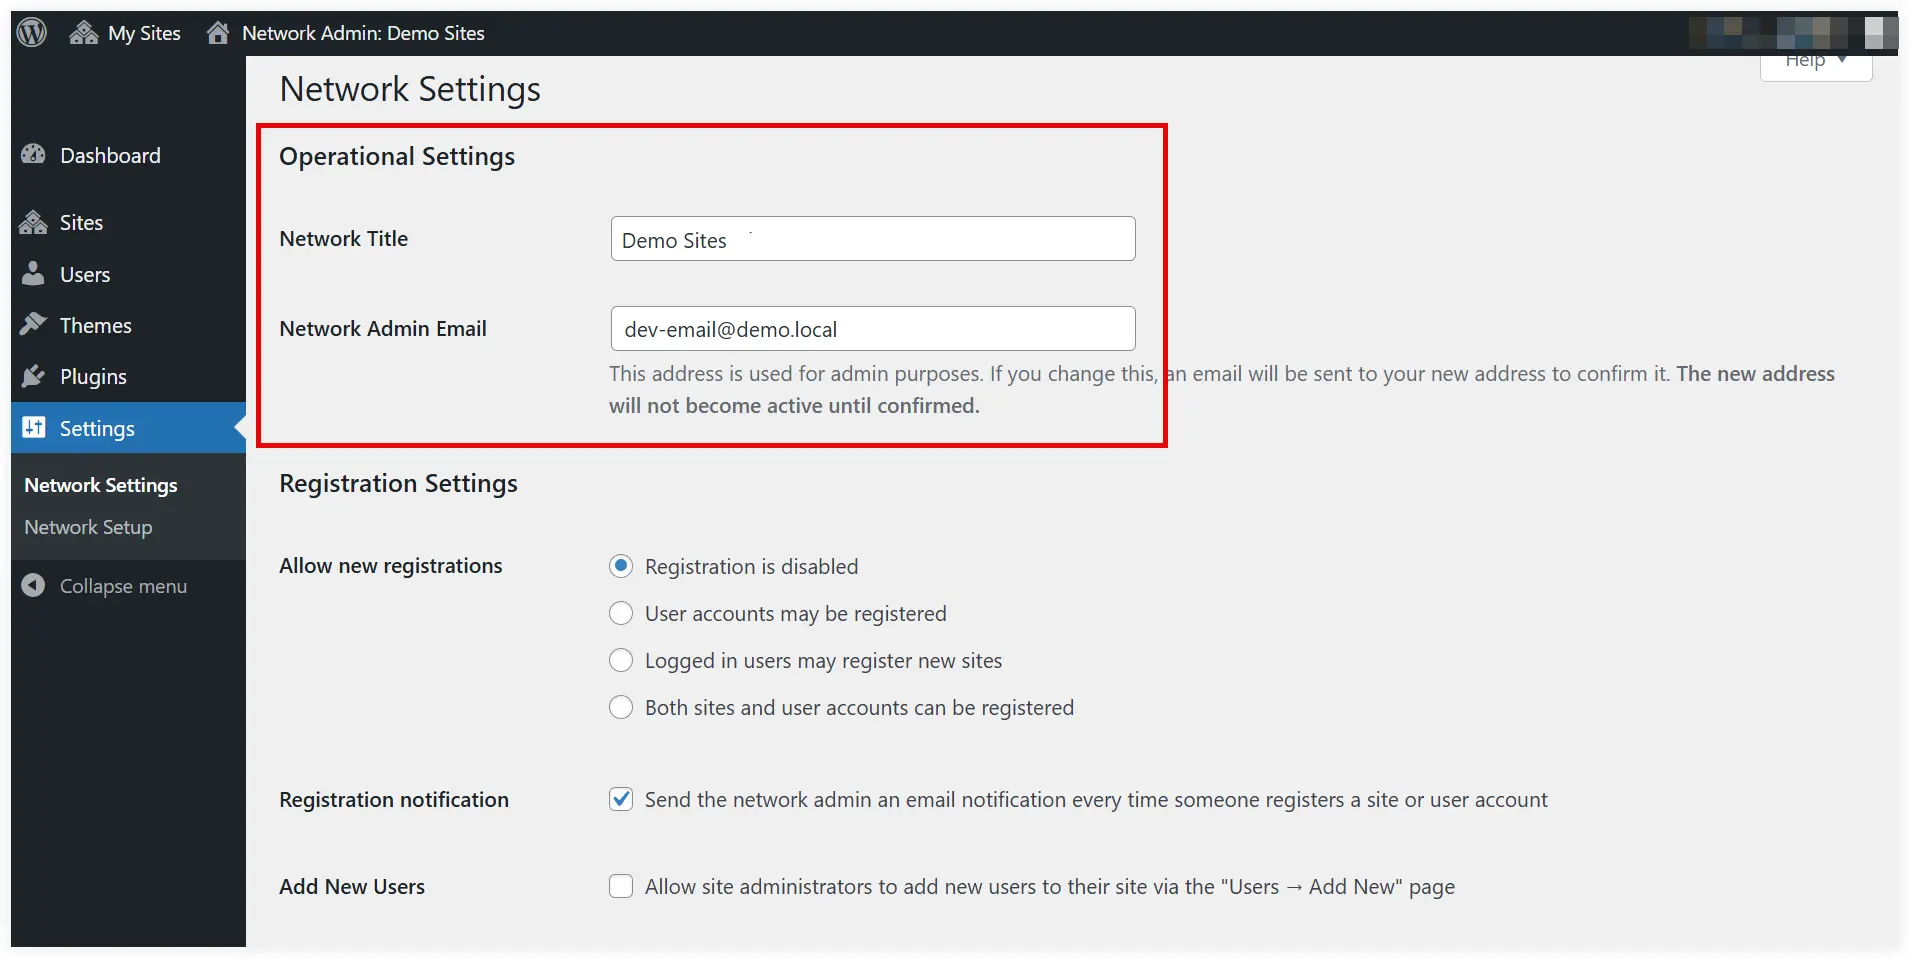
A. Operational Settings
Mention your network title and admin email address in the Operational Settings.
B. Registration Settings
The Registration Settings allow you to open your multisite network for registrations. User and site registrations are disabled by default. You can enable existing registered users to create new sites and users.
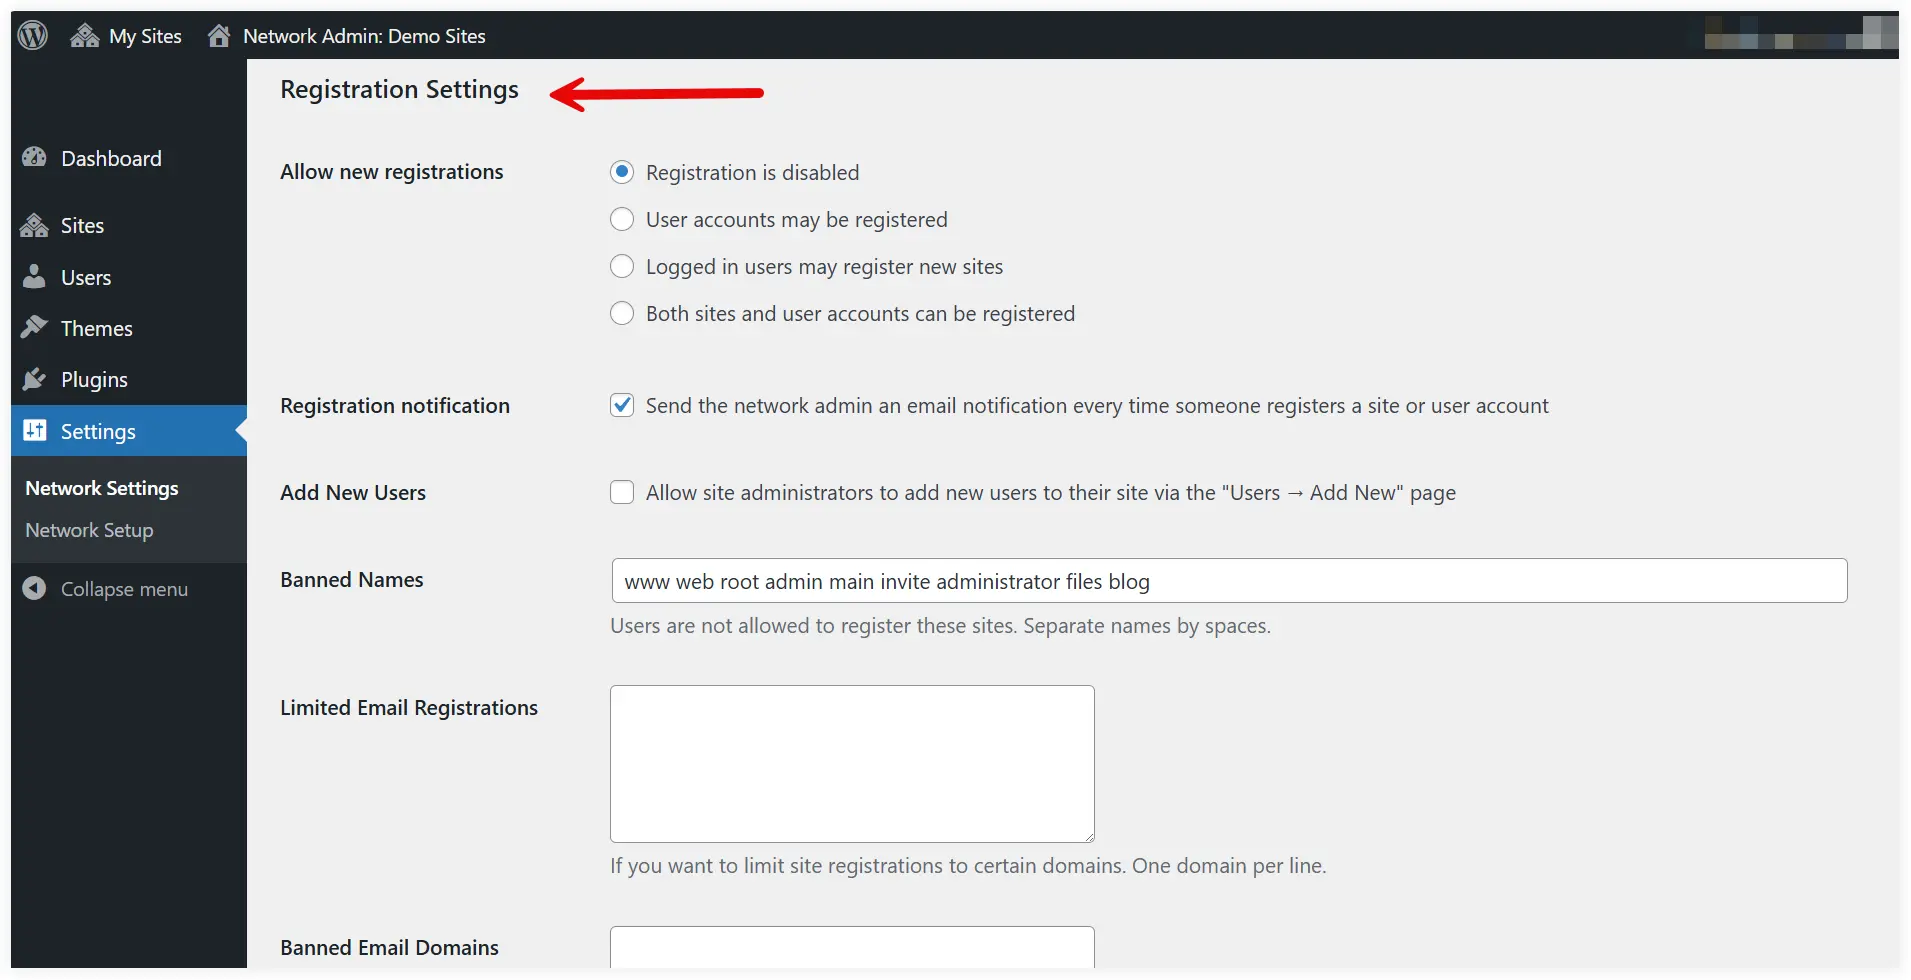
Enable Registration Notification to get an email notification when someone registers a site or user.
Enable Add New Users, if you want to permit site administrators to add new users to their sites.
The Limit Email Registrations option allows members of your organization to register and create both users and sites.
Using the Banned Email Domains, you can block specific domains to access the registration feature.
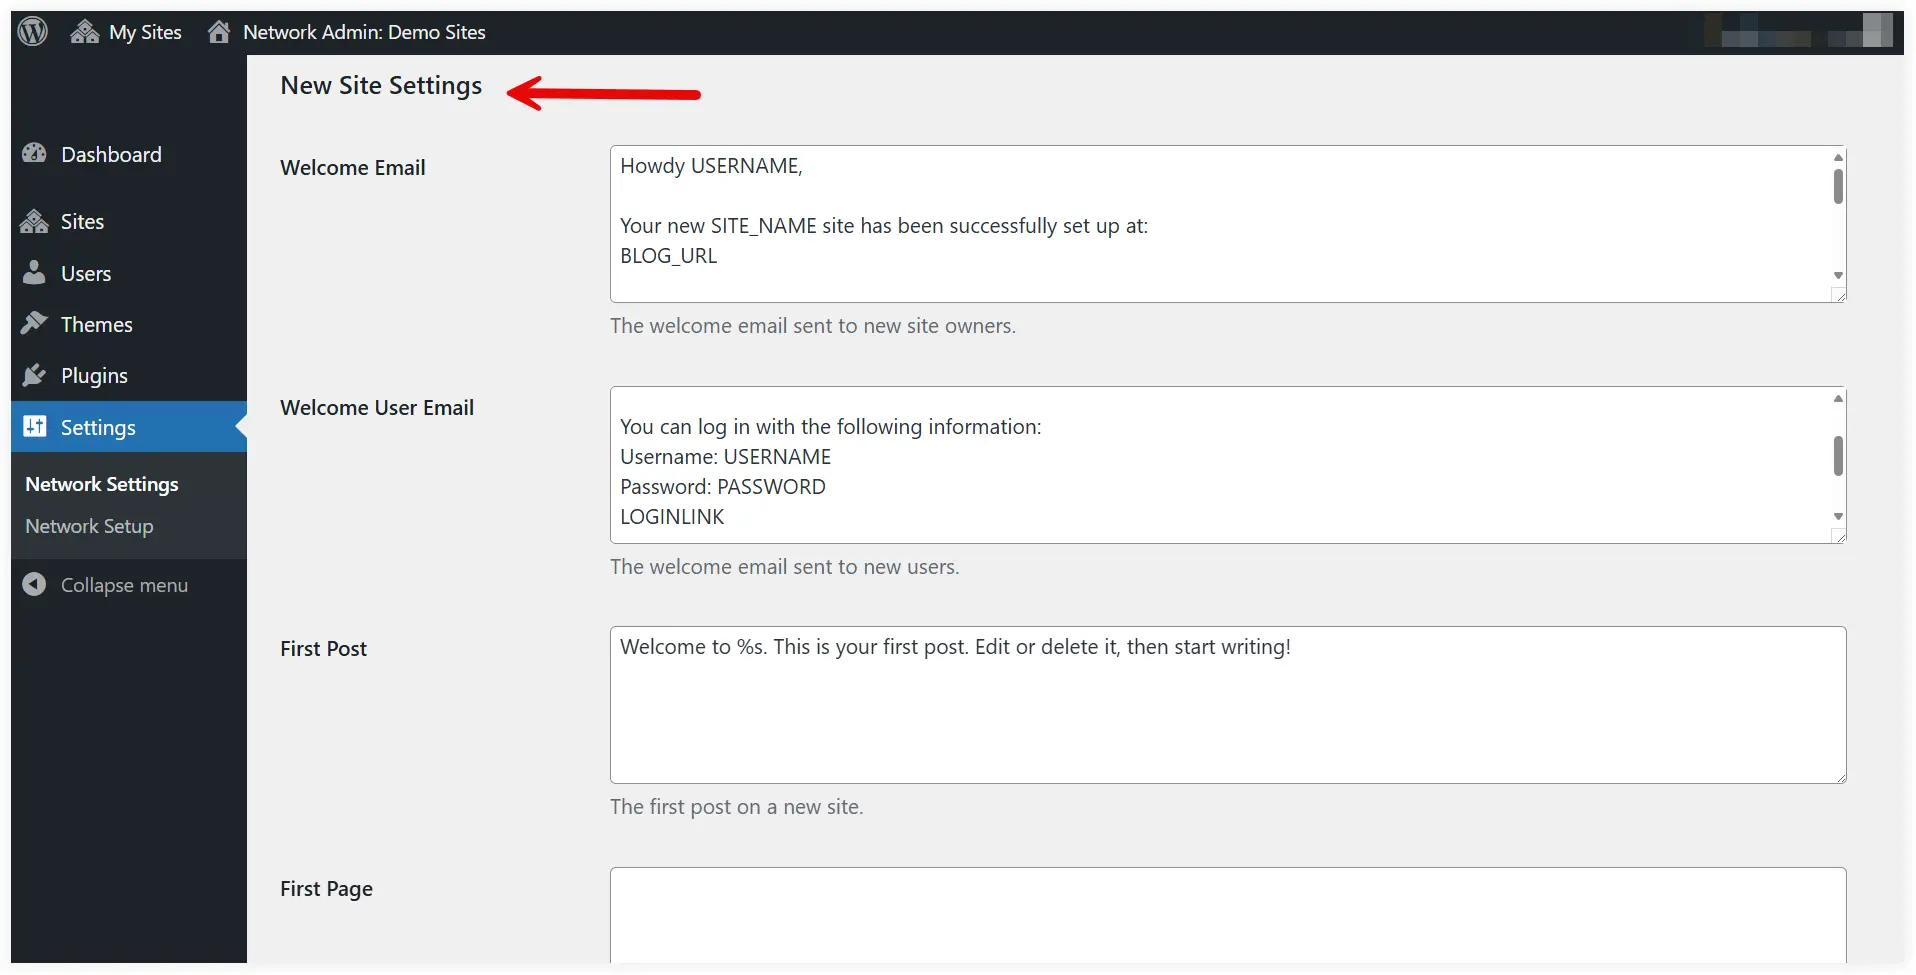
C. New Site Settings
The New Site Settings lets you configure the default welcome Emails, first post, first page, first comment, etc. for new sites and users created on your network.
D. Upload Settings
These settings are useful to conserve server resources by limiting uploads for individual sites. The default value is 100 MB and you can increase or decrease it depending on your requirements.
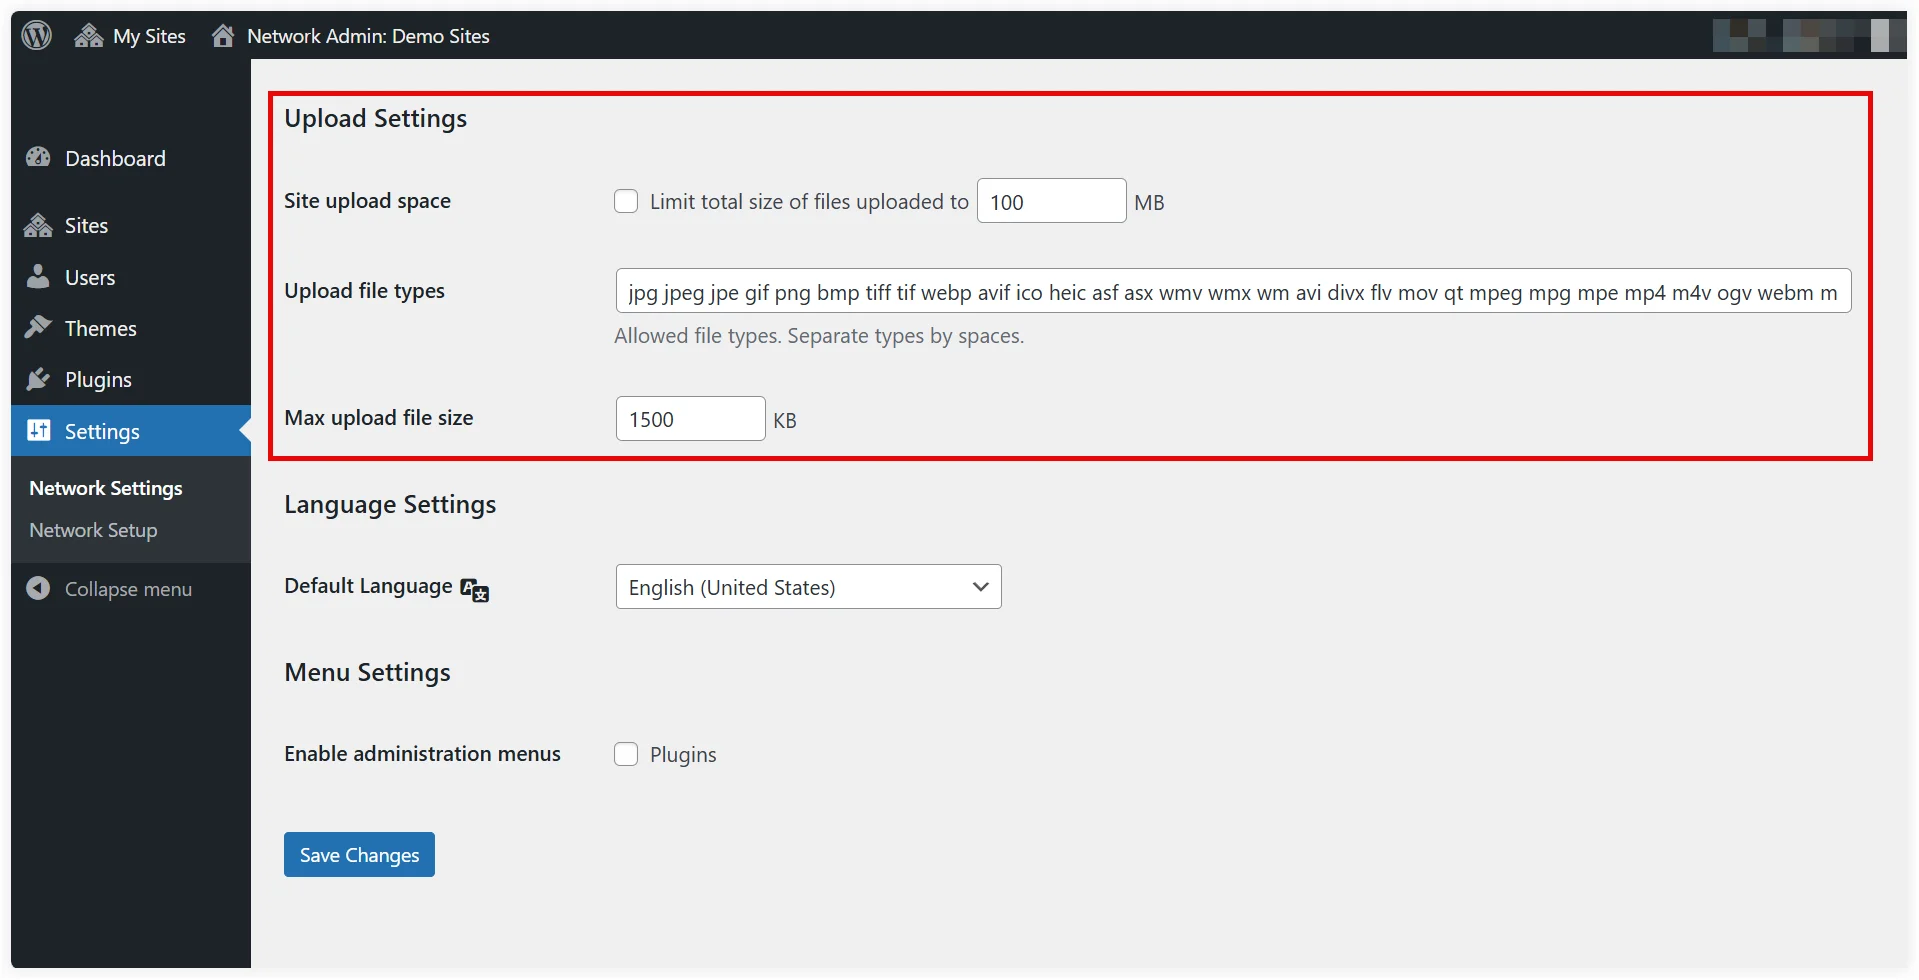
It also has the option to allow some specific file formats to be uploaded on the sites. By default, all the images, audio, video, and pdf files are allowed to be uploaded. You can also add doc,docx, and others as well.
You can also specify the maximum file size to be uploaded on the sites. This is useful to stop users from uploading large files on the server.
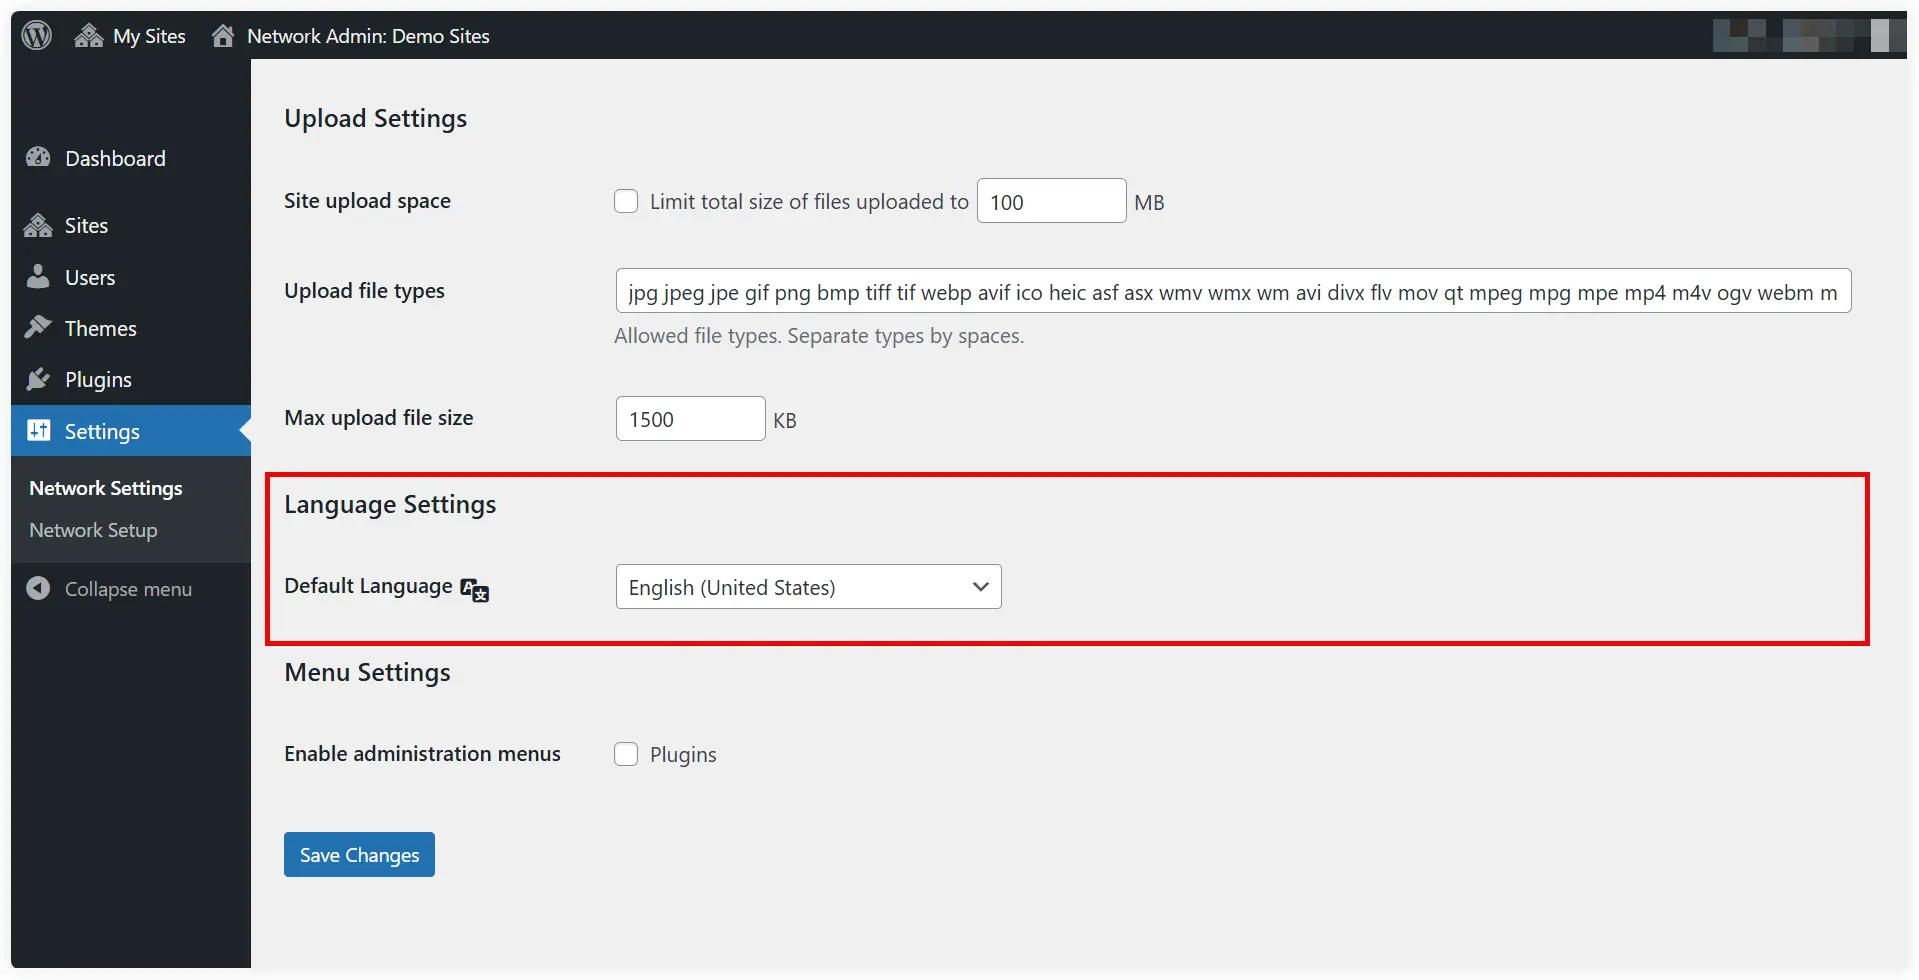
E. Language Settings
The selected language will be used as the default language for all the network sites.
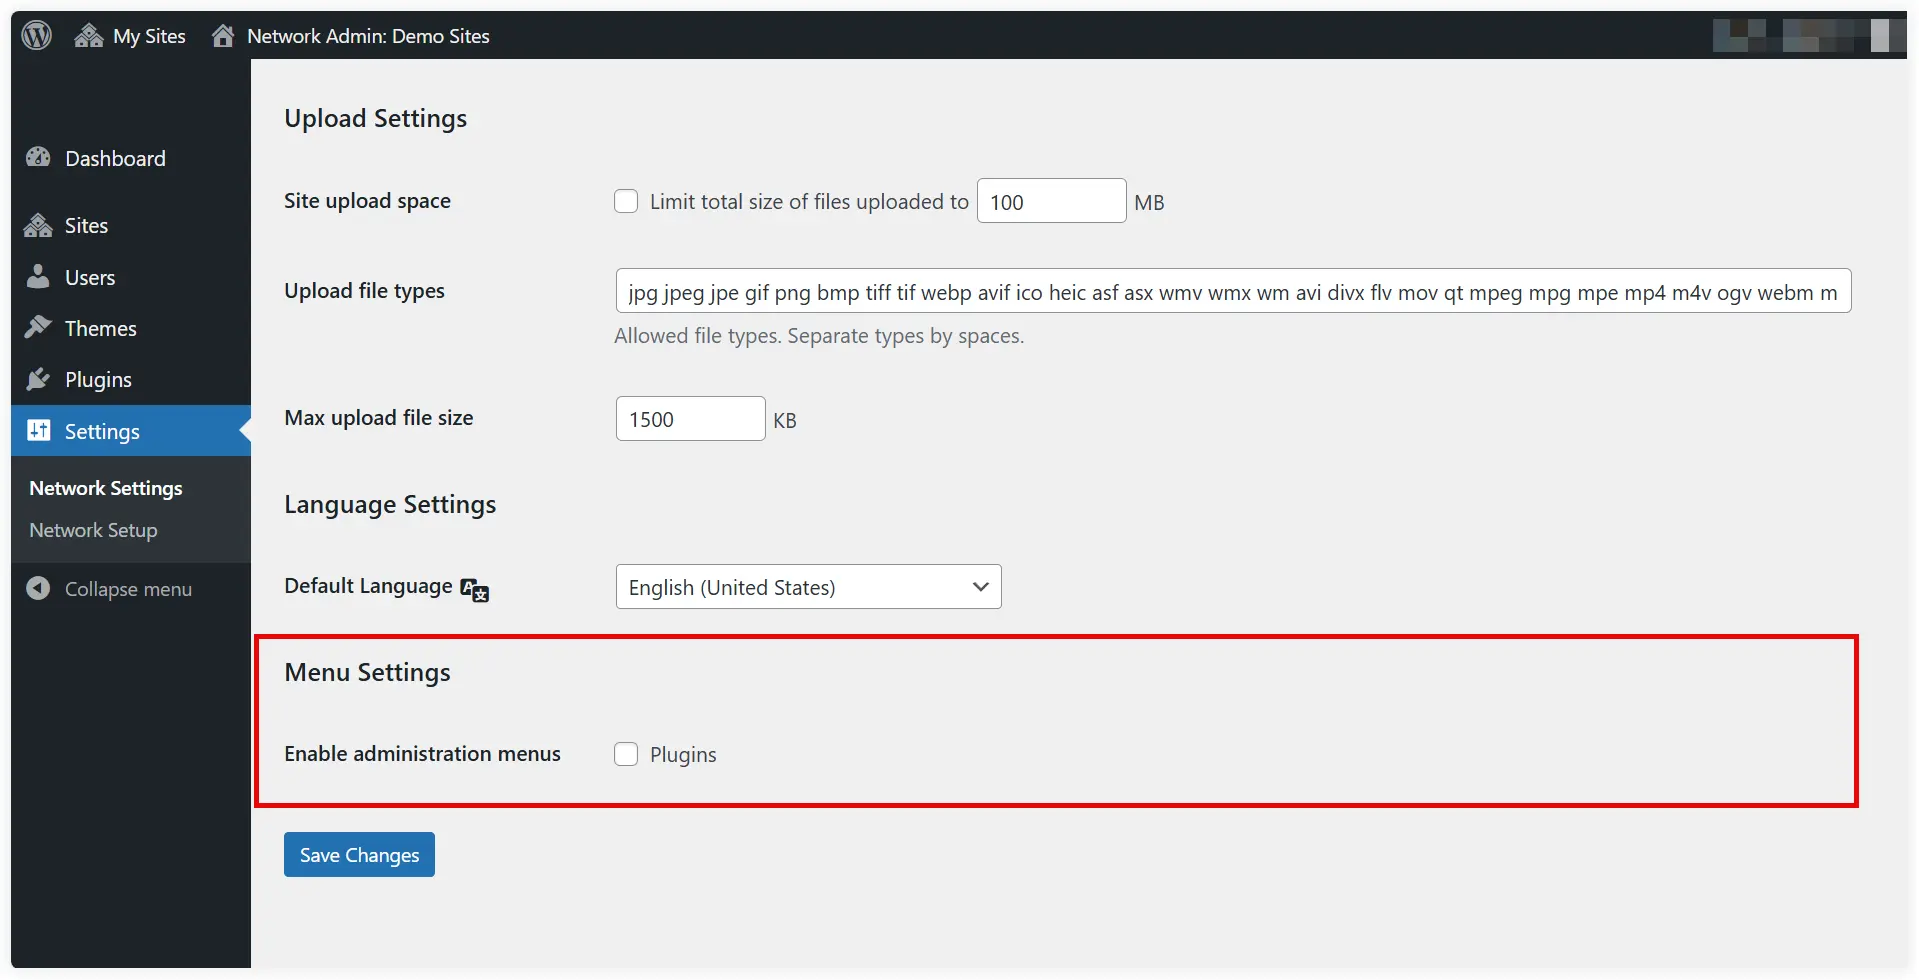
F. Plugin Menu Settings
If you want to provide an administrative view of the Plugin section on sites of your network, you can do it from here. Enabling this option allows users to activate or deactivate installed plugins but they still won’t be able to install new plugins.
Finally, click on Save Changes to complete the configuration of Network Settings.
5. Start Adding New Sites to Multisite Network
After doing the multisite network configuration, it’s time to add sites to your network. Let’s see how it can be done.
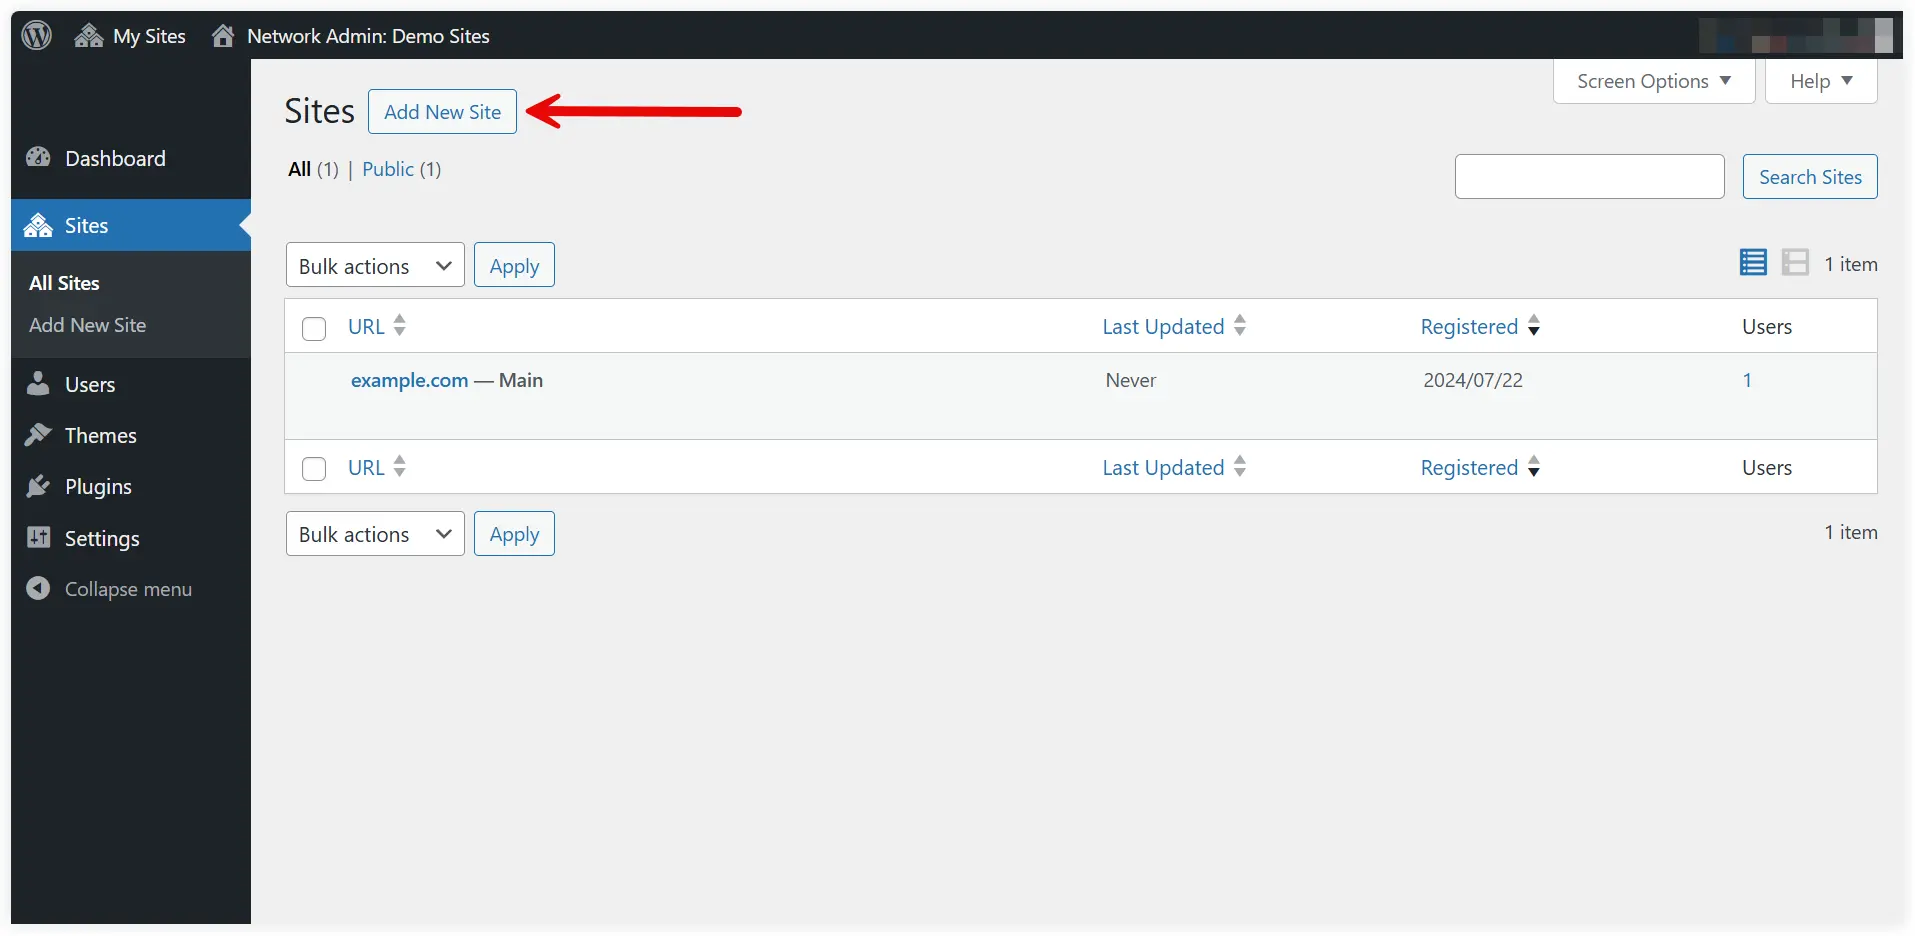
Navigate to My Sites >> Network Admin and select Sites.
Click Add New Site.
Provide the New Site Address, Site Title, Site Language, and Admin Email.
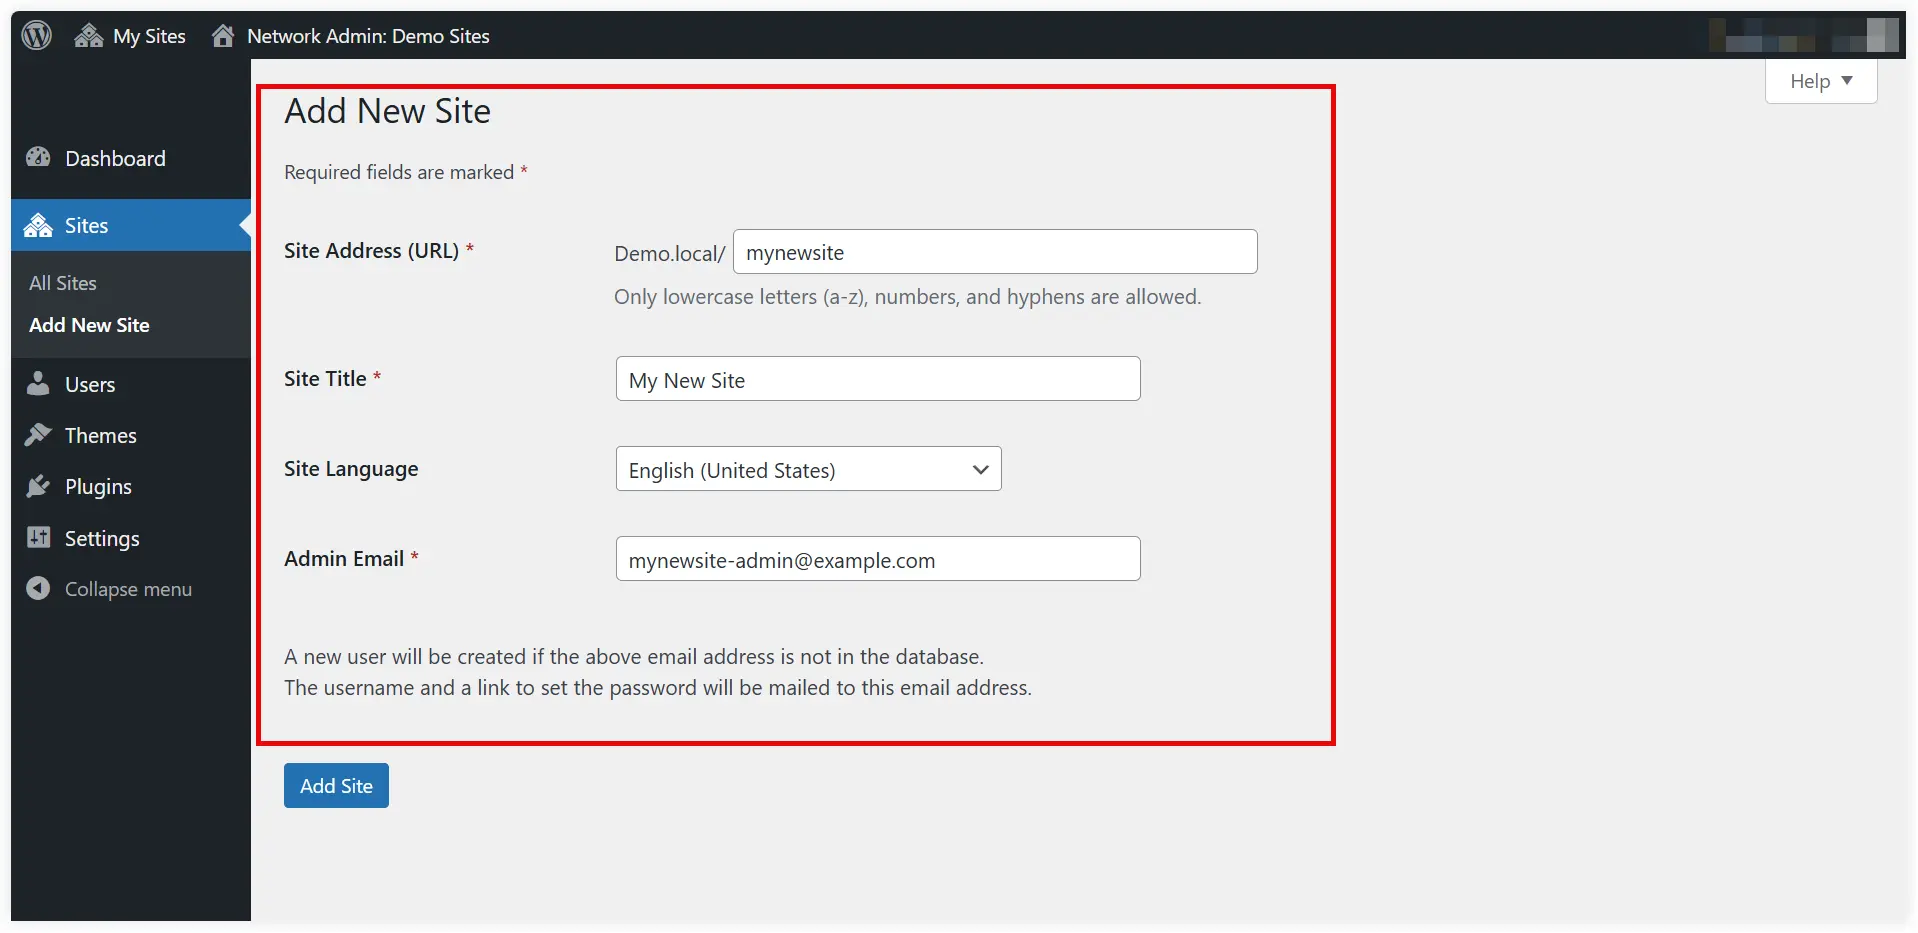
The username and password for the newly created user will be shared with the specified email address by WordPress if this email address is not in use right now.
Click on Add Site.
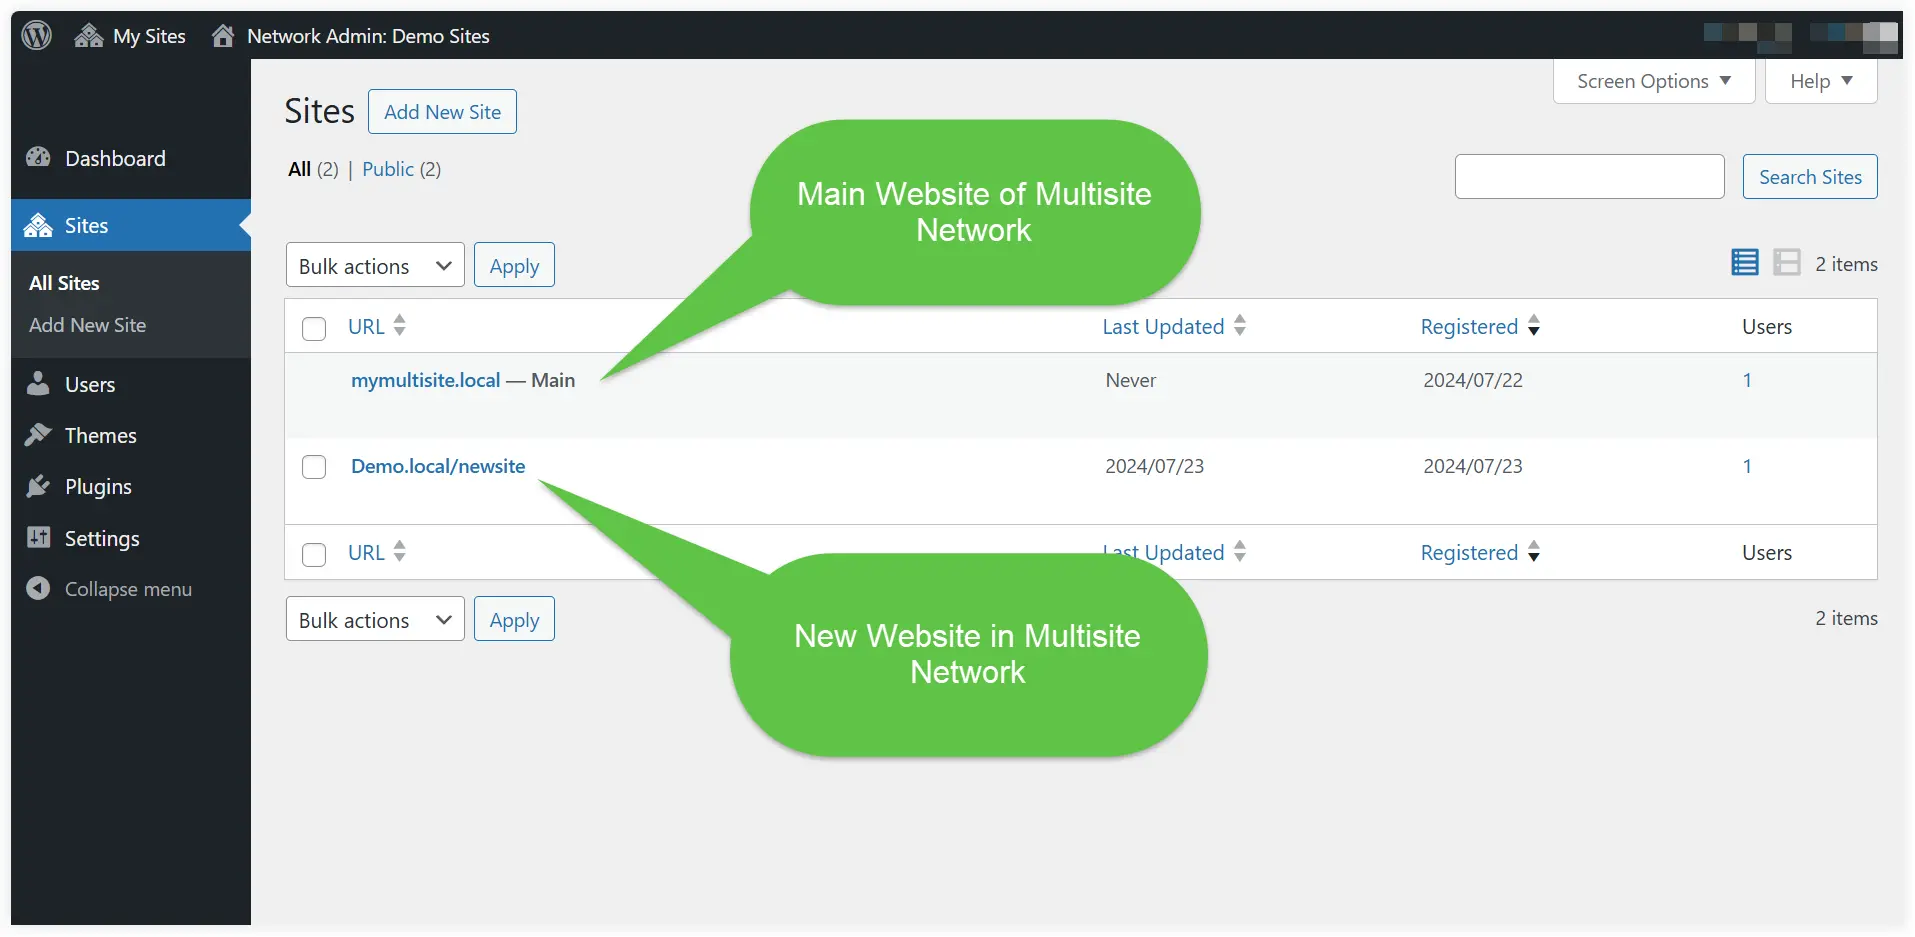
Congratulations a new site has been successfully added to your multisite network. In the same way, you can add the rest of the sites in your multisite network to serve different purposes.
After setting up the sites in the WordPress multisite network, you can log into the new sites to configure themes, plugins, and content.
Final Takeaway
It’s not difficult to set up a WordPress multisite network and by following our step-by-step guide you can easily set up a multisite network and add new sites from a single dashboard. If you’re managing a network of blogs, client sites, or a variety of business websites, WordPress multisite network setup is a scalable and effective solution. As a result, you’ll save time and have greater control and consistency across all your sites when you use a multisite network.


0 Comments