
Elementor advanced tabs help make the navigation easier for users to find what they are looking for quickly. It can help present information in an interactive and well-organized manner. This action requires the use of the Elementor site builder and Elementor tabs widget.
Through the customization options, it is possible to make the tabs align perfectly with your website’s theme.
If you are not sure of how to create tabs in Elementor you are in the right place.
This guide will provide more information on how to create Elementor advanced tabs, and best practices for creating advanced tabs for more interactivity.
What Is the Elementor Advanced Tabs?
The Advanced Tabs in Elementor are a webpage element that lets you arrange various content like product descriptions, FAQs – frequently asked questions, service info, product information, etc. When content is well arranged, then you are assured that visitors will find information easily without any problem.
The tabs are usually a content space with tab titles on them. You can add different content in each tab according to the requirement. For example, tabs on a product page like the following:
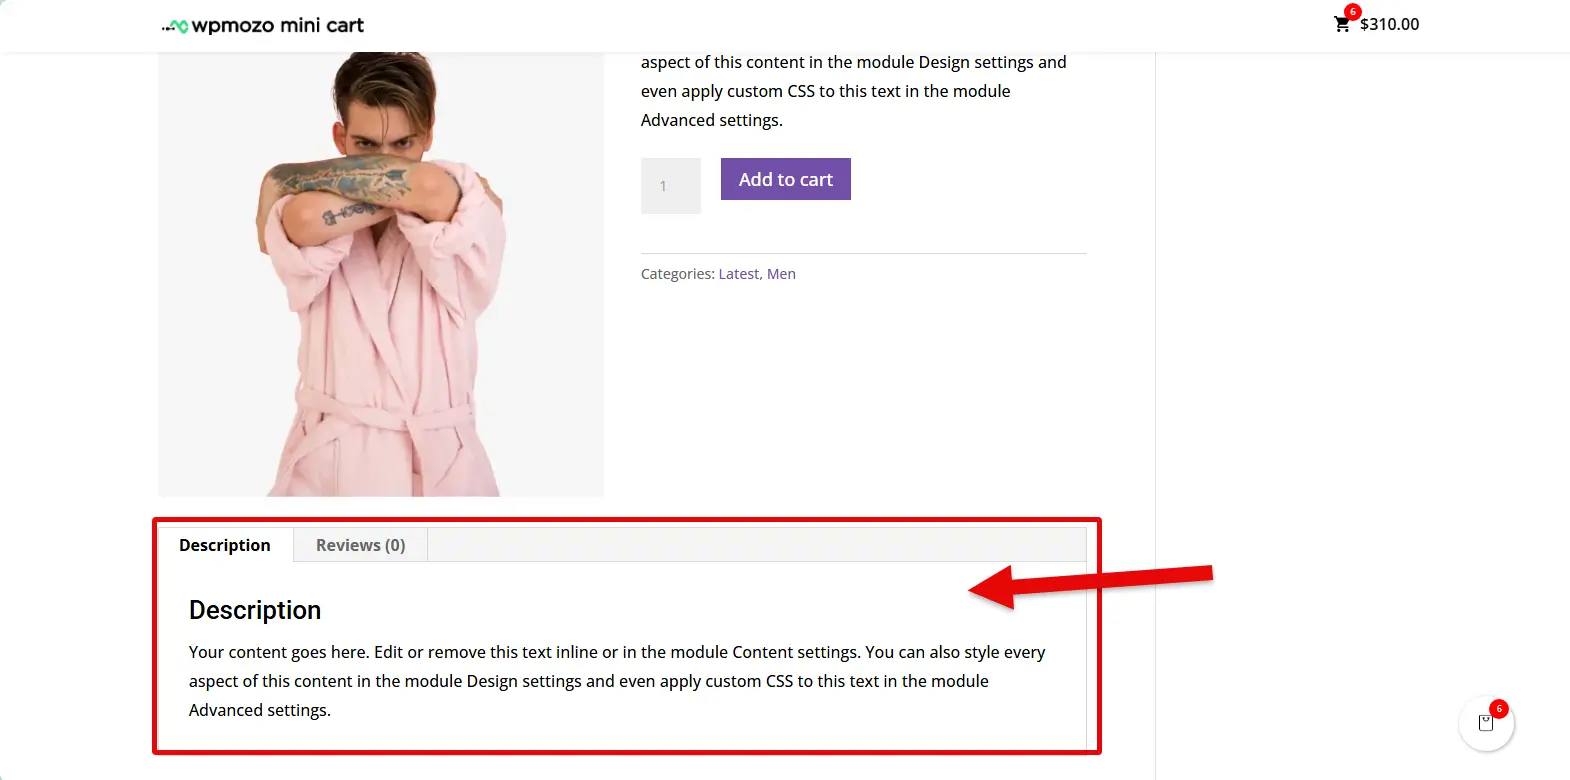
Users can explore each tab based on their requirements, and you didn’t increase the length of the page to add the content. Instead, you did it concisely using the tabs.
To create advanced tabs, you can use the Elementor Advanced Tabs widget by WPMozo.
Below, you can learn how to do that.
How to Create Elementor Advanced Tabs for Interactivity
It is not that complicated to create Elementor advanced tabs. However, you need to have already activated the Elementor site builder on your website, then install a preferable Elementor tabs addon (in our case we will use the WPMozo Addons for Elementor.) and activate the tabs widget.
All essential addons for Elementor need to be installed for the best experience.
Step 1: Download the Elementor Add-On Plugin
The first step is to download the WPMozo Addons for Elementor from the official website of WPMozo. The WPMozo Addons for Elementor features over 55 widgets for Elementor, with enhanced design options, interactive elements, responsiveness, and lightweight capabilities.

By choosing this Elementor plugin to design tabs, you make a robust decision as the widget provides extensive features and options that can fulfil various requirements effectively.
Step 2: Upload, Install, and Activate the Elementor Add-On
Proceed to log in to your WordPress website.
Once on the dashboard, on the left side menu, click on WordPress plugins, on the next page, click Add New Plugin. Select the option to Upload Plugin.
Upload the advanced tabs Elementor plugin like WPMozo.
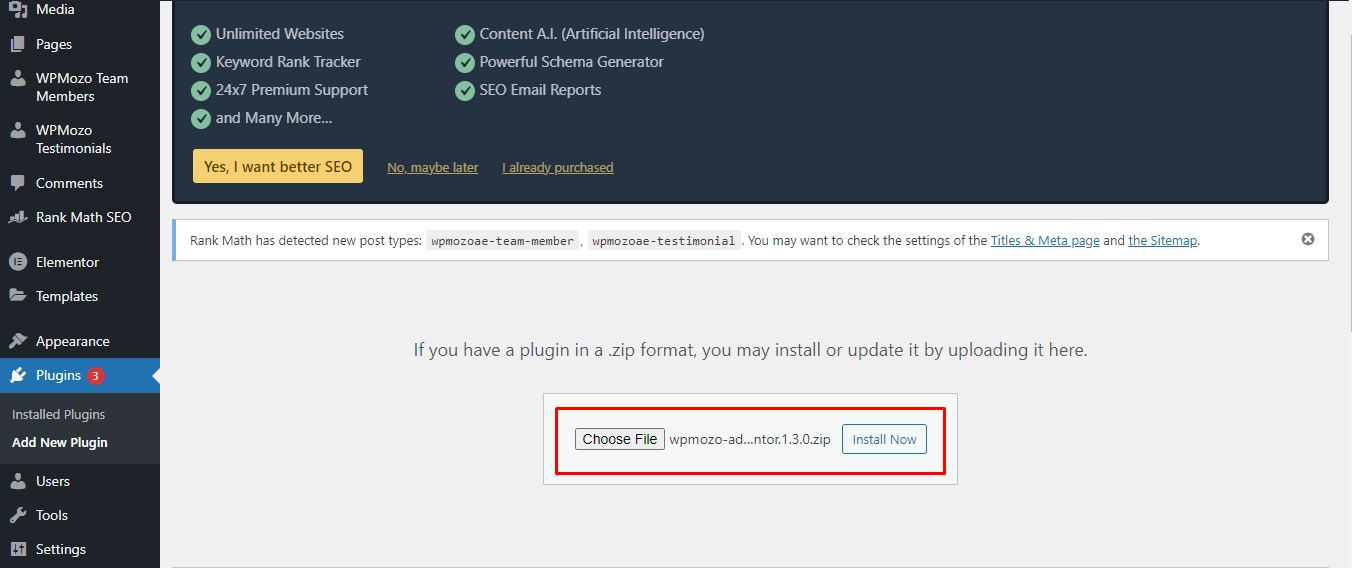
Once installed, activate it to start using it.
Step 3: Open a Page or Post
On the left side menu bar, click on pages, or posts to edit your preferred content. On the page or post, click the Edit with Elementor option. However, for that option to be there, you need to have installed and activated the Elementor WordPress plugin.
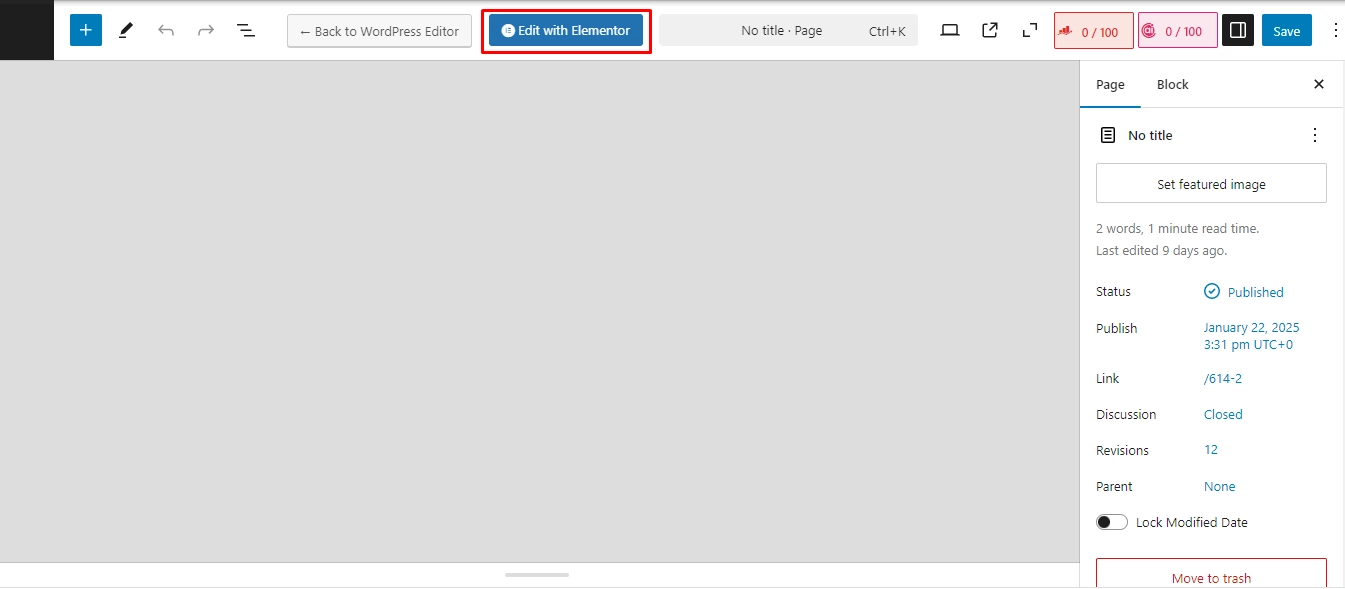
On clicking the Elementor button, you will be redirected to another page.
Step 4: Search for the Elementor Tabs Widget
On the next page, search for the Advanced Tabs widget. Or scroll down the left side menu bar, till you find the WPMozo option and choose Advanced Tabs.
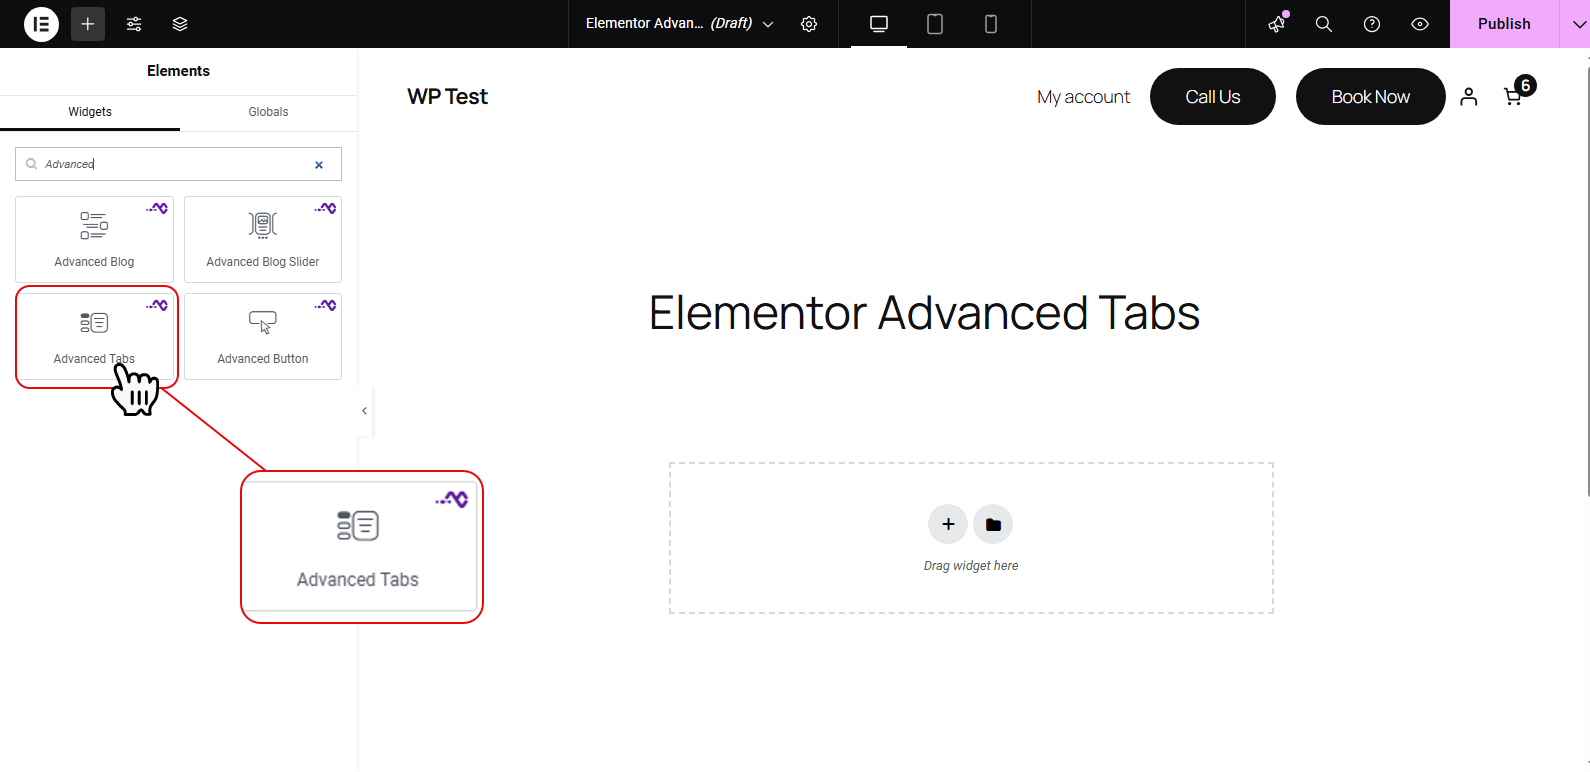
Click on it. Or drag and drop it.
Step 5: Edit the Elementor Advanced Tabs
The Elementor Advanced Tabs block will appear, and you can add as many tabs as you wish.
For instance, settings, instructions, FAQ, about, product information, etc. After understanding all the customization options, you will now be more certain about how to create advanced tabs in Elementor.
We will now dwell on how to edit the different sections; content, style, and advanced tabs:
1. Content
The content section provides a wide variety of tab customization options to ensure your tabs are informative, well-arranged, and easy to read.
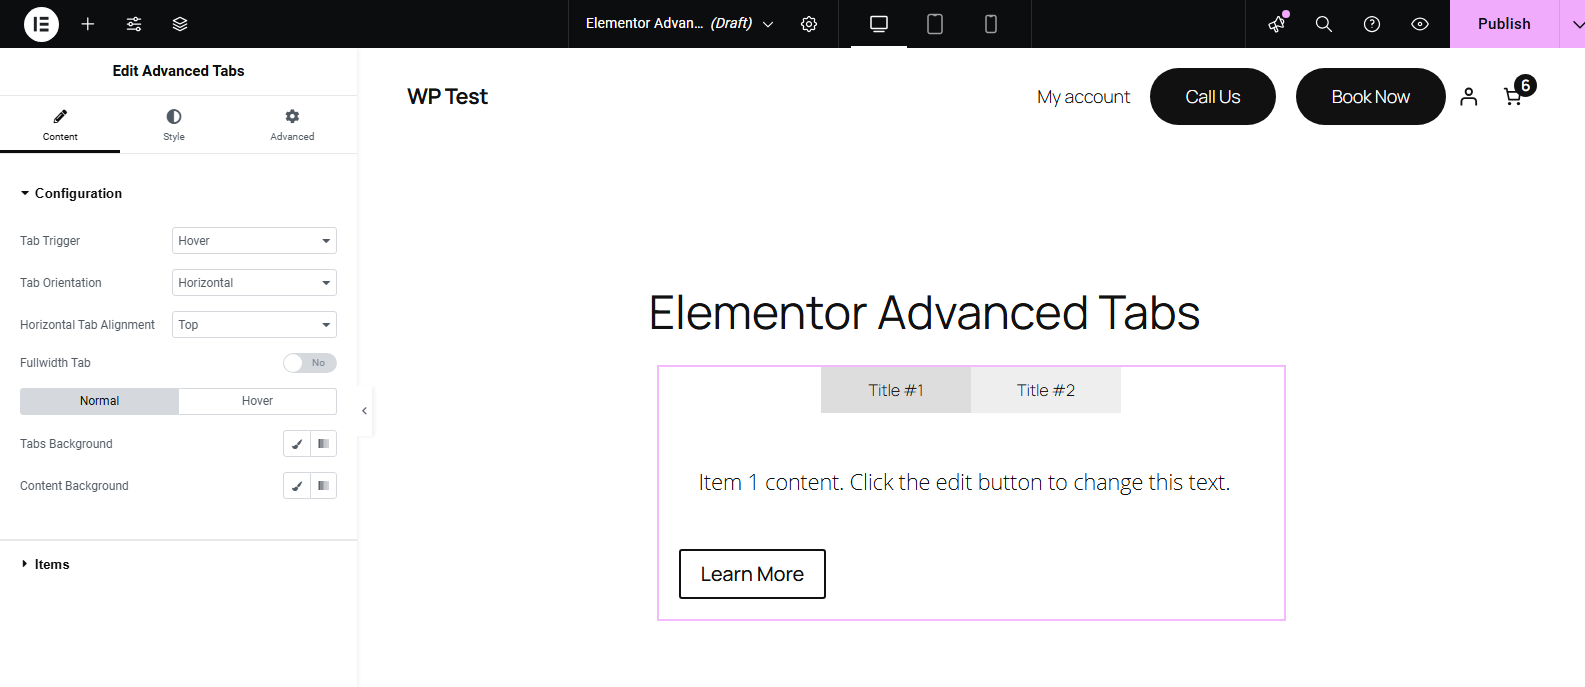
Tab Trigger
Using the Tab Trigger option, you can decide how you want the user to access the content available in each tab. The widget lets you enable:
- Hover
- Click
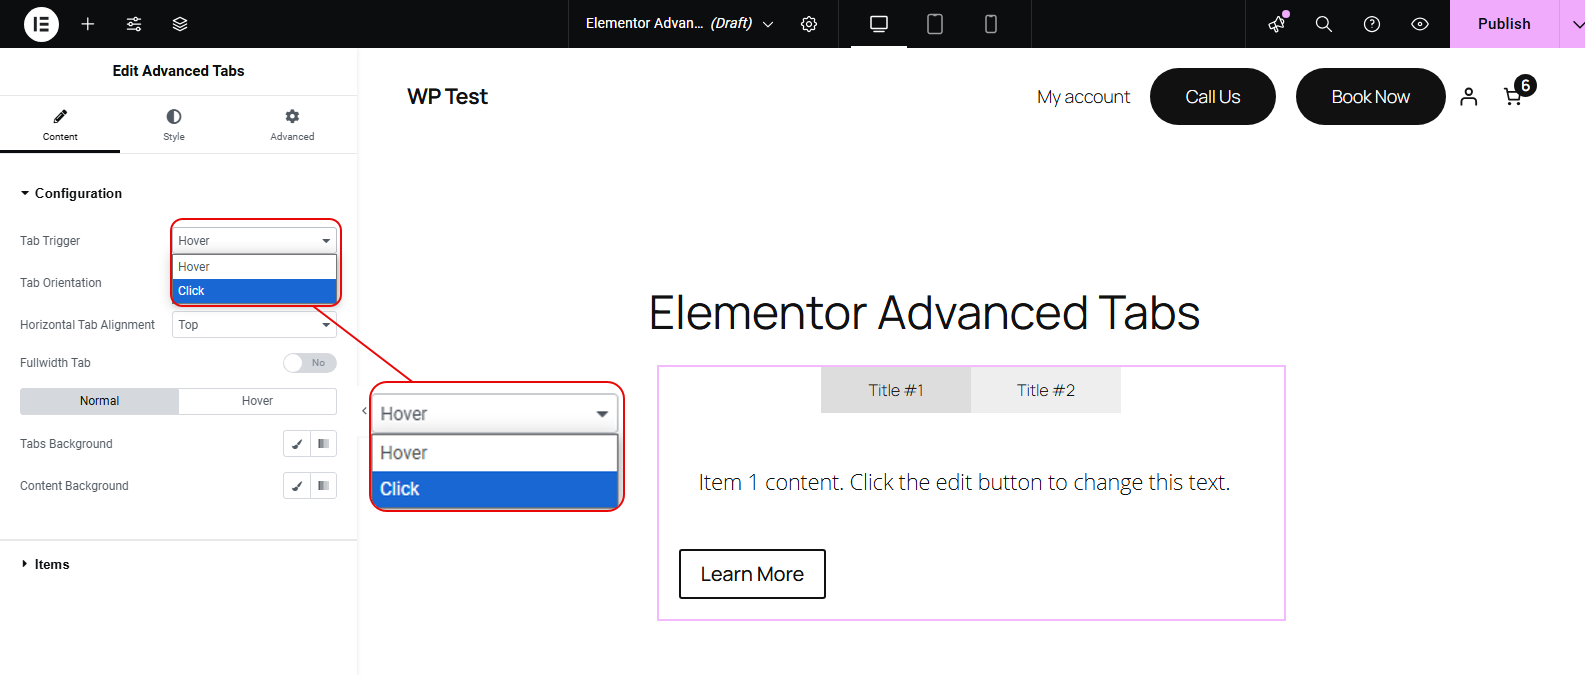
If you enable Hover, then users can switch between tabs’ content by hovering on them. If you enable Click, the user needs to click to access the tabs’ content. Here’s the working of both the trigger types.
Hover tab trigger.
Click tab trigger.
Tab Orientation (Vertical or Horizontal)
The default Tabs widget of Elementor page builder, only lets you create horizontal tabs. But, using the WPMozo Advanced Tabs widget, you can create both horizontal and vertical tabs.
Go to Tab Orientation, and select either:
- Vertical
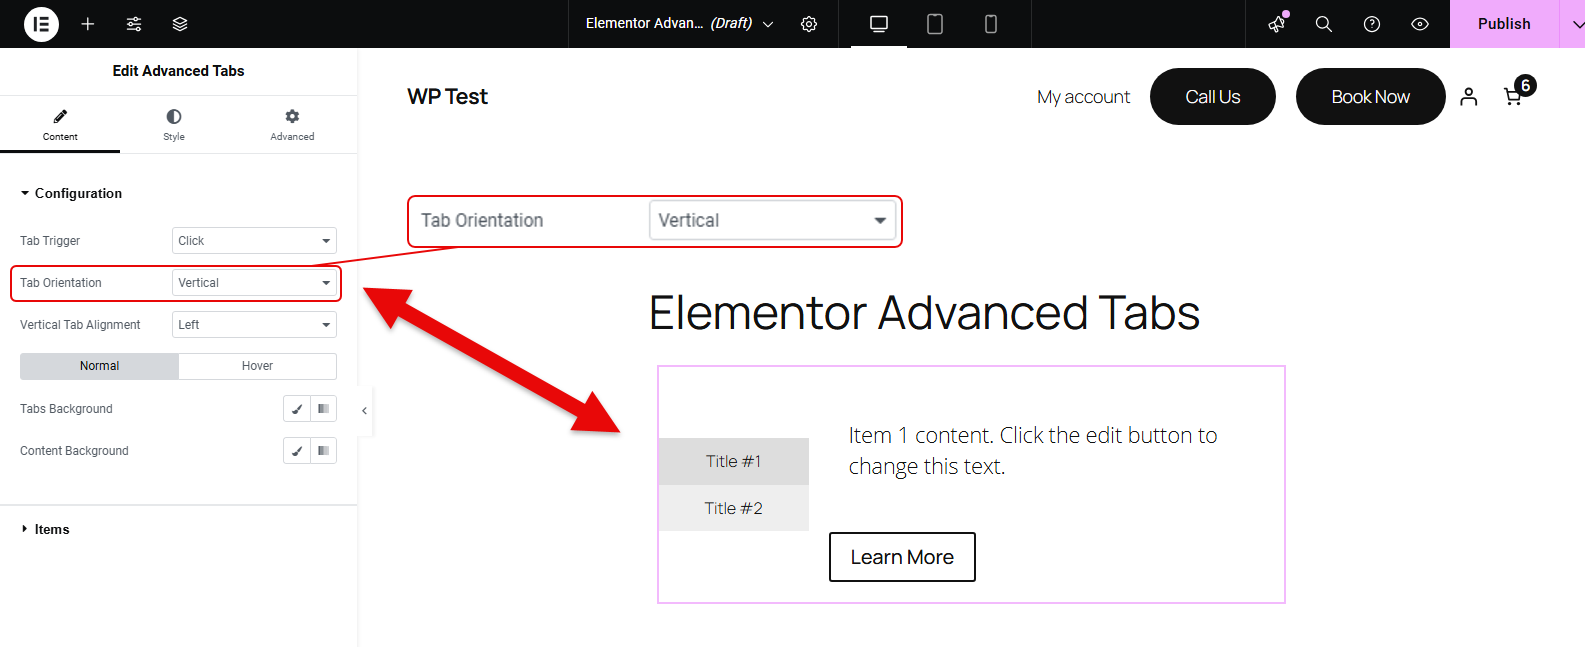
- Horizontal
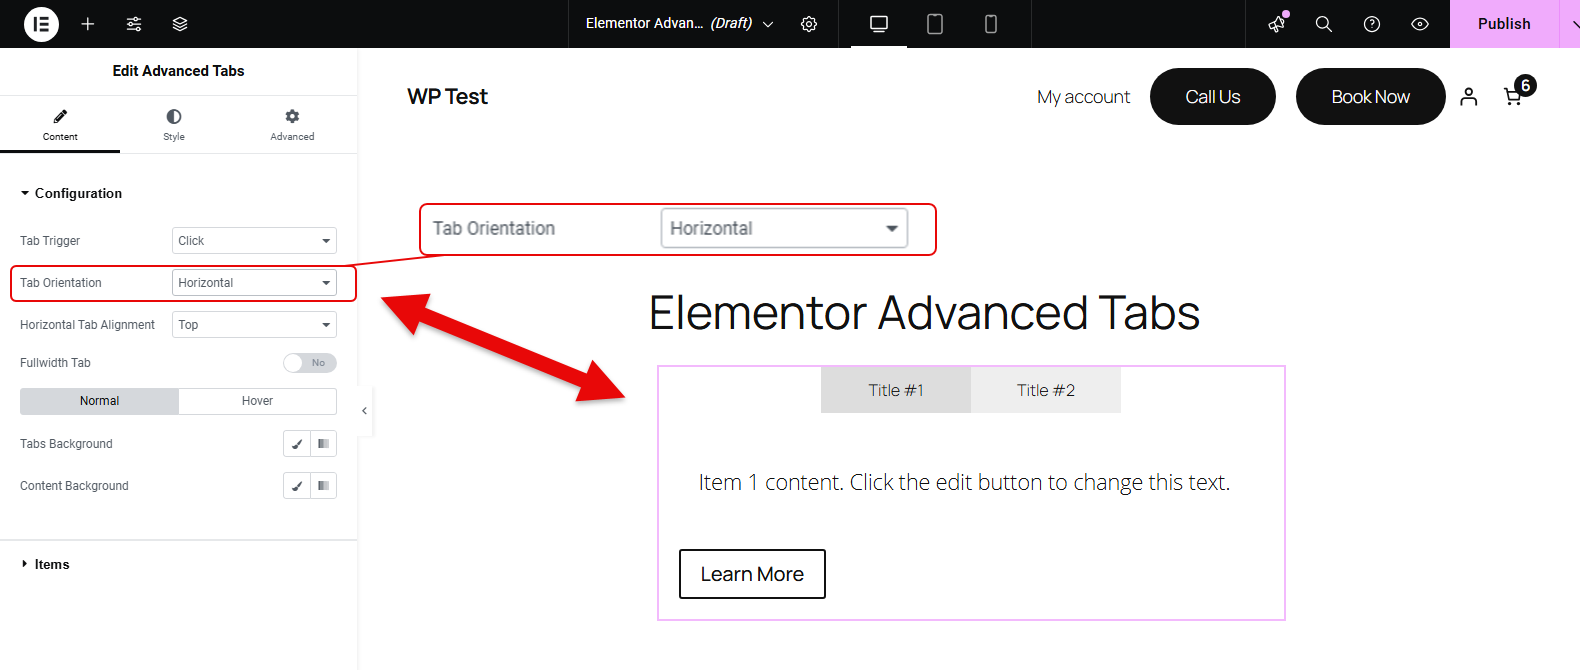
Horizontal/Vertical Tab Alignment
After selecting the orientation, the next option you get is Tab Alignment based on Orientation. This lets you set the Tabs switch on:
- Top / bottom for Horizontal
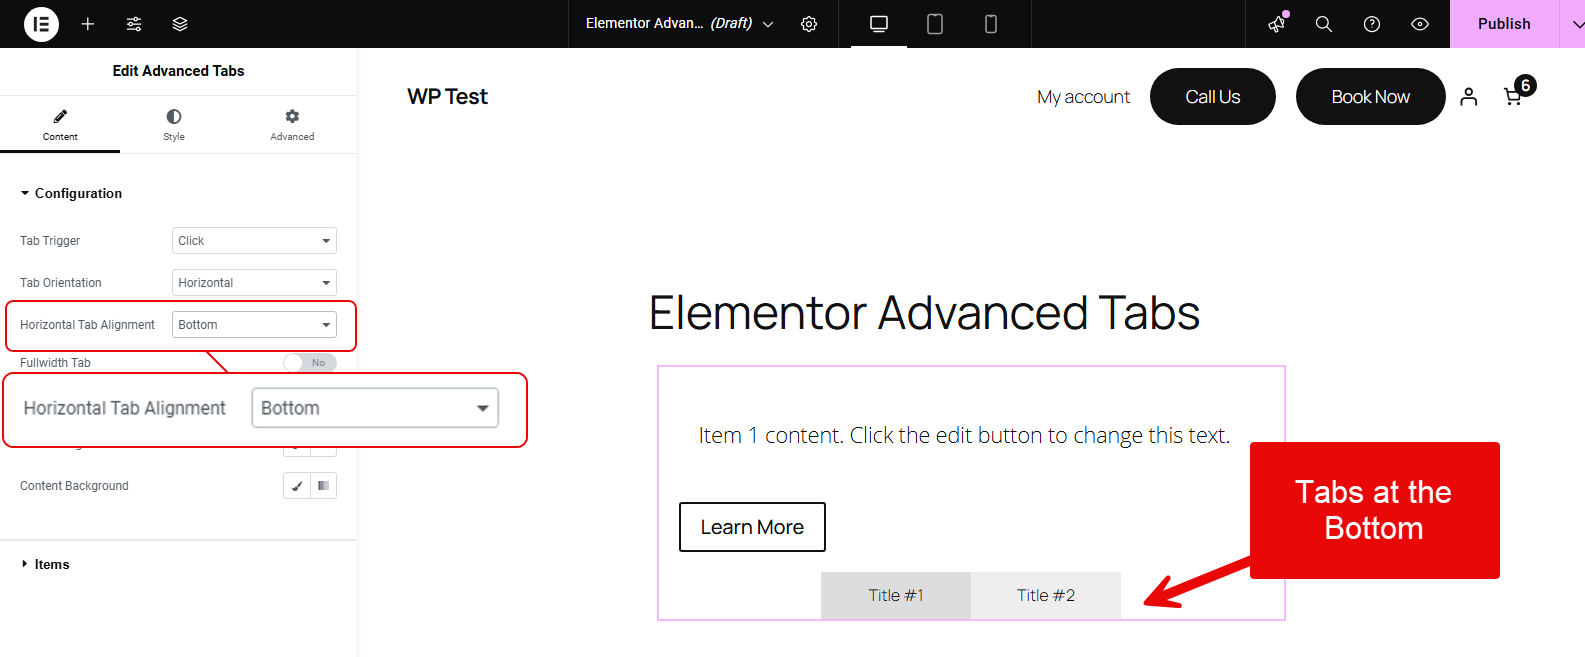
- Left/right for Vertical
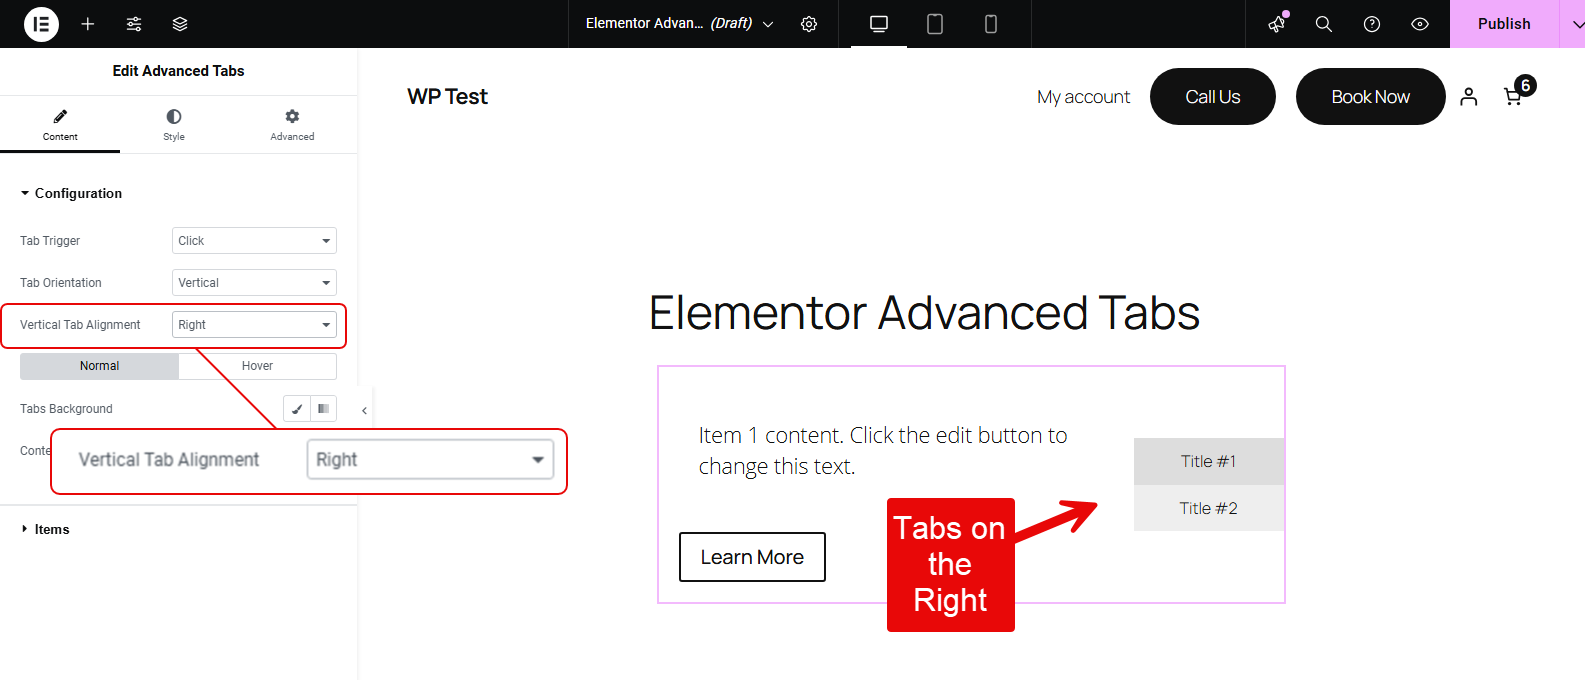
This is a unique feature for Elementor tabs enabling you to make your vertical or horizontal tabs more flexible according to the project requirements.
Change Tabs Background and Content Background
After customizing the layout of the tabs, you get the option to change the color of the tabs and content.
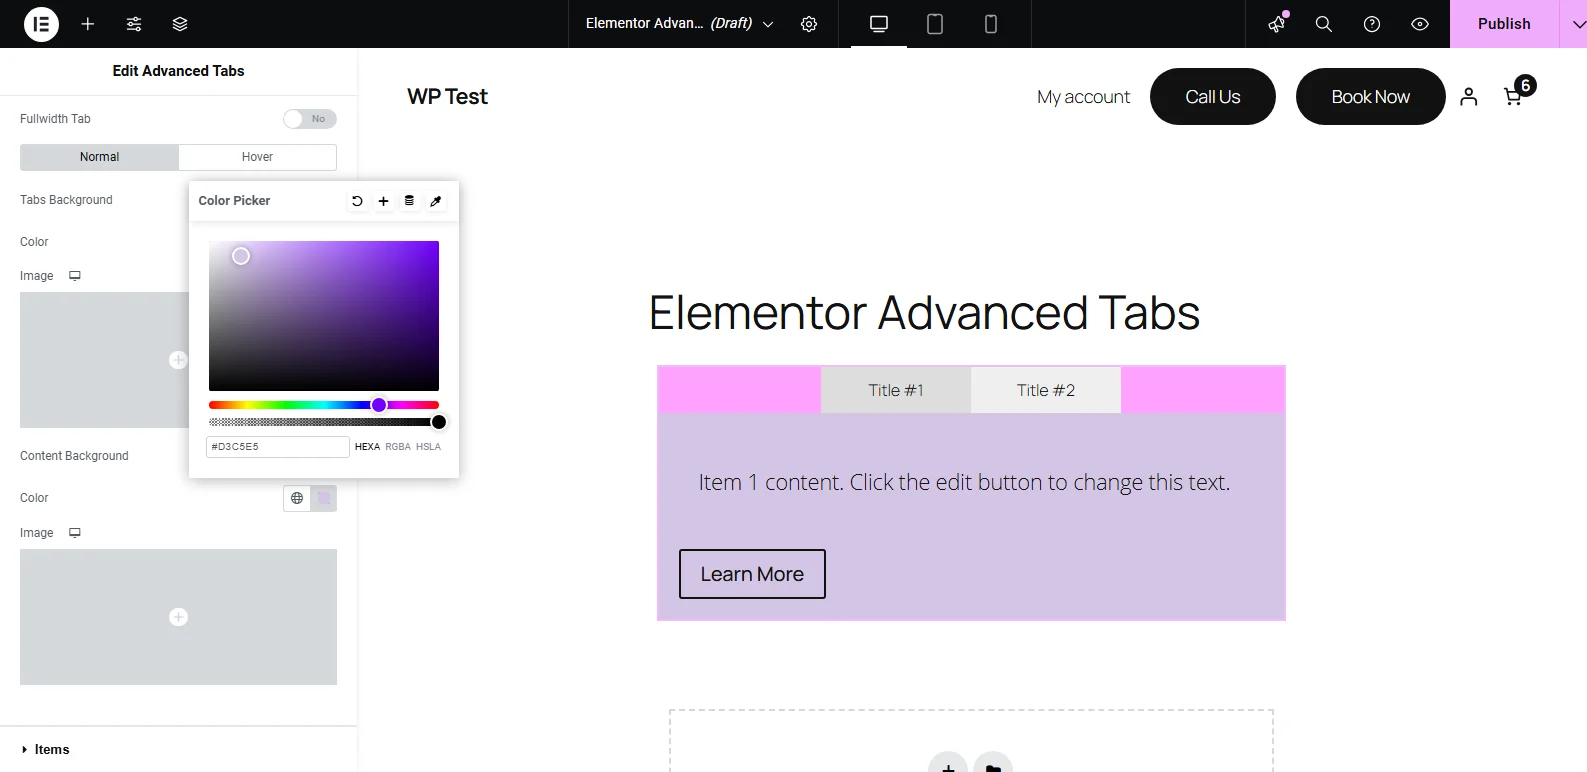
You can also change the color for the Normal and Hover state. Simply, switch to the Hover tab and apply your customizations.
Note: If you have applied color changes to tabs individually while adding the content, then background color change will only apply to those tabs that were not edited in their individual settings.
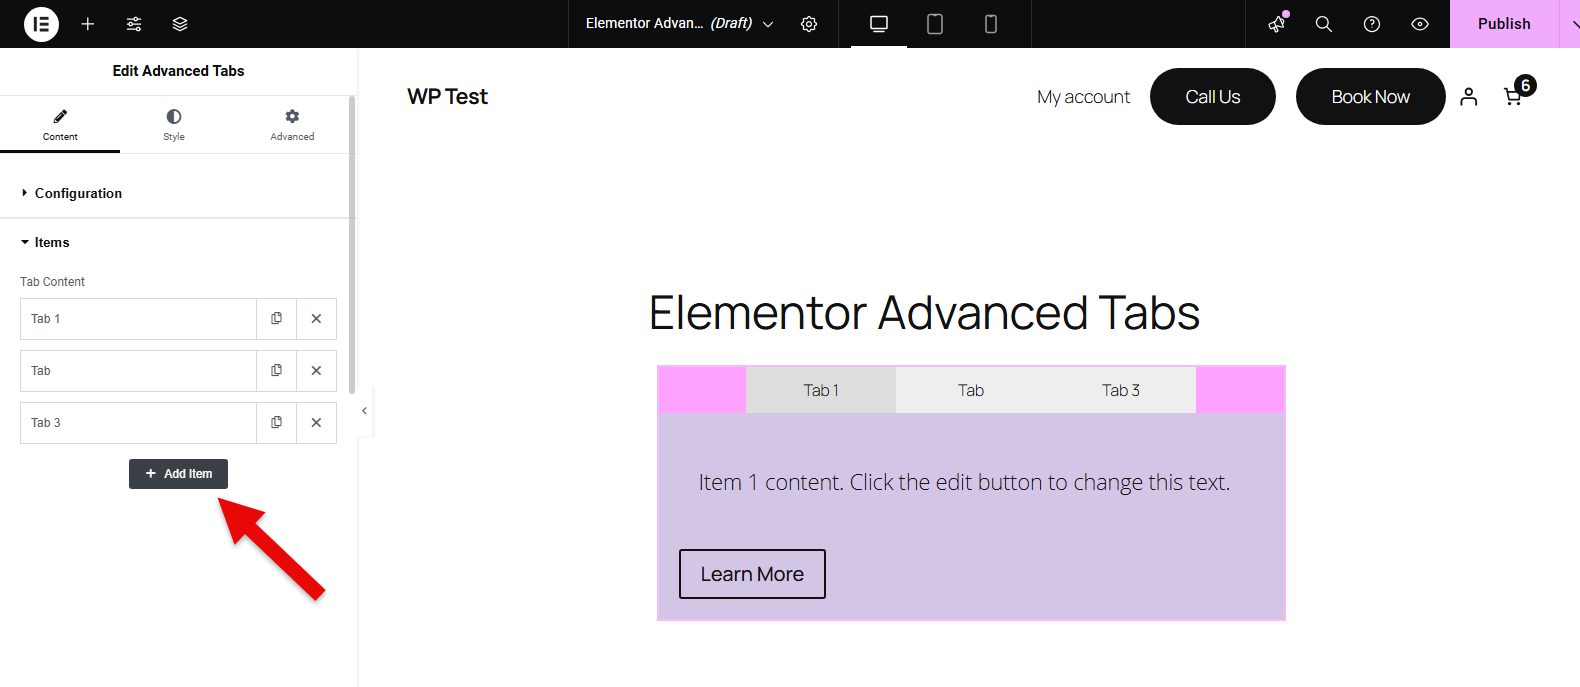
Add New Tabs
When you click the Items option, it allows you to add as many tabs as you need. You can even duplicate the specific tab if you want it to remain with the same layout.
Add Content to the Tabs
Select any of the tabs and you will see the content input box.
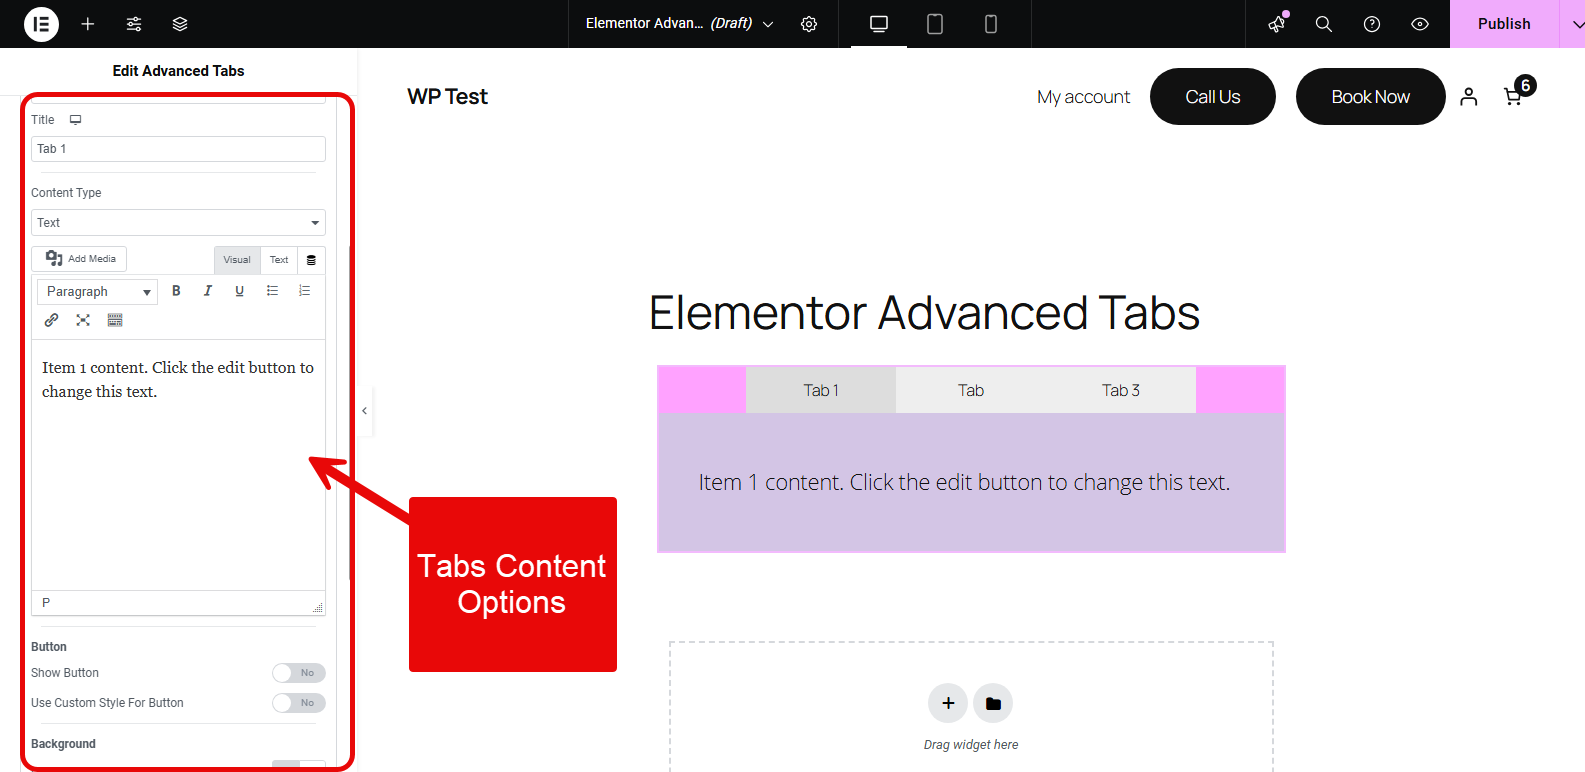
You can add content of your choice, change the title, add links to the title, add media, etc.
First, you get the Title Type. It lets you add a title as:
- Simple text
- Text with Icon
- Text with Image
- Icon only
- Image only

If you choose Icon, you get the option to add the icon. If you choose Image, you get the option to add the image. Likewise, you need to do the same with text with icons or image.
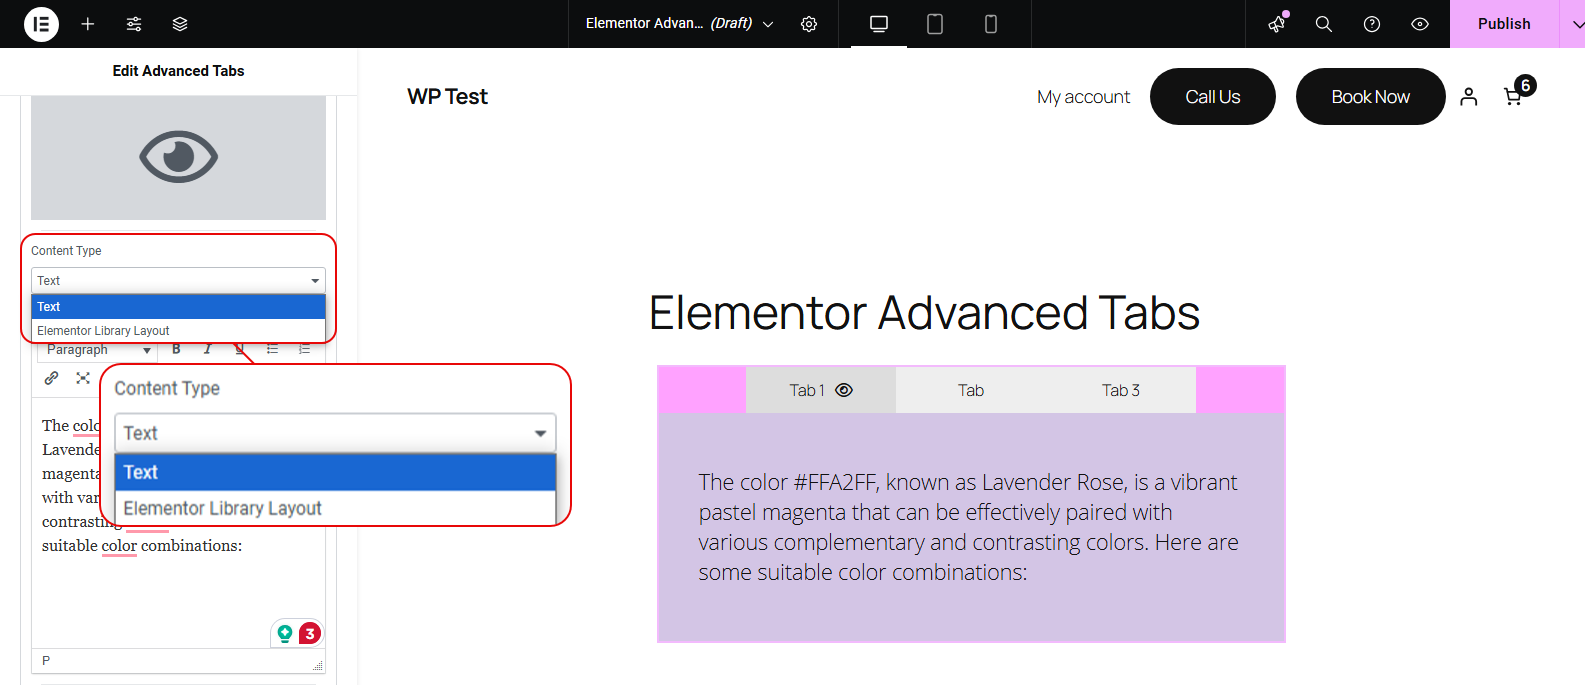
After this, you get the Content Type option. It allows you to:
- Add text
- Elementor Library Layout
Add a Button in the Tabs
What’s good about the Elementor Advanced Tabs widget by WPMozo is that you can show the button as well. The setting is found when you add the content.
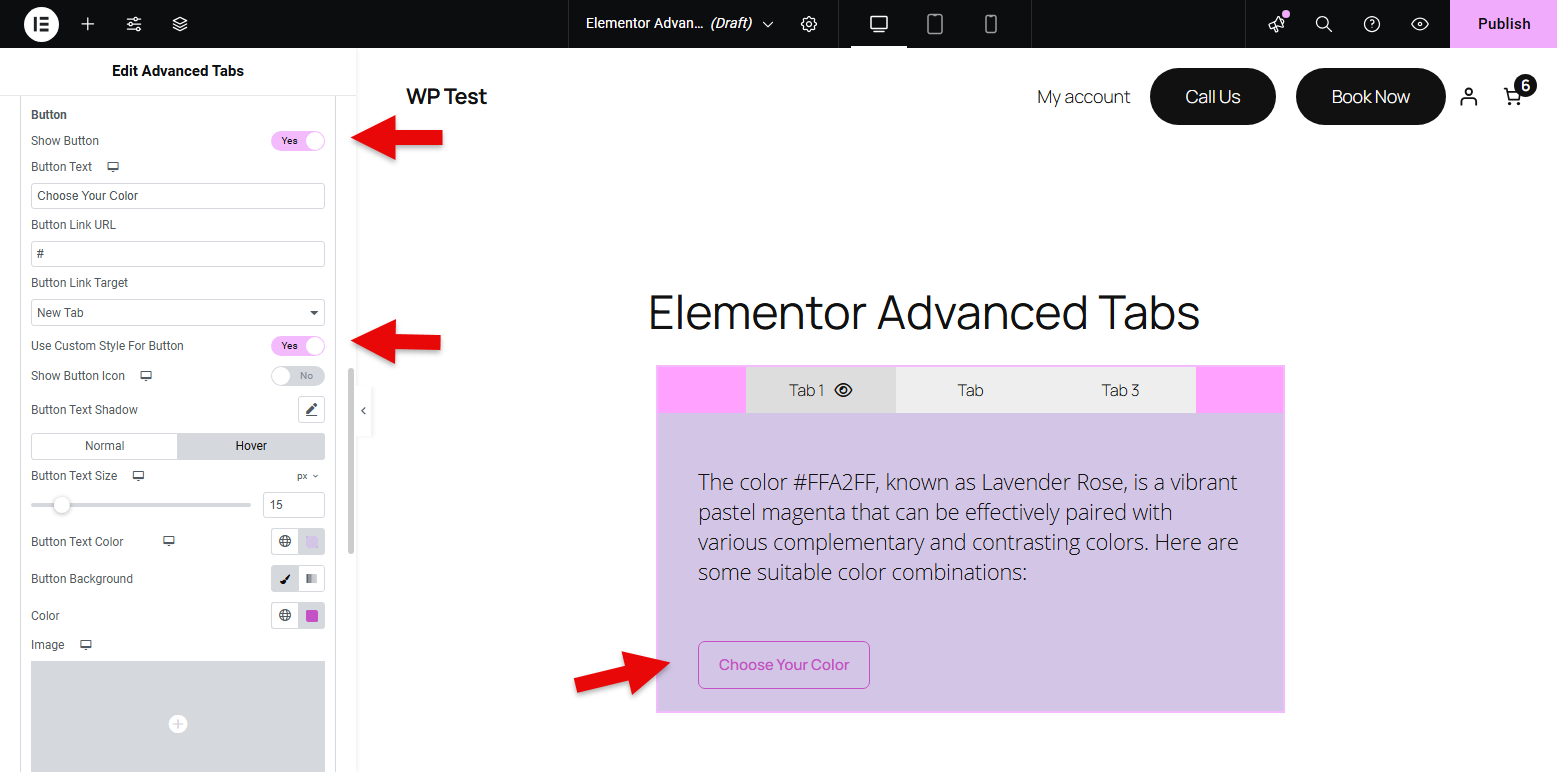
Simply click the Show Button and the tab will start to display a button. Once it is enabled, you can customize it further, like custom styles, button text, and link open target.
Change Background Color
You can proceed to change the background color of the tabs’ content.
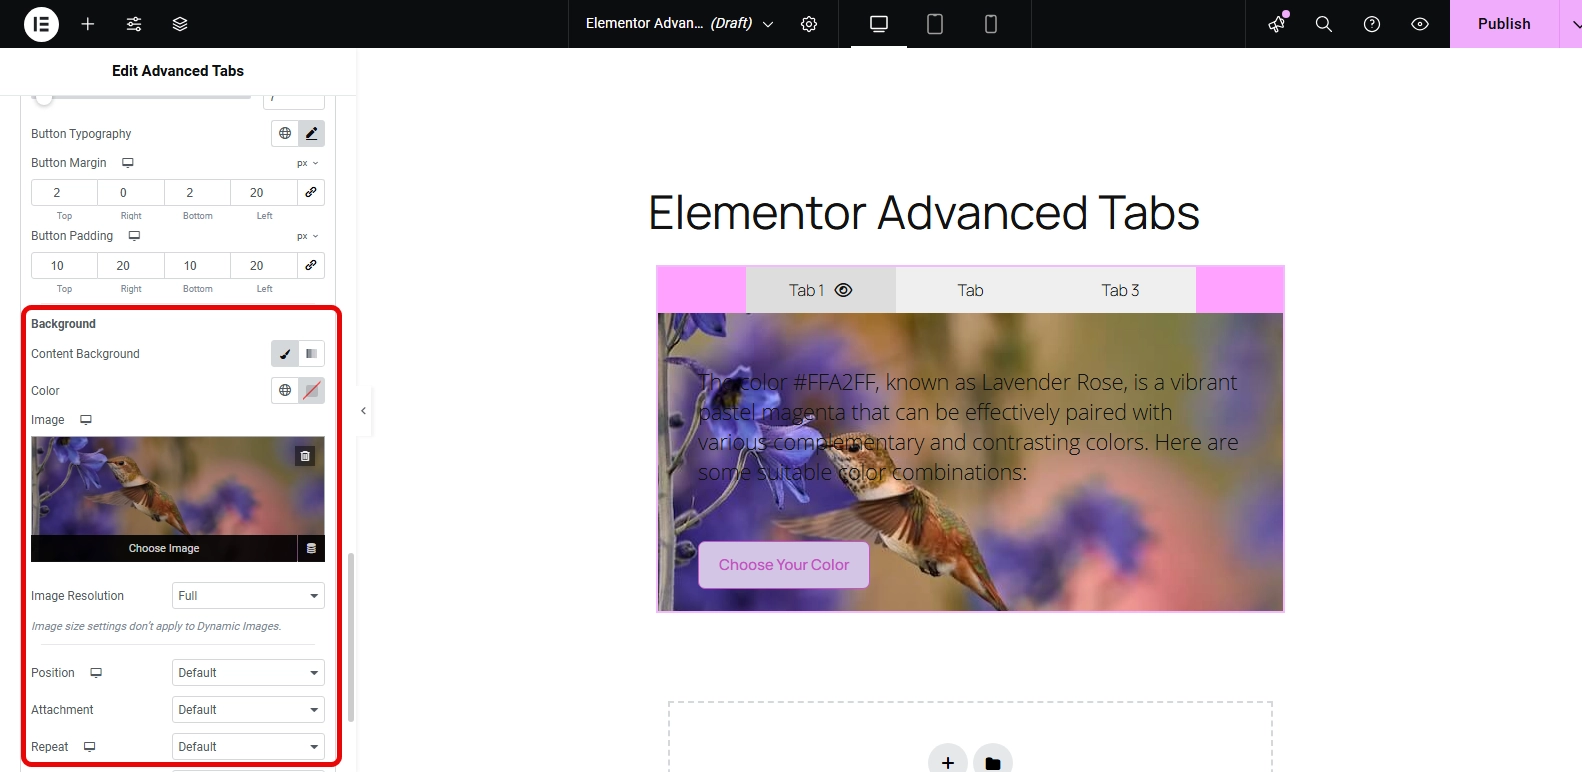
Each can have a unique color, or you can have the same color for all. You can choose to display color or gradient, and if needed, you can display an image in the background as well.
2. Style
The style section features a wide variety of tab customization options that you can use to ensure your content is presentable and appealing to the eyes.
Customize the Tab Title
The Title of the tabs is a crucial element, without it, the user won’t know which tab holds what information. Therefore, you get the Tab Title option.
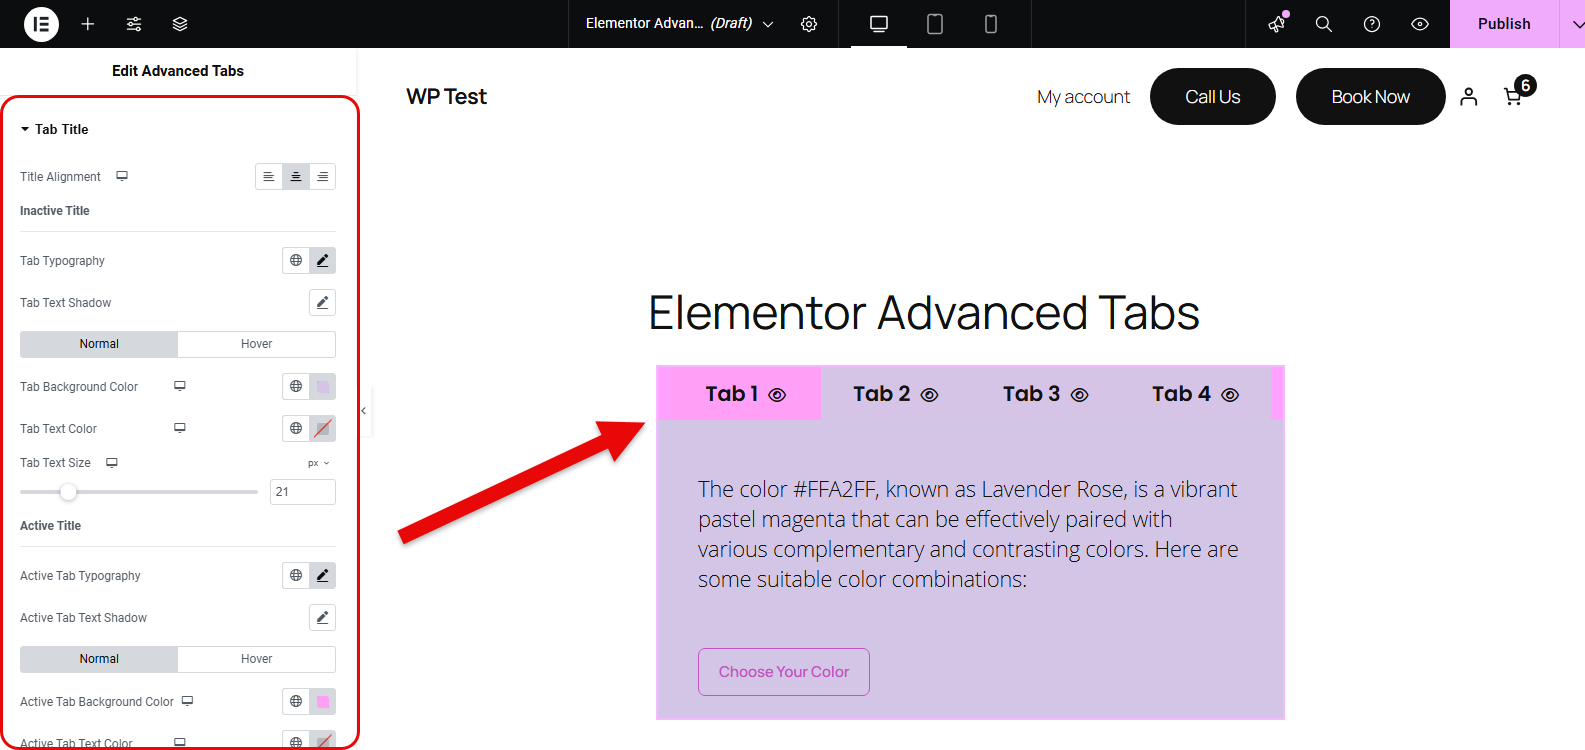
Here, you can:
- Change the Title Alignment
- Apply Typography customizations on Active and Inactive Title
It also lets you configure the customizations separately for the Normal and Hover state.
Change Alignment of The Tab
You can also change the alignment of the tabs to be aligned toward the left, right, up, or down.
Customize Icon
If you choose to display the Icon with Text, then the Icon option provides you with settings to customize it.
You can change icon size, and color for inactive and active tab icons, and for Normal and Hover states.
Modify Content’s Typography, Color and Text Shadow
After customizing the icon, you get the option to improve the tabs’ body.
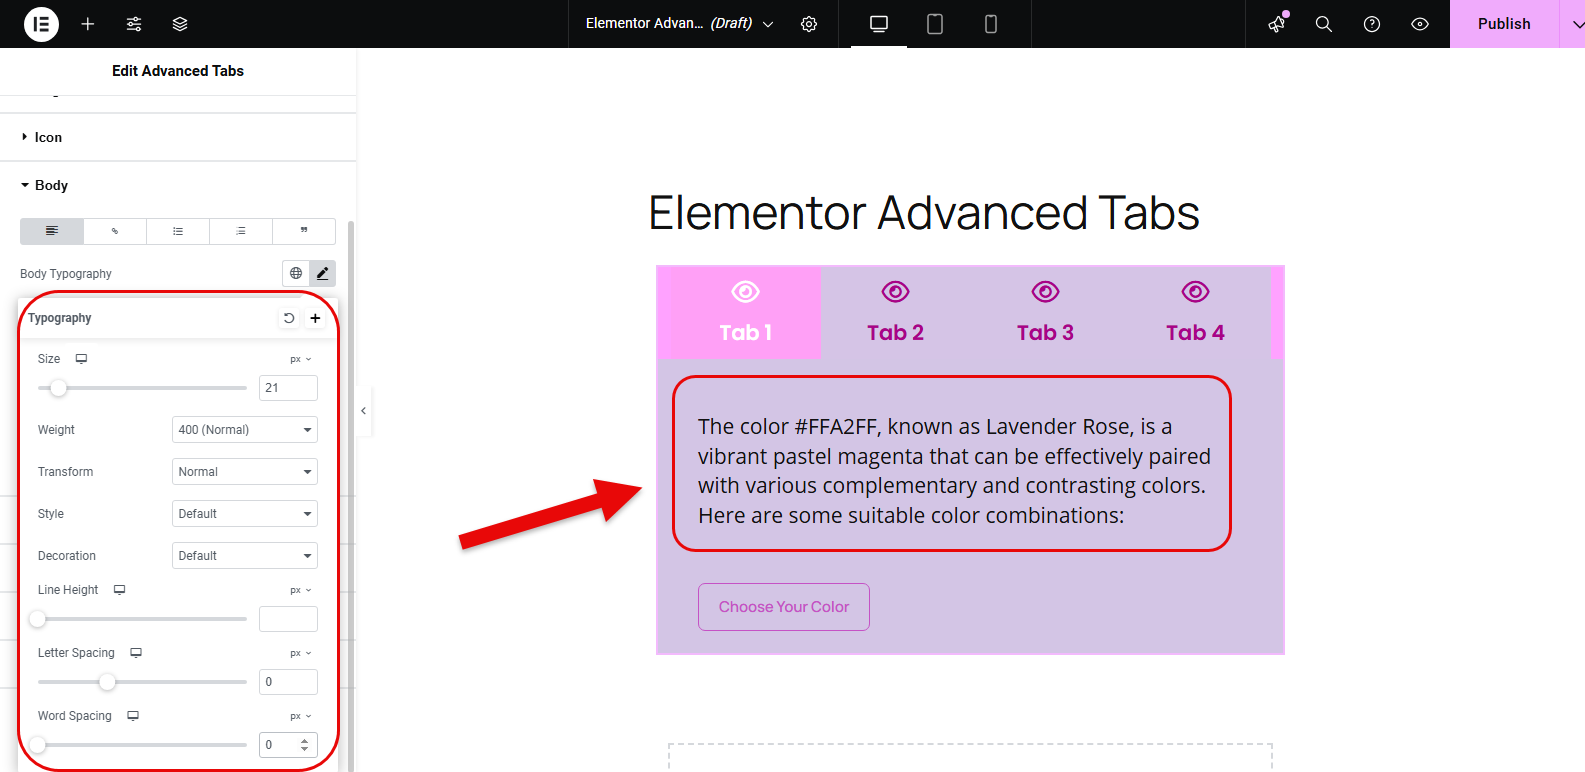
Access Body, and here, you get the options that let you change the content’s font type, font size, font weight, style, capitalization, decoration, line height, line spacing, word spacing, text stroke, and text shadow.
You can also change the color of the text according to how you prefer it. Make sure it is easily readable and aligns with your website’s theme colors to prevent it from seeming out of place.
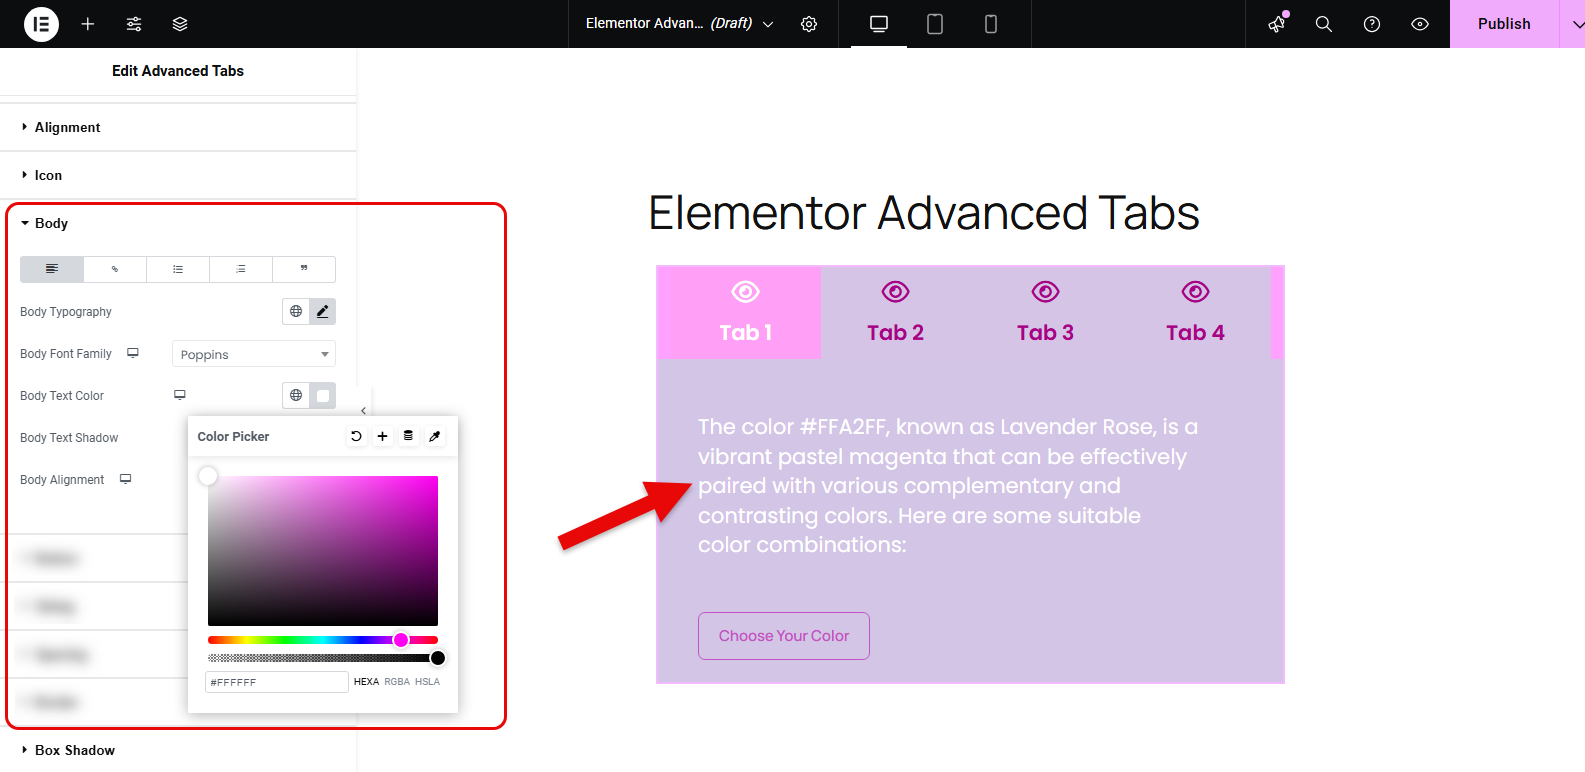
In addition to the content, you can apply the same text customizations if the body includes:
- Link
- Unordered list
- Ordered list
- Bullquote
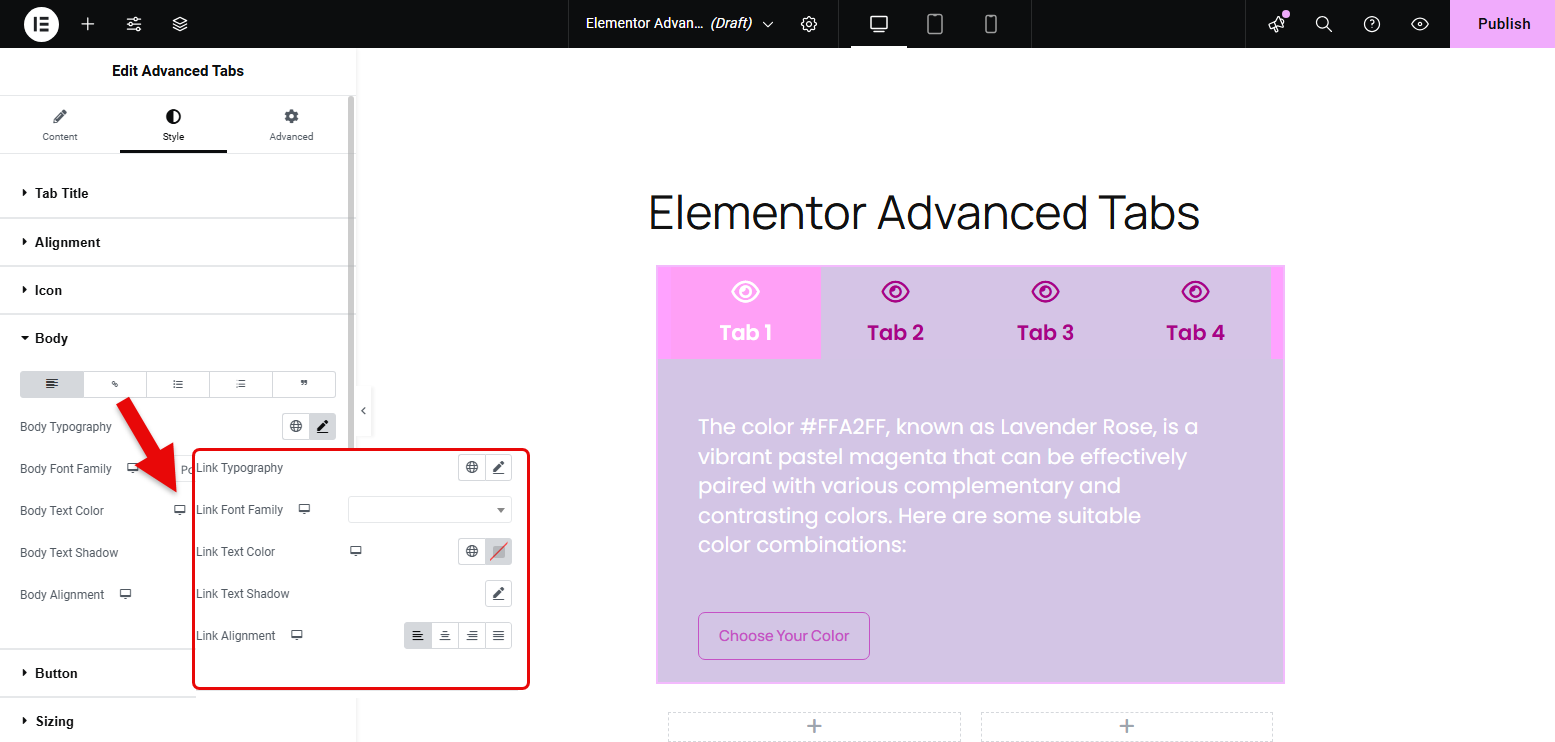
Simply switch to the dedicated body type and apply the tweaks.
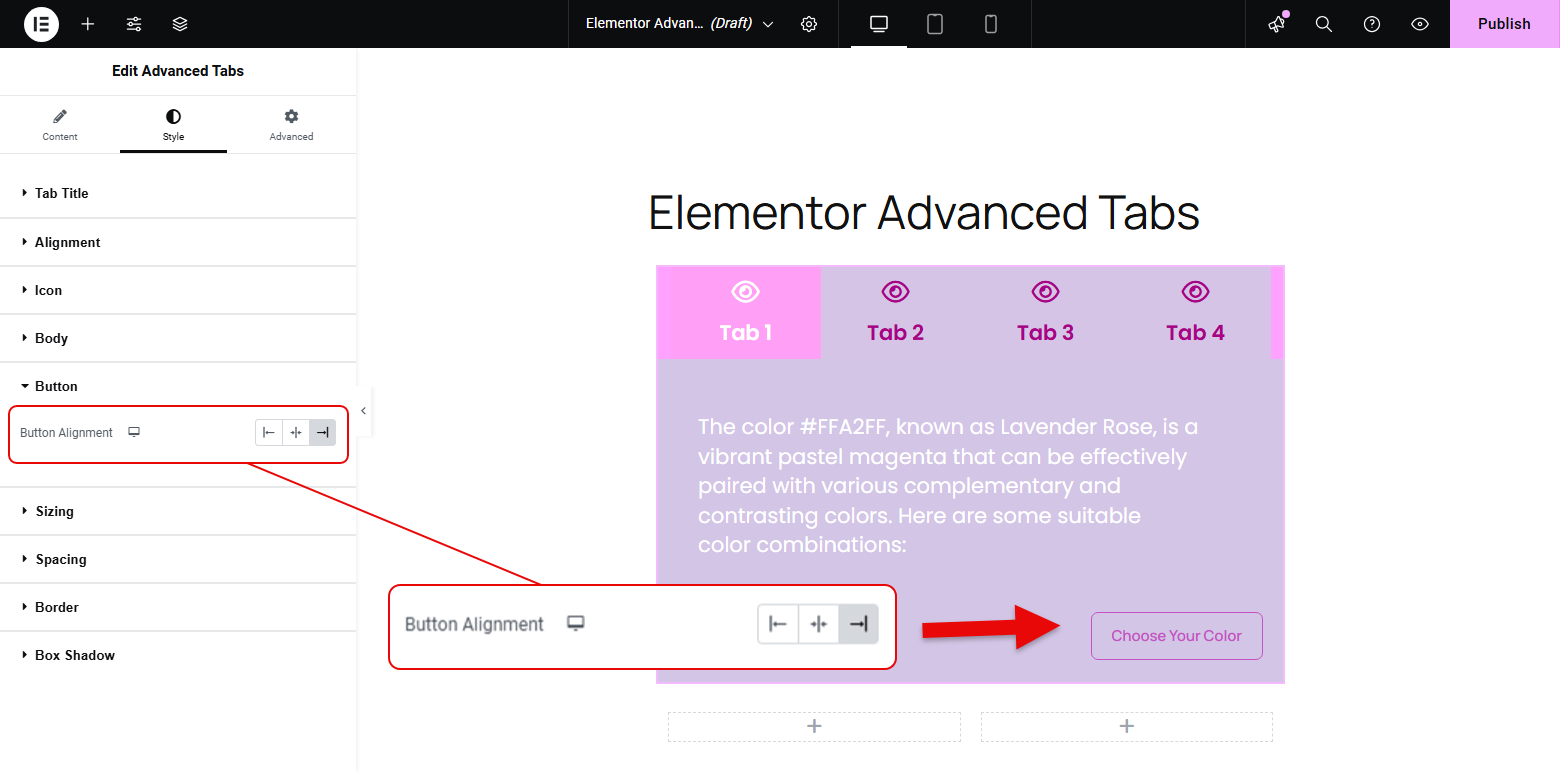
Change Button Alignment
The Button option available in the Style tab lets you change the alignment of the tabs button to Left, Right, and Center.
Change Tab Size
When you access the Sizing option, you can adjust Tabs size and icon size in terms of width.
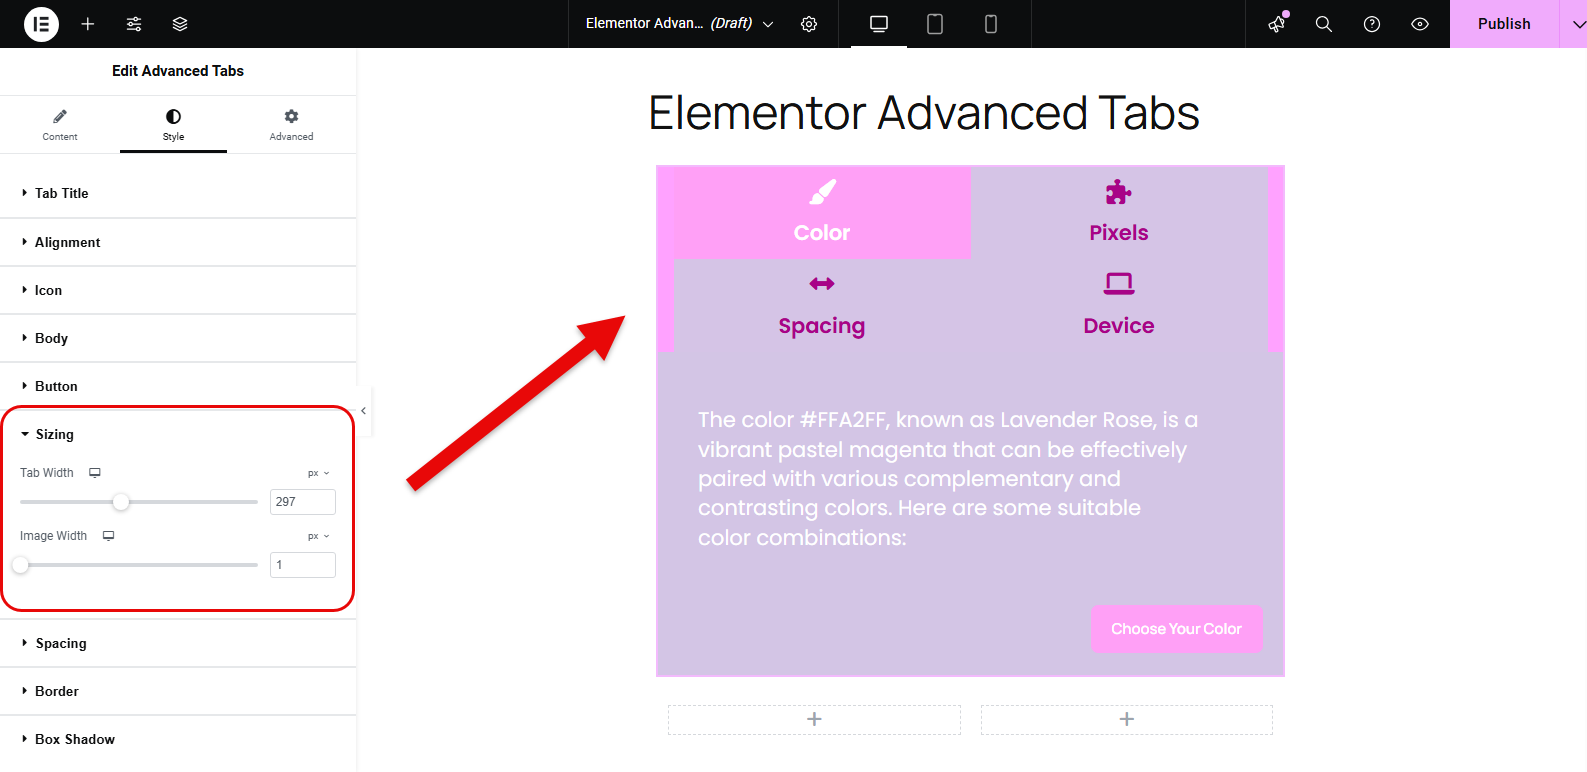
To change the Tab size, simply utilize the Tab Width option. If you need to change the icon’s size, utilize the Image Width option.
Change Tabs to Fullwidth
Above, the tabs we have created show some gaps on the left and right of the first and the last tab. But you can easily modify that by enabling Fullwidth tabs. To do that, you need to go to the Content → Configuration → enable Fullwidth Tab, and this will remove the excessive gap from either sides.

So, this is how you can create advanced tabs using the WPMozo Elementor widget. What we have explored are the dedicated features of this widget. However, if you want to utilize the native options of Elementor on this widget, you can do that as well effectively. In the below section, we will explore that subject.
3. Utilizing Elementor Native Options (Advanced Tabs)
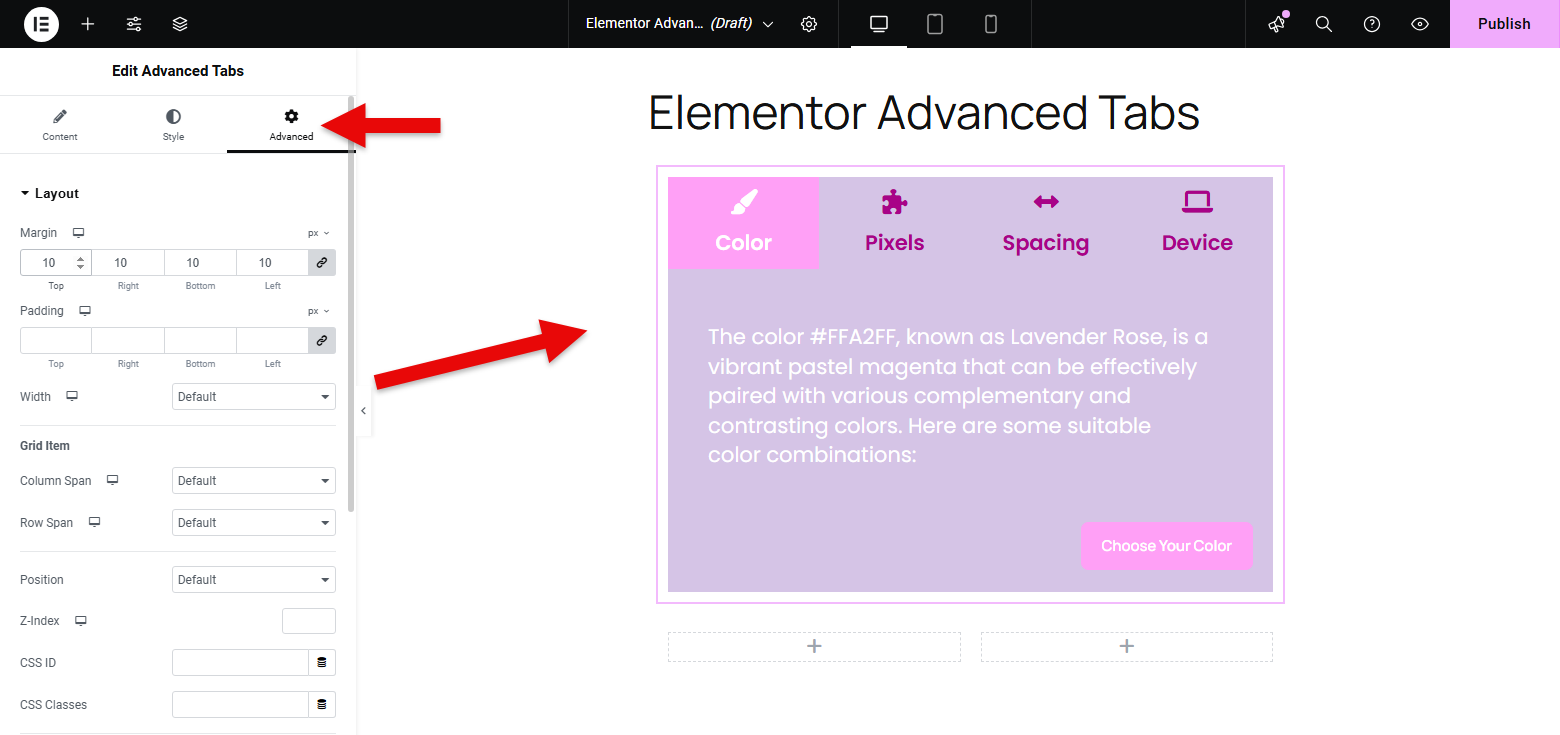
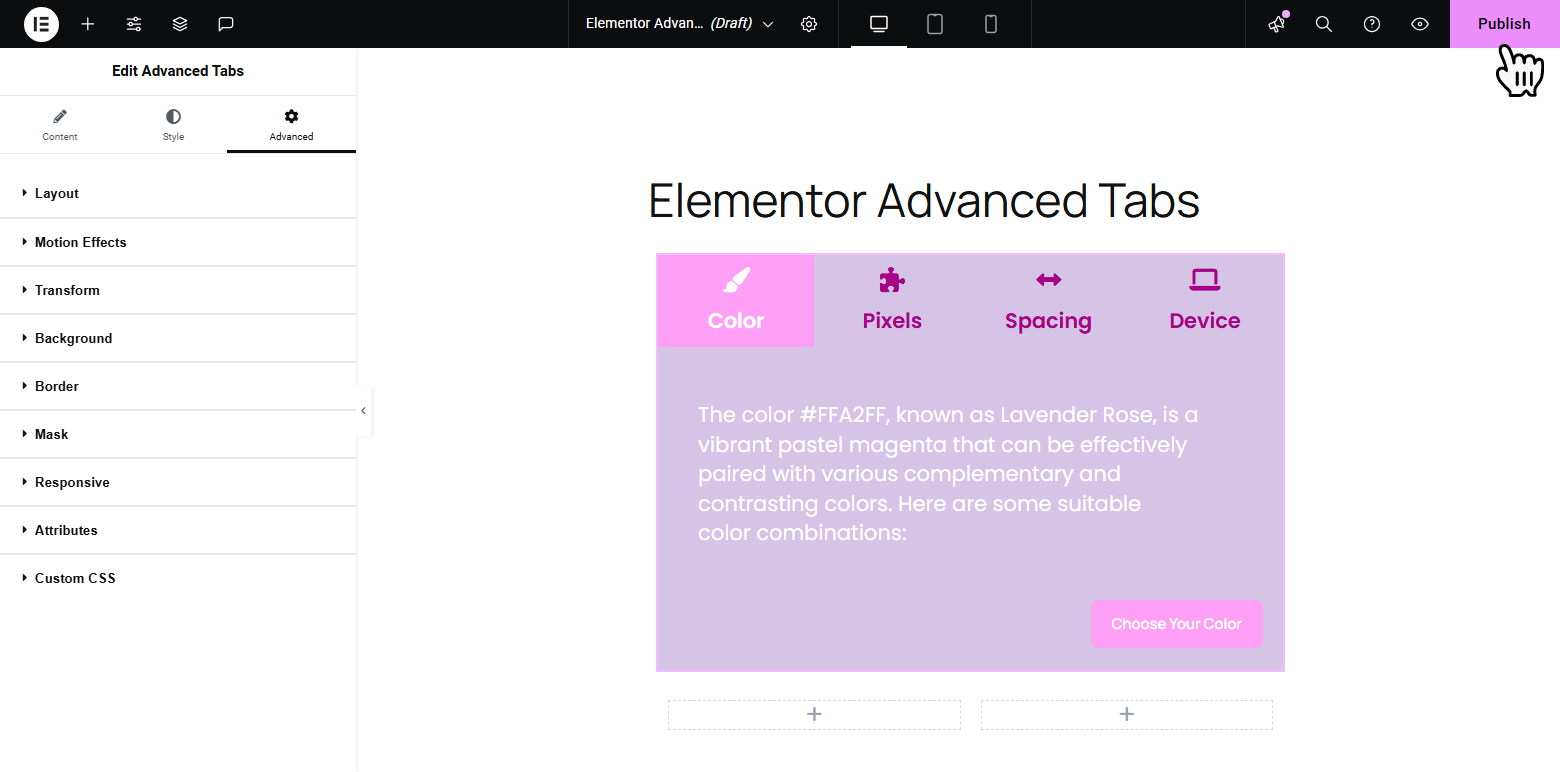
On the advanced tabs option, you can make relevant changes to the layout, motion effects, transformations, background, border, mask, responsiveness, attributes, and custom CSS.
Layout
Through the layout settings, you can change:
I) The Margin & Padding (Top, Bottom, Right & Left) – which change the spacing between different Elementor advanced tabs elements. Positive margin value increases space, while negative values decrease space. The padding affects the space between the content and the element’s border.
II) Width – You can change the width to be full-width, inline, or custom. When you choose:
- The auto option – the width is determined by the content itself.
- Full width option – it takes the full width of the container.
- Inline – automatically adjusts to the width based on the content.
- Custom option – it allows you to specify the specific width value.
III) Column and Row Span – which specifies the number of columns or rows a cell should span or merge.
IV) Alignment – The option allows you to change the alignment of the different Elementor advanced tabs to be vertical, horizontal, etc.
V) Position – You can select absolute, fixed, or default position. The default position allows you to let the elements to stay in its natural state. On the other hand, the absolute position allows you to manually place the X and Y positions based on how you prefer. Ultimately, the fixed position option allows the tabs to remain in the same custom position even when scrolling occurs.
VI) Z indexing – It allows you to specify the stacking order of the tabs.
VII) Add Additional CSS – You can add unique CSS to make the tabs look much better. However, you need to be knowledgeable about CSS.
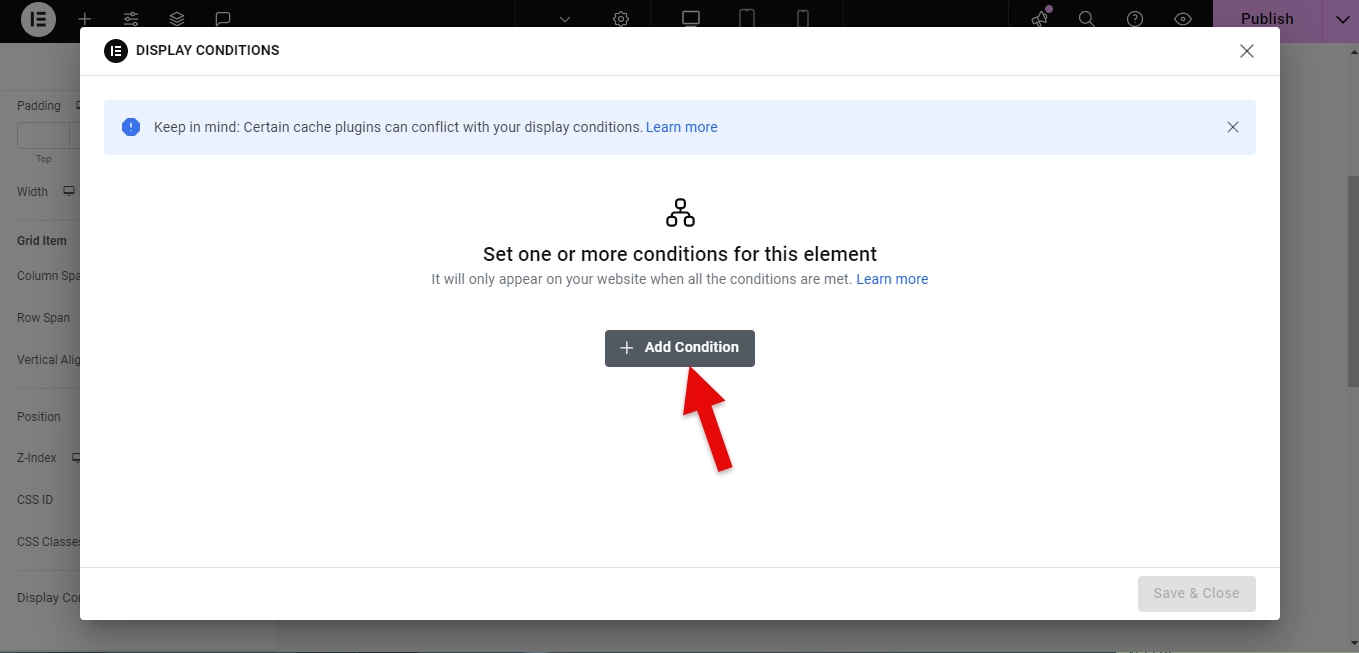
VIII) Display Conditions – You can also change the circumstance in which a certain tab should appear.
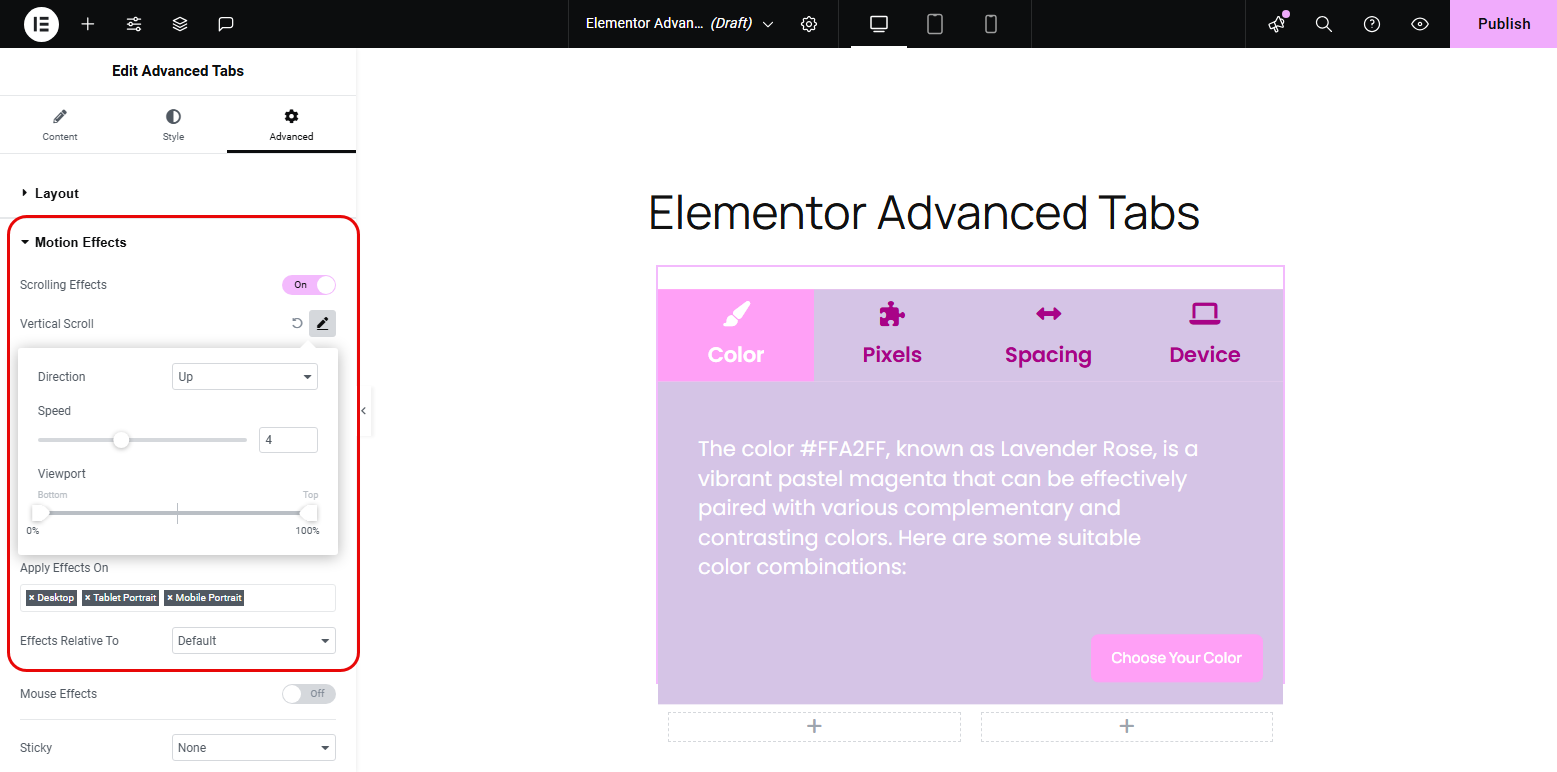
Motion Effects
The motion effects option allows you to change the:
I) Elementor Scrolling Effects – If you toggle on the scrolling effects, you can make some modifications such as the vertical scroll, horizontal scroll, transparency, blur, rotation, and scaling. You can also choose on what devices the scrolling should be active and effects.
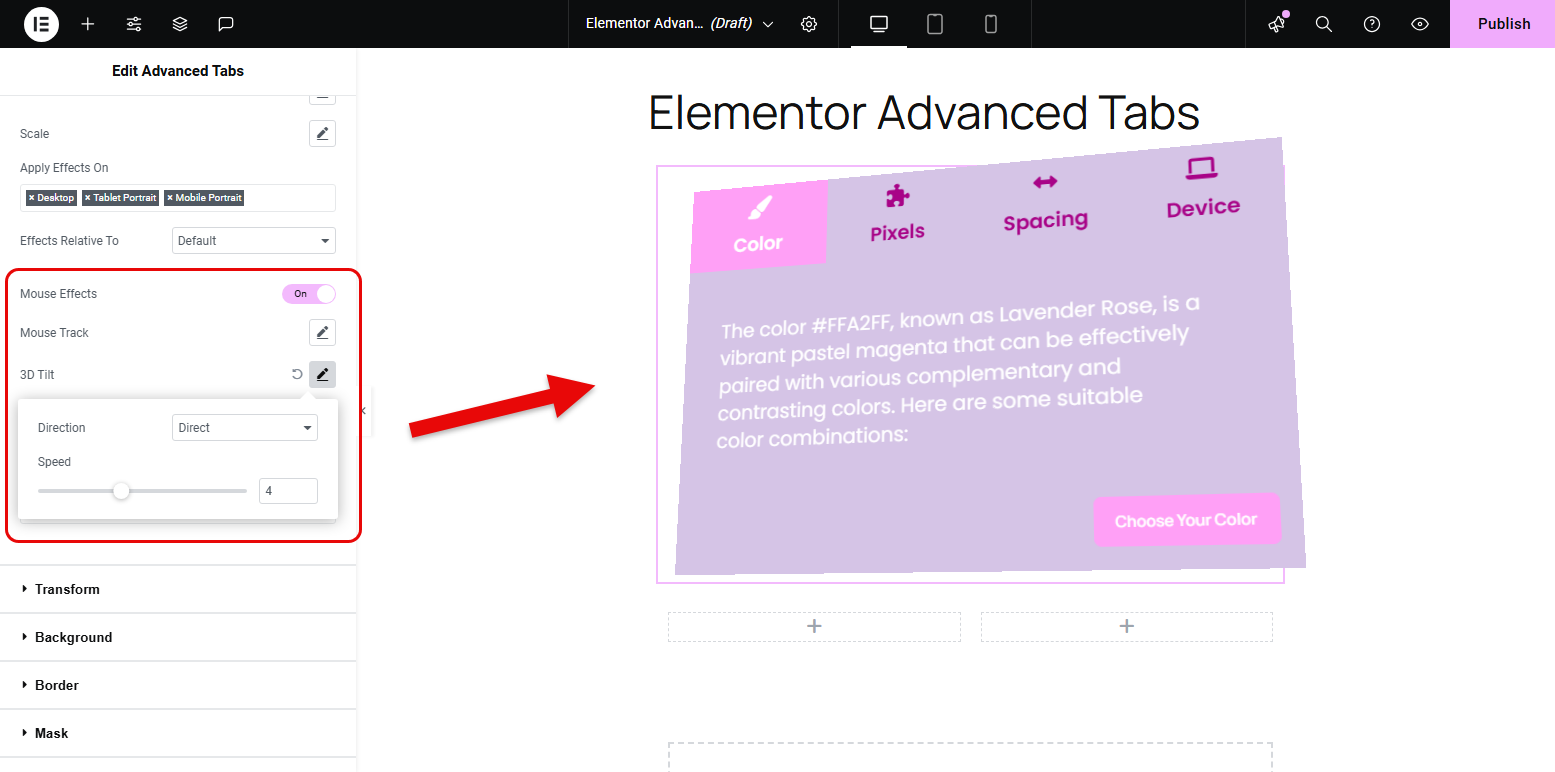
II) Mouse Effects – When you toggle on mouse effects, you will be able to change what the mouse does; it can cause the Elementor advanced tabs to have a 3D tilt or mouse track.
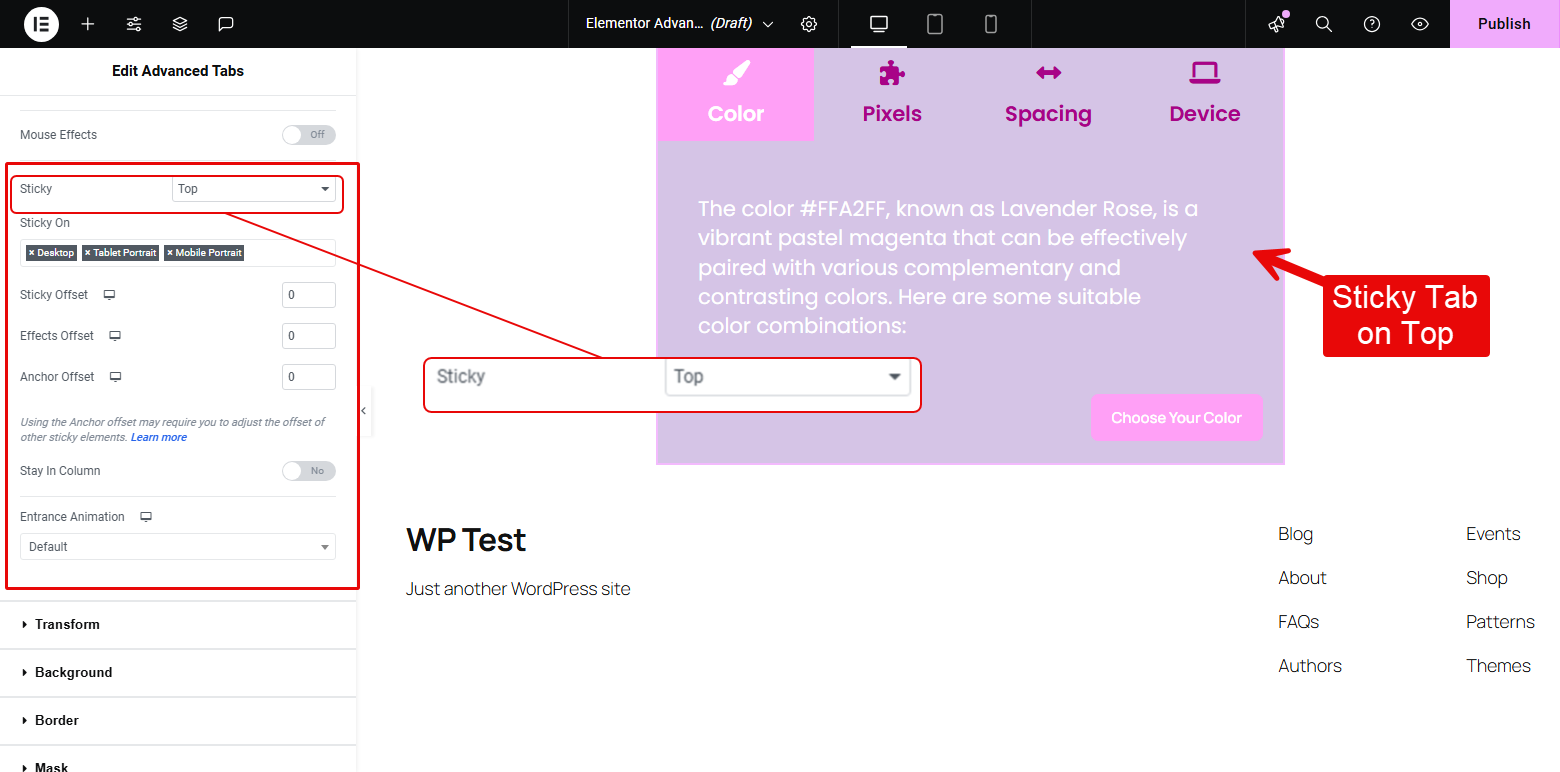
III) Sticky Content – You can also change the stickiness of the content to either stick to the top or bottom. It can be based on sticky, effects, or anchor offset stickiness. You can also allow it to stay in the column or not.
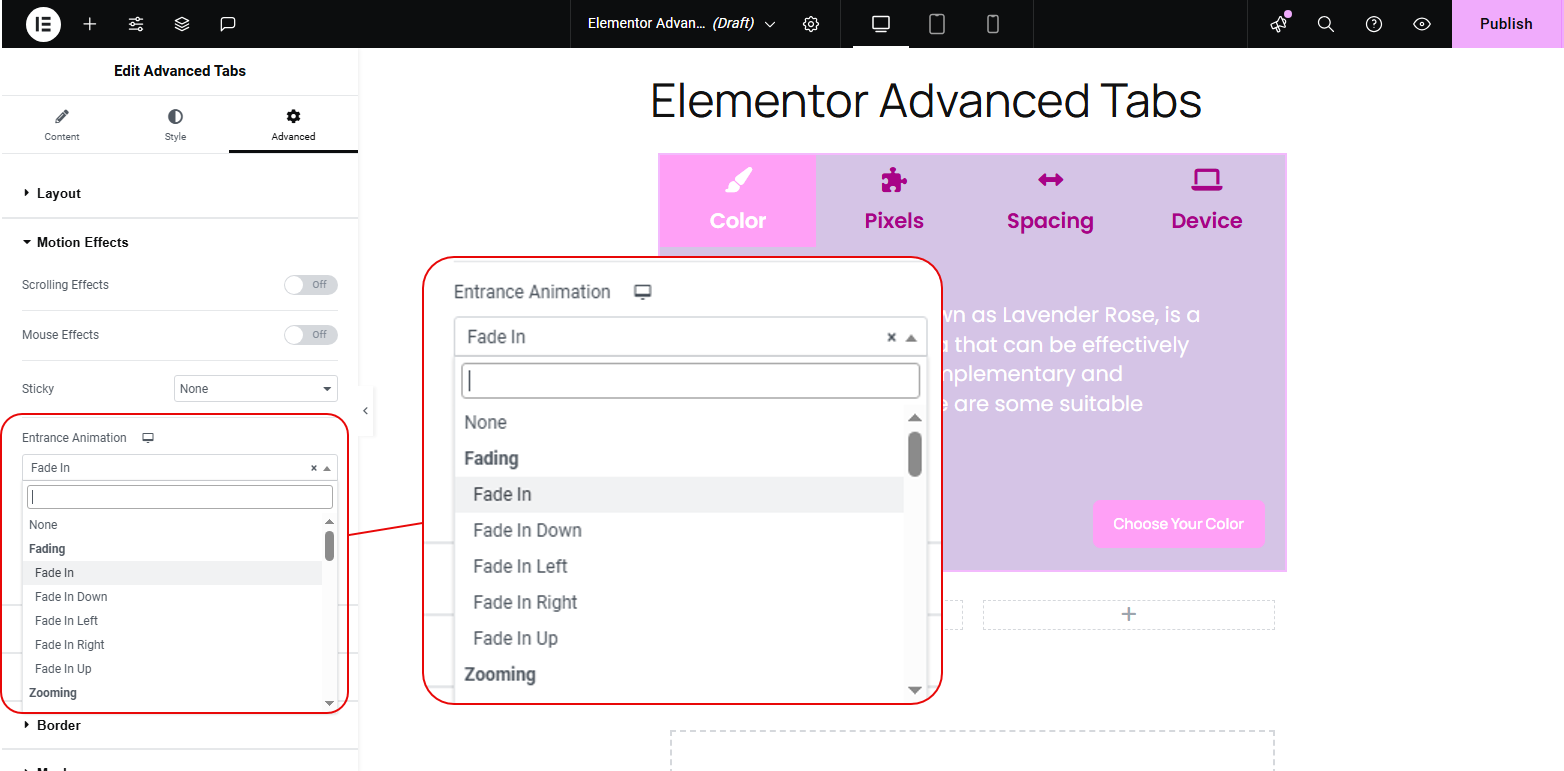
IV) Entrance Animation – You can change how the Elementor advanced tabs appear on the screen. Therefore, you can modify using the different animation effects like fade in, fade out, bounce in, slide out, etc. Additionally, you will be able to modify the animation delay and animation duration.
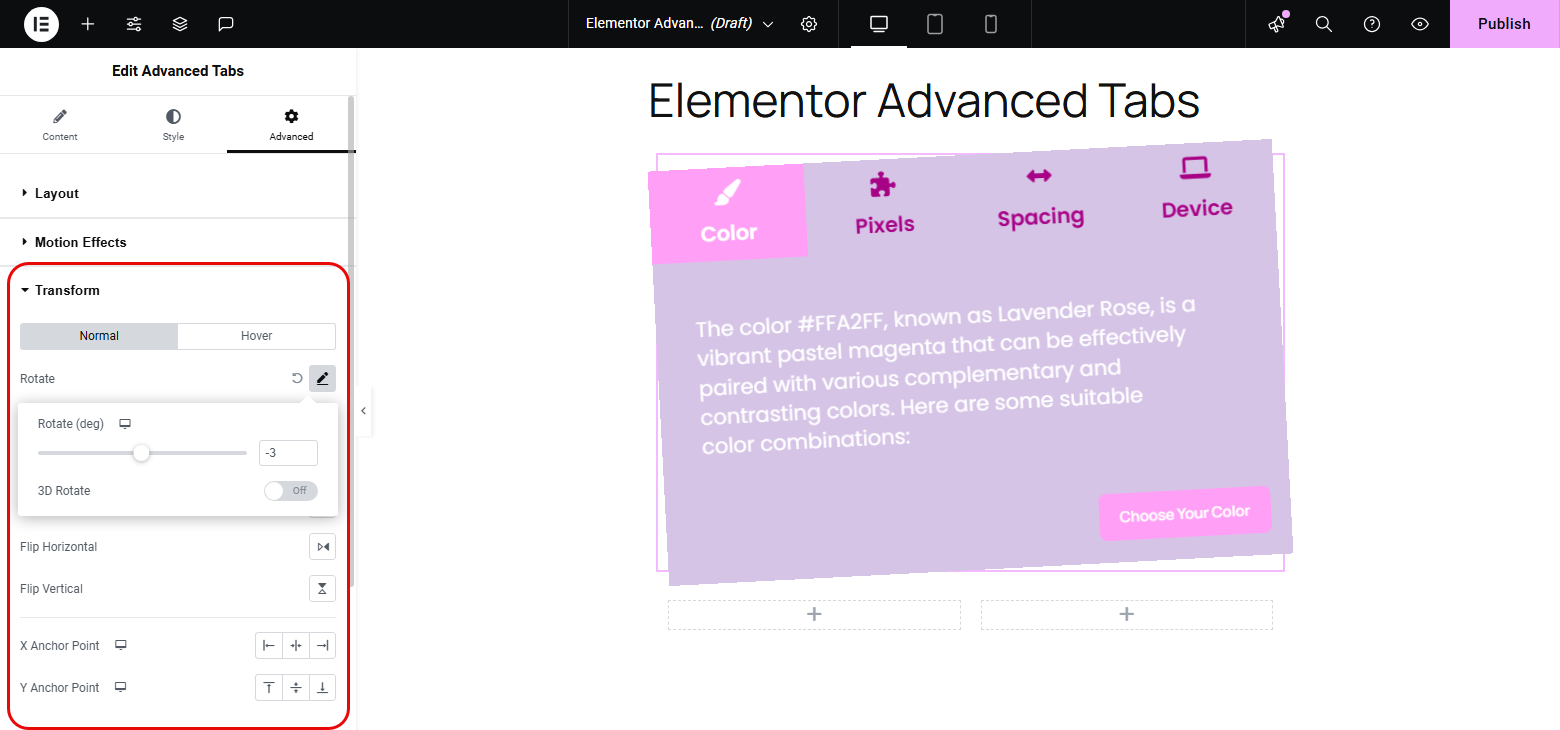
Transform
I) Normal Effect – Through the normal effect option you can change the tab’s rotation, scale, offset, skew, flip horizontally, flip vertically, X anchor point, and Y anchor point. This will change how the tabs appear based on how you feel. You can change the settings a couple of times till you find what works best for you.
ii) Hover Transform Effect – The hover transform effect will only occur when someone hovers over the content. Therefore, you need to choose some amazing effects that your target audience will be amazed at.
You can change the rotation, offset, skew, scale, horizontal flip, vertical flip, transformation, Y anchor point, and X anchor point. Therefore, when someone hovers over the content, the transformation will occur, and when in a normal state the “normal transform effects” will occur.
Step 6: Save Your Work
Likewise, you can use other native options of the Elementor page builder for customizing Advanced Tabs widget. Once done, click on the publish option at the top of the page. You can then preview the page to see how it will look on the website.
As easy as that.
What Is the Importance of Using Tabs On Websites?
There are various reasons why you need to use advanced tabs for Elementor on websites:
1. Increase Familiarity and Content Organization
Tabs are used to facilitate familiarity between the user and the website. The tabs help to divide content into sections for easy readability. Therefore, users can access what they want easily.
2. Group Content
The website tabs are used to show alternative views of a similar group of information and ease the navigation process.
3. Improve the Visual Aspect of a Website
Tabs can improve the visual aspect of a website, hugely. They add an interesting UI element that makes the website more intuitive.
4. Optimize the Use of the Screen
Tabs are also great when the space is limited, and you want to optimize the use of the available screen.
Best Practices for the Use of Tabs on Websites
To ensure the tabs meet their goals, there are certain guidelines you need to follow. These include:
1. Make Sure the Tabs Look Realistic
When creating tabs for your website, ensure they look and behave like they should. They shouldn’t be confusing to use at all. Also, don’t stack up tabs on top of each other. No double navigation unless you want to introduce hierarchy within the tabs.
2. Place the Navigation Tabs at the Top
If the tabs are for navigation purposes, you need to place them at the top of the page to ensure easy visibility so that they can get the important information they need to get. However, the top should have the primary navigation tabs and secondary tabs can be placed elsewhere.
3. One of the Tabs Should Always Be Active/Pre-Selected
Also, ensure that one of the tabs is always pre-selected so that users can be able to locate it. Ideally, the active tabs should be easy to notice – the color can be distinct or even have a larger font size than the other inactive tabs.
The inactive tabs should be a bit dimmed or faded so that they don’t take up all the attention of the active ones, however, they should still be easy to read so that users can’t just dismiss them.
4. Arrange the Tabs Systematically
Another key thing is to arrange the tabs systematically in an order that makes sense to the users. Place yourself in the user’s shoes to understand whether they can comprehend the information easily.
Also, ensure the tab labels are in plain language to give users the urge to click. Ideally, you can use one or two words for the tab labels for easy identification. Also, ensure the tab labels use the title-case capitalization but not all caps.
5. The Tab Content Should Load Fast
The tab content should appear in 0.1 seconds after clicking the tab. Therefore, even if you will have any animations or special effects ensure they are fast enough to ensure users can get the content
FAQs – Frequently Asked Questions
1. What are the different types of tabs?
The different tabs include pricing tabs used to display features & costs of certain products, category tabs mostly for online stores for easy switching between product categories, product info tabs to showcase features, reviews, descriptions, and reviews of products or services, and navigation tabs which are great to provide the menu of a website like about us, services, etc.
2. Why should you put tab labels in a single row?
This helps in the organization process to prevent any overcrowding or confusion. Therefore, you ought to use the right editing or customization features. Also, try and use a consistent style for all of them.
3. Which websites require the use of tabs for better user experience?
E-commerce sites, portfolio websites, comparison websites, online forms, and content-heavy websites.
Conclusion
The Elementor advanced tabs widget can help you modify the tabs to make them appealing to your target audience. You just need to ensure the active Elementor advanced tab stands out from the inactive ones so that they can draw users to want to check the information in each.
Also, ensure the tab labels are straight to the point to ensure that a user can decide quickly whether to check it out or not. Additionally, the content needs to appear within 0.1 seconds to prevent the user from feeling tired of waiting.
All the advanced tab settings make the whole tab creation interesting.
So, what are you waiting for? Modify your Elementor Advanced tabs to look impressive to your target audience!


0 Comments