
If you’re looking to create a post slider for WordPress on your website, then in this post, you can find the easy steps on how to do that.
I’ll share the step-by-step process that would allow you to create your WordPress post slider in the least time. There are two methods to create a post slider, and I’ll share both. Plus, some examples to inspire your design.
If you’re excited to create your post slider in WordPress, then let’s get started with the basics: What and why you should use a post slider on your website.
What is a WordPress Slider for Posts?
A post slider in WordPress is a carousel element on which you can display your blog posts and rotate them just like the following visual.
Website visitors can interact with it through slider arrows or by dragging it, and explore the content without scrolling or searching. It is a simplified way to provide your users with effortless content exploration.
Why Use a Post Slider in WordPress?
In addition to the improved interactivity, a WordPress post slider enables you to present your blog posts in an engaging way. Instead of just utilizing a grid or list layout, you’re making the post display something modern and aesthetic.
Furthermore, by using a post slider for WordPress, you’re:
- Saving space on the page
- Making content exploration easy
- Improved user sessions
- Showcasing posts where necessary
- Increased conversions
Now think for a moment, with all these benefits, how much good you can do with your content?
A lot, that’s the simple answer.
Therefore, if it is feasible, you should incorporate a post slider in WordPress and below that’s what we are going to see. We will explore the easy methods to add a post carousel in WordPress using Elementor builder. If you’re ready, let’s get started!
How to Create a Post Slider for WordPress (2 Easy Methods)
To build your WordPress post slider, there are two methods:
- Using a plugin
- Without a plugin (Custom Code and CSS)
Below, we will first explore the With plugin method because for non-technical users it is the easiest and preferrable method. Plus, it provides more options to customize your post slider. Therefore, it’s better that we start with it.
Method 1: Creating a WordPress Post Slider Using a Plugin in Elementor
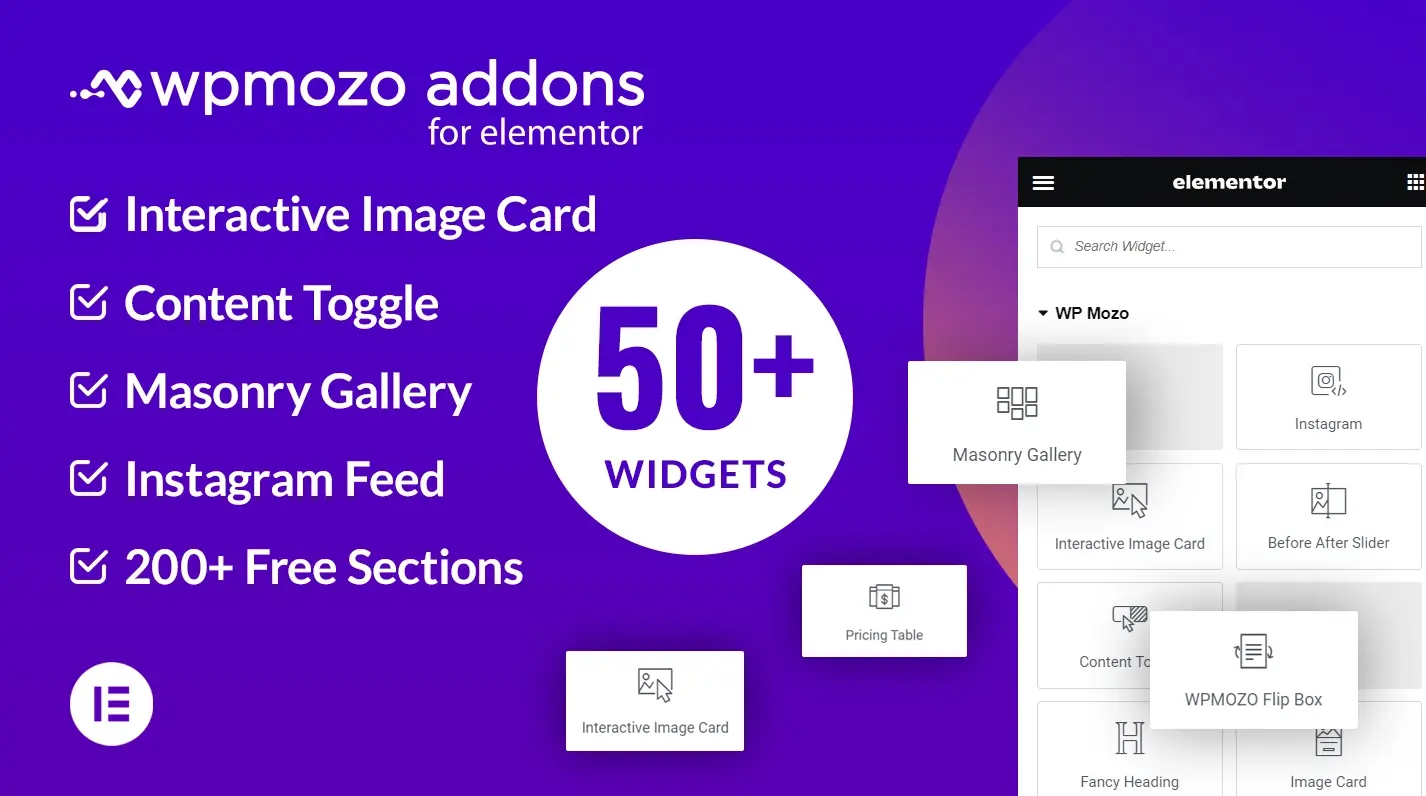
The plugin we will use for this tutorial is WPMozo Addons for Elementor.

This Elementor plugin offers more than 68 widgets that you can use to create various kinds of webpage elements, including sliders in WordPress. Among those widgets, you get the Advanced Blog Slider widget. By using the options of this post carousel widget, you can create beautiful blog sliders that:
- Have different layouts
- Support custom post types
- Have a custom read more button
- have Easy pagination and sliding controls
And there are a lot of different options you can utilize to make your Elementor post carousel highly engaging and interactive. The widget is highly intuitive and has no learning curves. This simply means a quick and effortless solution to create your best WordPress post slider.
Step 1: Install and Activate WPMozo Plugin
Visit WPMozo.com and go to the WPMozo Addons for Elementor page.
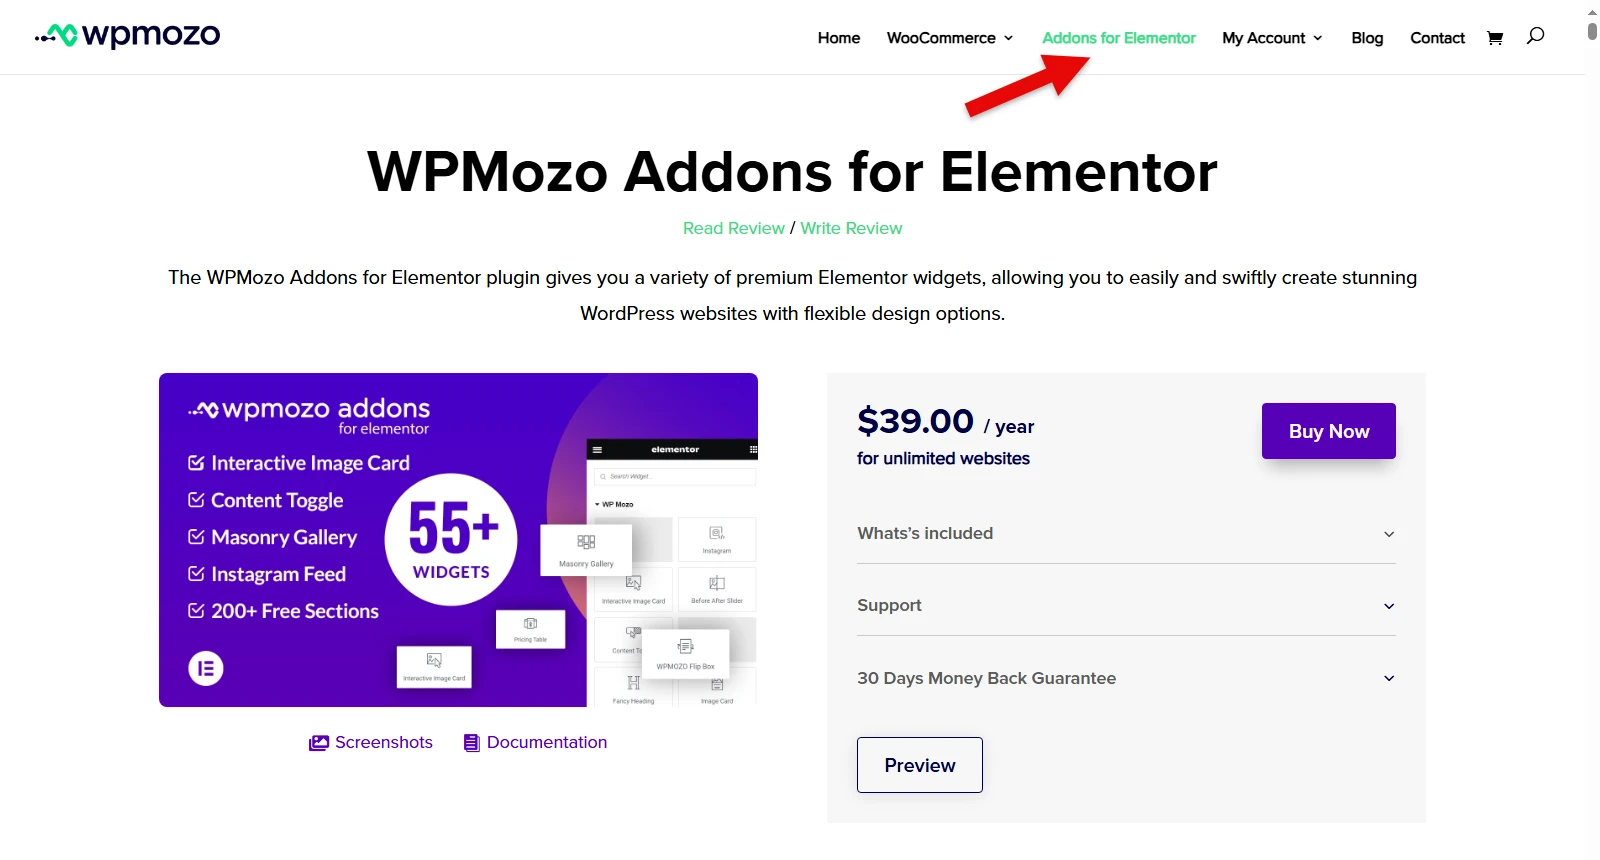
Then, select your license, and get the plugin. You need to download the plugin file; therefore, visit your account and download it. After the download, open the WordPress Dashboard, go to Plugins → Add Plugin → Upload Plugin
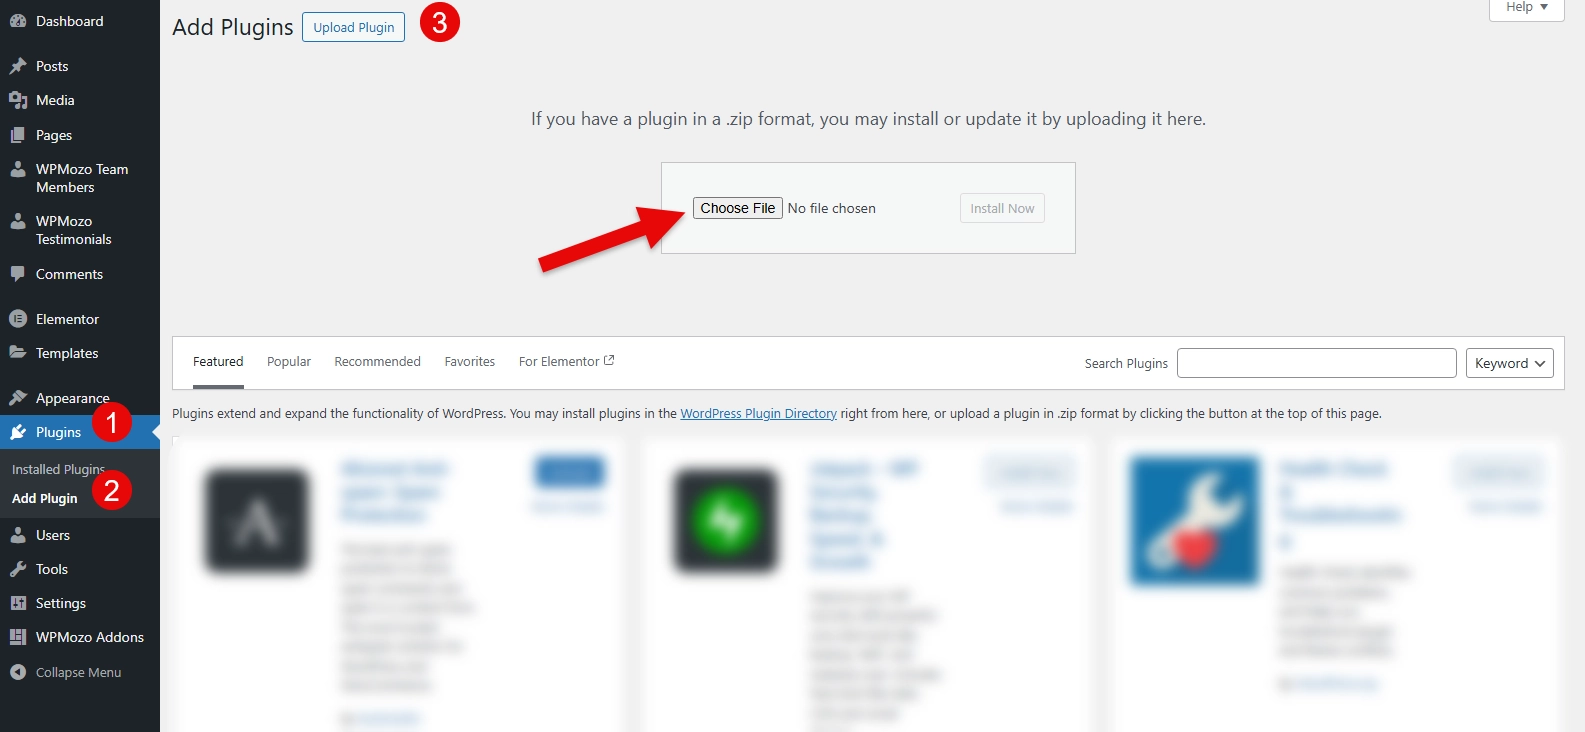
In the Upload Plugin window, add the file you’ve downloaded, and install the plugin, and then activate it.
Note: Ensure, you’ve installed and activated the free WPMozo Addons Lite for Elementor plugin as well, in order to let the premium plugin function effectively.
Step 2: Activate Advanced Blog Slider Widget
After installing the plugin, you need to activate the widget that you’ll use to create your WordPress post slider. So, to do that, go to WPMozo Addons → select Advanced Blog Slider → click Save.
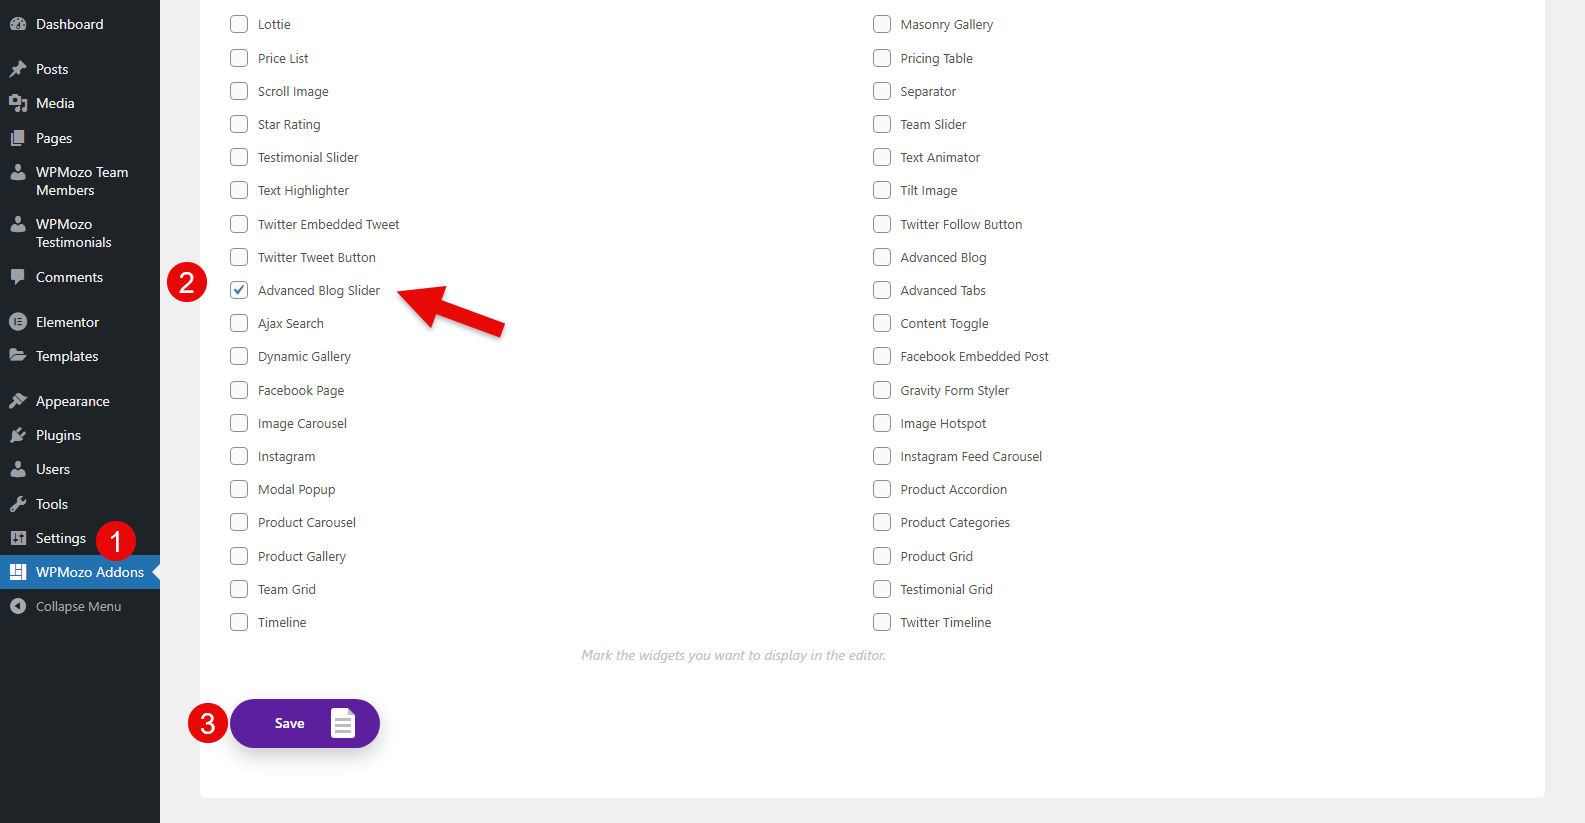
This will enable the widget, and you can use it to create the WordPress Elementor post carousel.
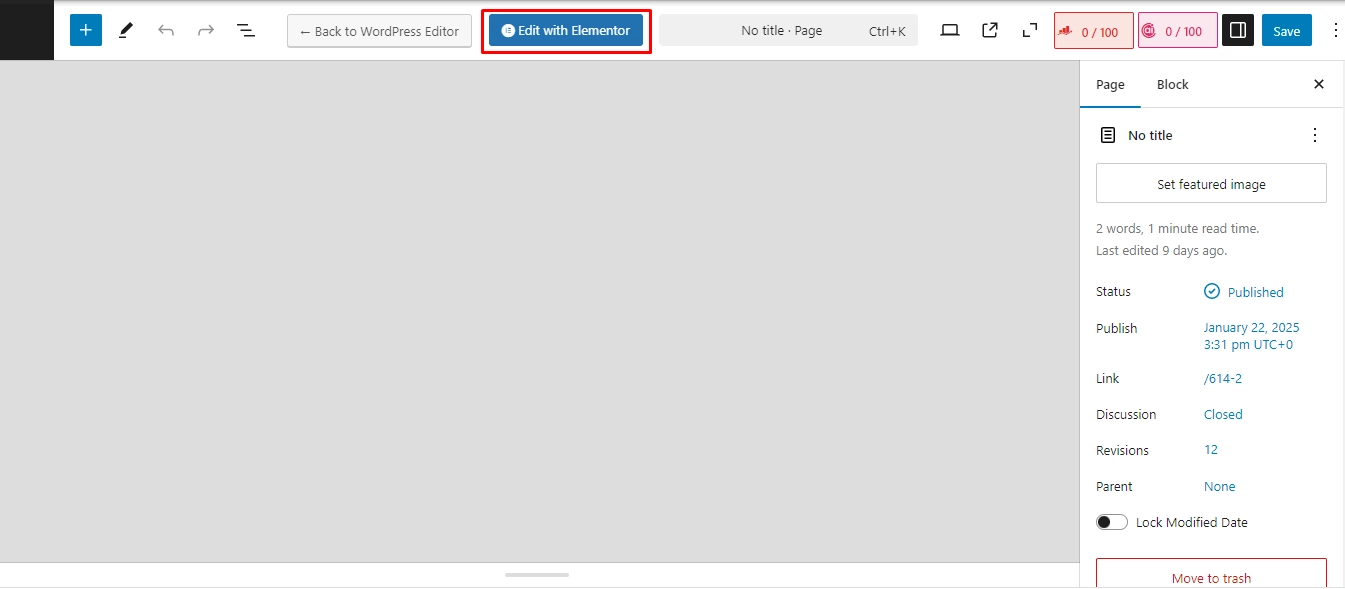
Step 3: Add Widget to Page
Since our widget is already activated, now, you can add it to the page and create the post slider. Create a new page or edit an existing one where you need to display the slider. Once the page is open, click on the Edit with Elementor button.
When the Elementor builder launches, go to the widgets section, search for Advanced Blog Slider. Or, you can scroll down to the WPMozo section and find your widget.
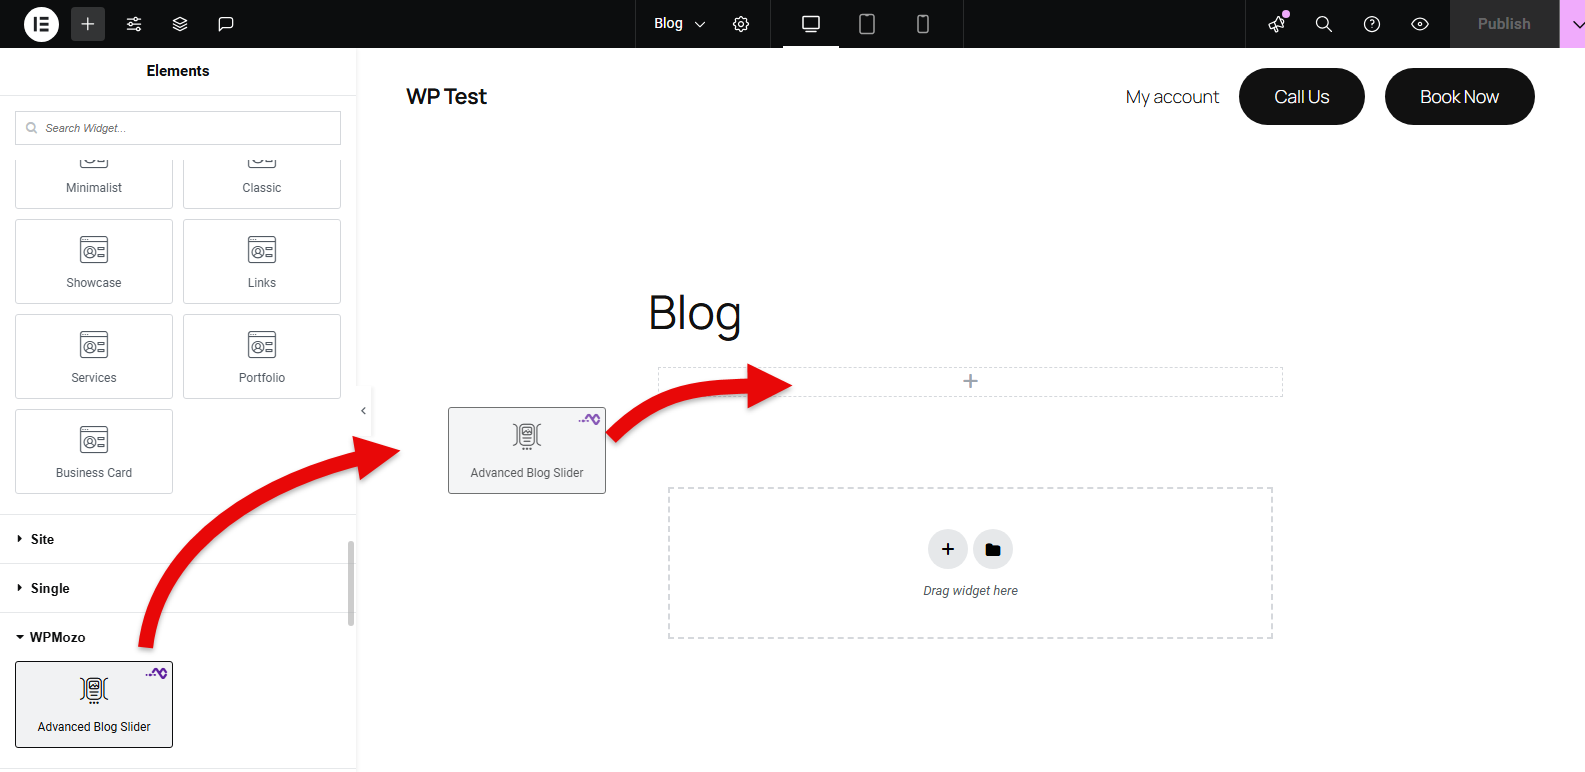
Once you have located it, click on it or drag and drop it to the page. As soon as you do that, you can see a post slider just like the following:
Now, what you need to do is configure it, customize it, review it, and publish it. Let’s explore the configuration and customization options in the next step.
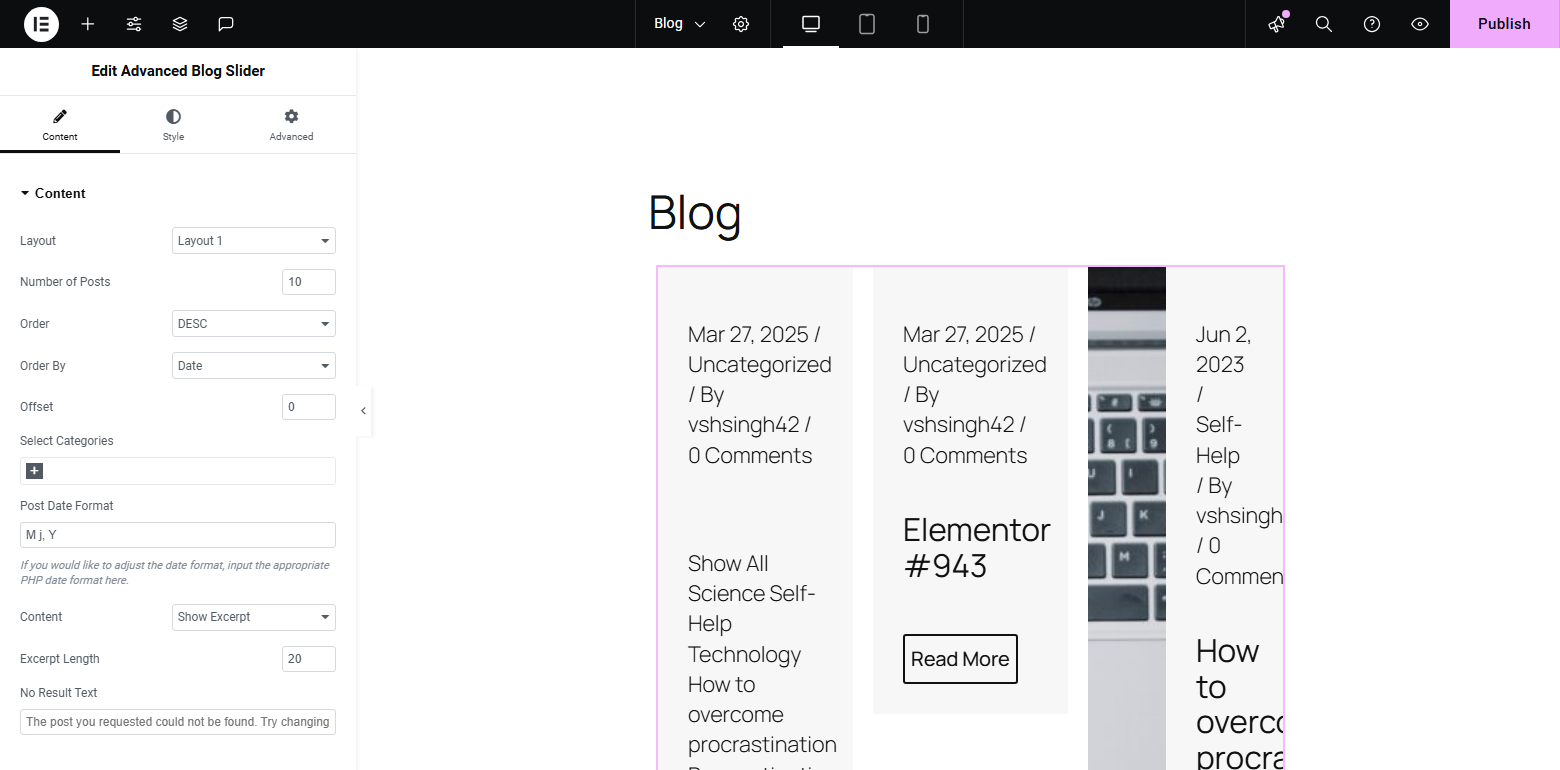
Step 4: Customize Your WordPress Post Slider
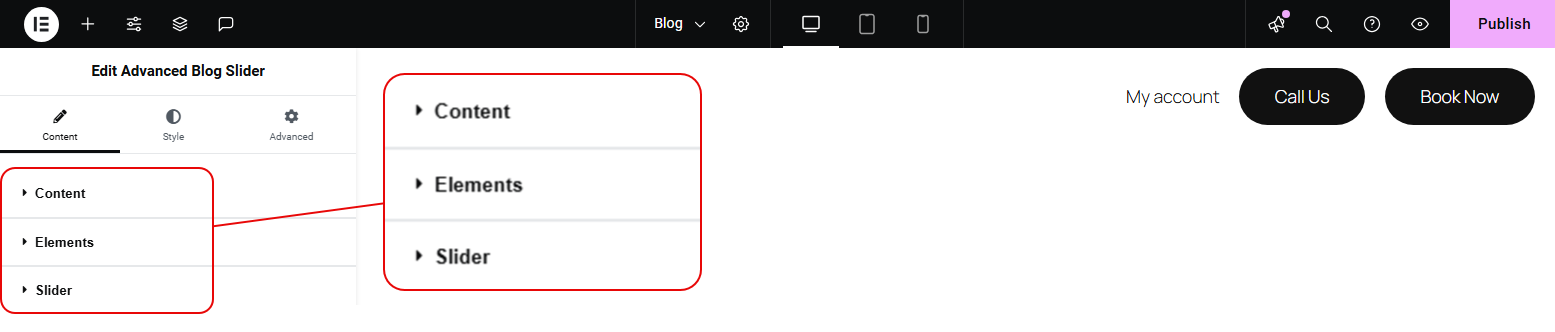
The first setting you get is the Content, where you get multiple configuration options as Content, Elements, and Slider.
In the Content options, you get to configure the following:
- Layout
- Number of posts
- Order
- Post categories
- Offset posts
- Post Date Format
- Excerpt display
After utilizing the options, you can make the Elementor post carousel look like the following:

With the Elements options, you can optimize the slider elements such as:
- Ignore Sticky Posts
- Hide or Show Featured Image
- Choose Featured Image Size: Medium, Large, and Full
- Show or Hide Read More Link
- Add Custom Text for Read More Link
- Show or Hide: Date, Categories, Author, and Comment Count
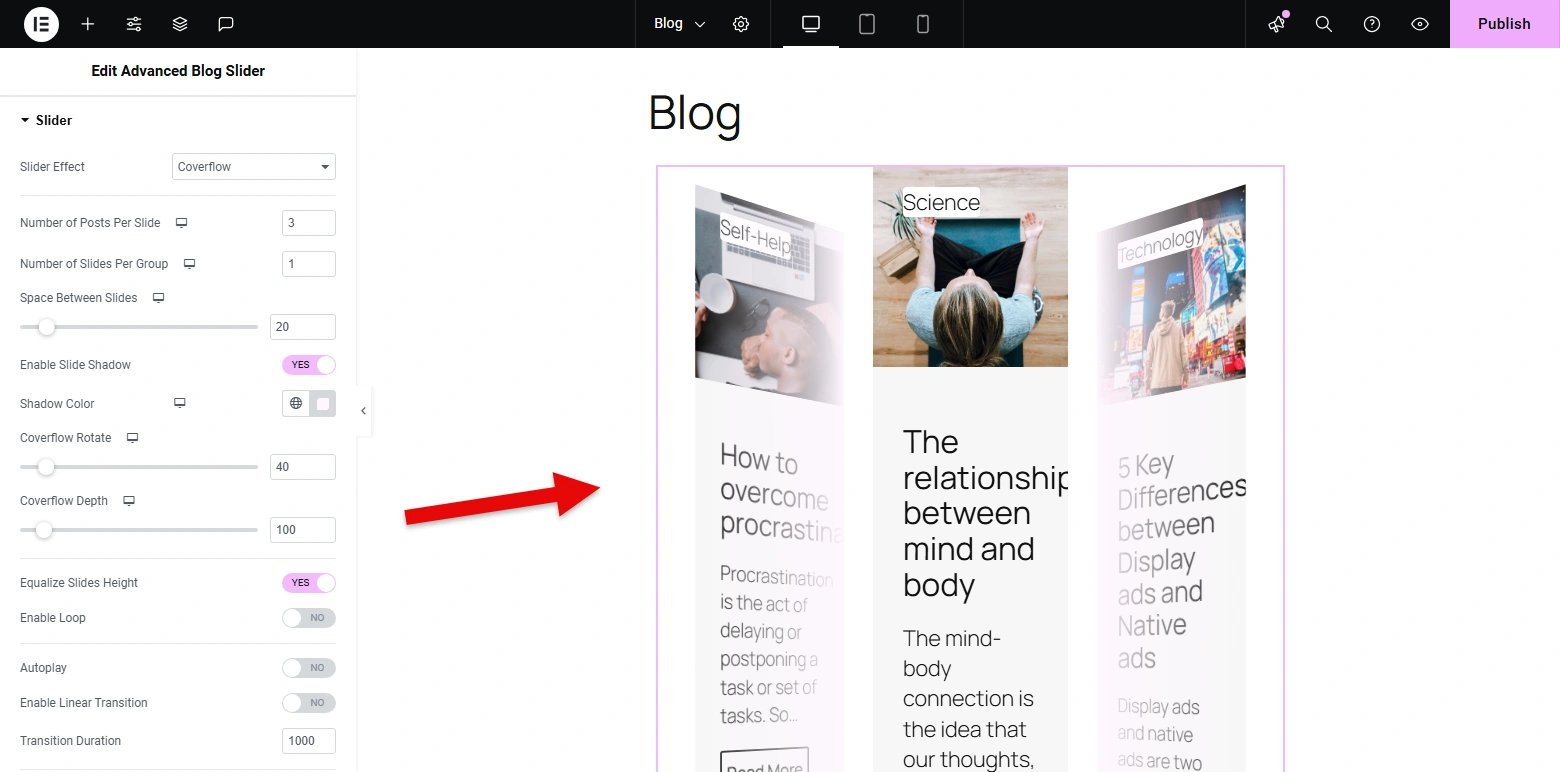
With Slider options, you get to configure the working of the post slider with features like:
- Slider Effect: Slide, Coverflow, and Flip
- Number of Posts Per Slide
- Number of Slides Per Group
- Space Between Slides
- Equalize Slides Height
- Enable Loop and Autoplay
- Show or Hide Arrows
- Show or Hide Pagination
After configuring all of the above options, you can have your post slider for WordPress look like the following:
However, your work isn’t over yet. In order to maximize the look of our post carousel for Elementor, you need to access the design options in the Styles tab. Here, you get to apply tweaks to:
- Image
- Meta Icon
- Post Content
- Category
- Slider
- Title Text
- Body Text
- Post Meta Text
- Read More
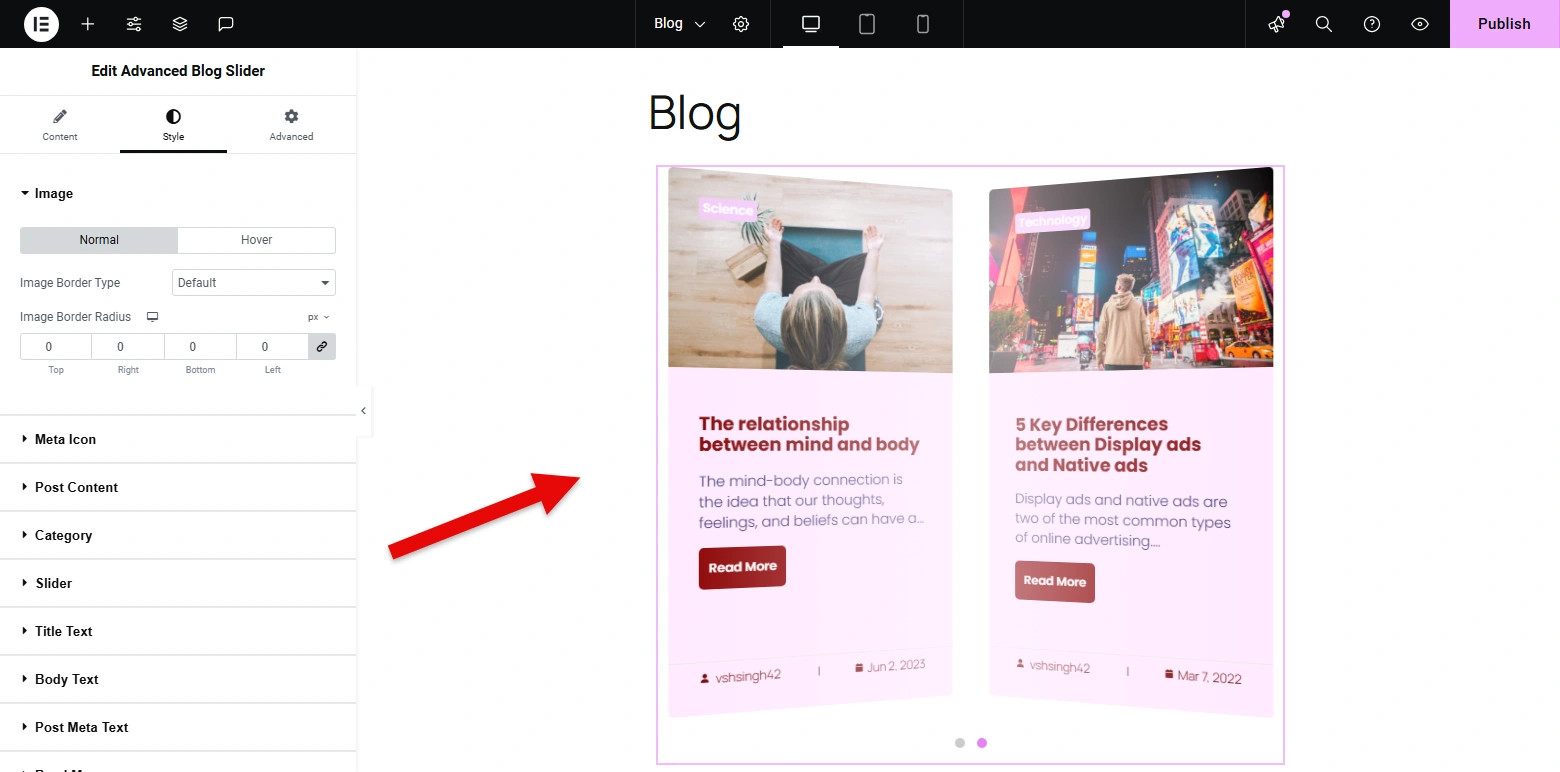
Once you utilize all of the above options, you can transform your post slider for WordPress just like the above.
Step 5: Review and Publish the Post Carousel Elementor Layout for WordPress
By utilizing the Content and Styles settings of the Advanced Blog Slider widget, you have created the engaging post slider for your WordPress website using Elementor. The only thing remaining is you to review it and then publish. Once it’s published, your website visitors can explore it, interact with it, and easily read the content you post.
That’s all it takes to create the best WordPress post slider.
Method 2: Creating a WordPress Post Slider Without a Plugin
To create a post slider for WordPress without using a plugin, we need to use JS, HTML, Custom CSS, and Shortcode. When you use this method, it helps you add your post slider, however, it won’t provide functionalities like we explored in the above method. Therefore, many experts suggest using a plugin for better and faster results.
Still, if you want to create a post slider without using a plugin, follow the steps below. This method will help you add a post slider containing:
- 5 latest posts
- With title and featured images
- Responsiveness
Let’s start creating it.
Prerequisites: Make sure you know how to edit the functions.php file. Or install any Snippet plugin. For this post, I am going to use the Code Snippets plugin.
Step 1: Enqueue Swiper Assets for Post Slider
First, we need to enqueue swiper assets for post slider in the functions.php file. This will help us create the touch enabled slider on the page. So, for that, go to Snippets → Add New.
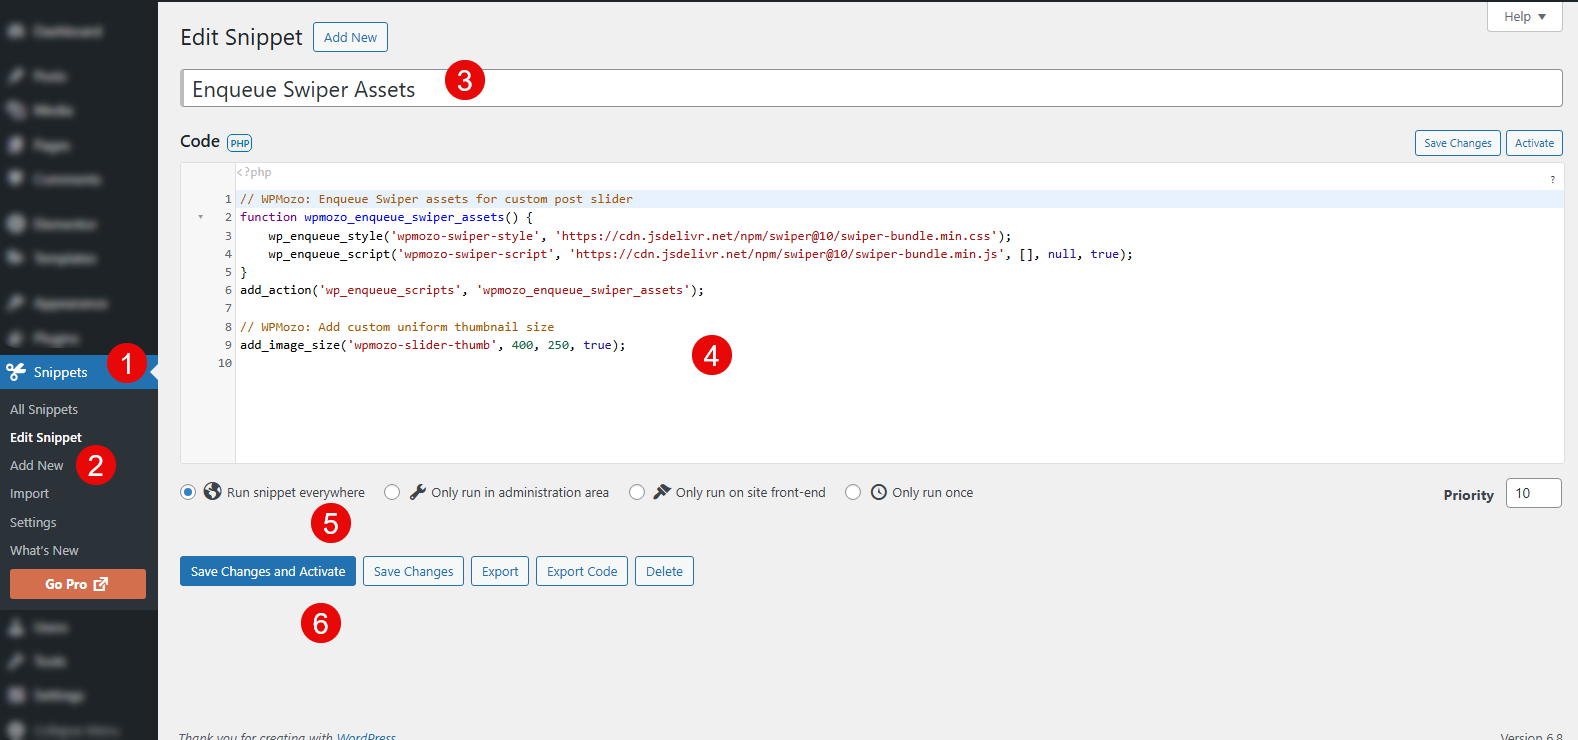
Title your snippet, and then add the following code:
// WPMozo: Enqueue Swiper assets for custom post slider
function wpmozo_enqueue_swiper_assets() {
    wp_enqueue_style('wpmozo-swiper-style', 'https://cdn.jsdelivr.net/npm/swiper@10/swiper-bundle.min.css');
    wp_enqueue_script('wpmozo-swiper-script', 'https://cdn.jsdelivr.net/npm/swiper@10/swiper-bundle.min.js', [], null, true);
}
add_action('wp_enqueue_scripts', 'wpmozo_enqueue_swiper_assets');

// WPMozo: Add custom uniform thumbnail size
add_image_size('wpmozo-slider-thumb', 400, 250, true);
After that, check Run snippet everywhere, and click Save Changes and Activate.
Step 2: Add Post Slider Shortcode Function
Our Swiper.js is enqueued, now, we need to add a function for the post slider shortcode, so that we can render the responsive post slider on the page. Repeat the same steps just as the previous one, and in the code field, add the following:
// WPMozo: Custom shortcode to render a clean, responsive post slider
function wpmozo_post_slider_shortcode() {
    $args = array(
        'post_type' => 'post',
        'posts_per_page' => 5,
    );

    $query = new WP_Query($args);
    ob_start();

    if ($query->have_posts()) : ?>
        <div class="swiper wpmozo-swiper">
            <div class="swiper-wrapper">
                <?php while ($query->have_posts()) : $query->the_post(); ?>
                    <div class="swiper-slide">
                        <a href="<?php the_permalink(); ?>" class="wpmozo-slide-link">
                            <?php if (has_post_thumbnail()) : ?>
                                <?php the_post_thumbnail('wpmozo-slider-thumb'); ?>
                            <?php endif; ?>
                            <h3 class="wpmozo-slide-title"><?php the_title(); ?></h3>
                        </a>
                    </div>
                <?php endwhile; ?>
            </div>
            <div class="swiper-button-next"></div>
            <div class="swiper-button-prev"></div>
        </div>
    <?php endif;

    wp_reset_postdata();
    return ob_get_clean();
}
add_shortcode('wpmozo_post_slider', 'wpmozo_post_slider_shortcode');
Then again, check Run snippet everywhere, and click Save Changes and Activate.
Step 3: Custom CSS for Slider Styling
Now, we have to add some custom CSS so that the slider doesn’t look basic.
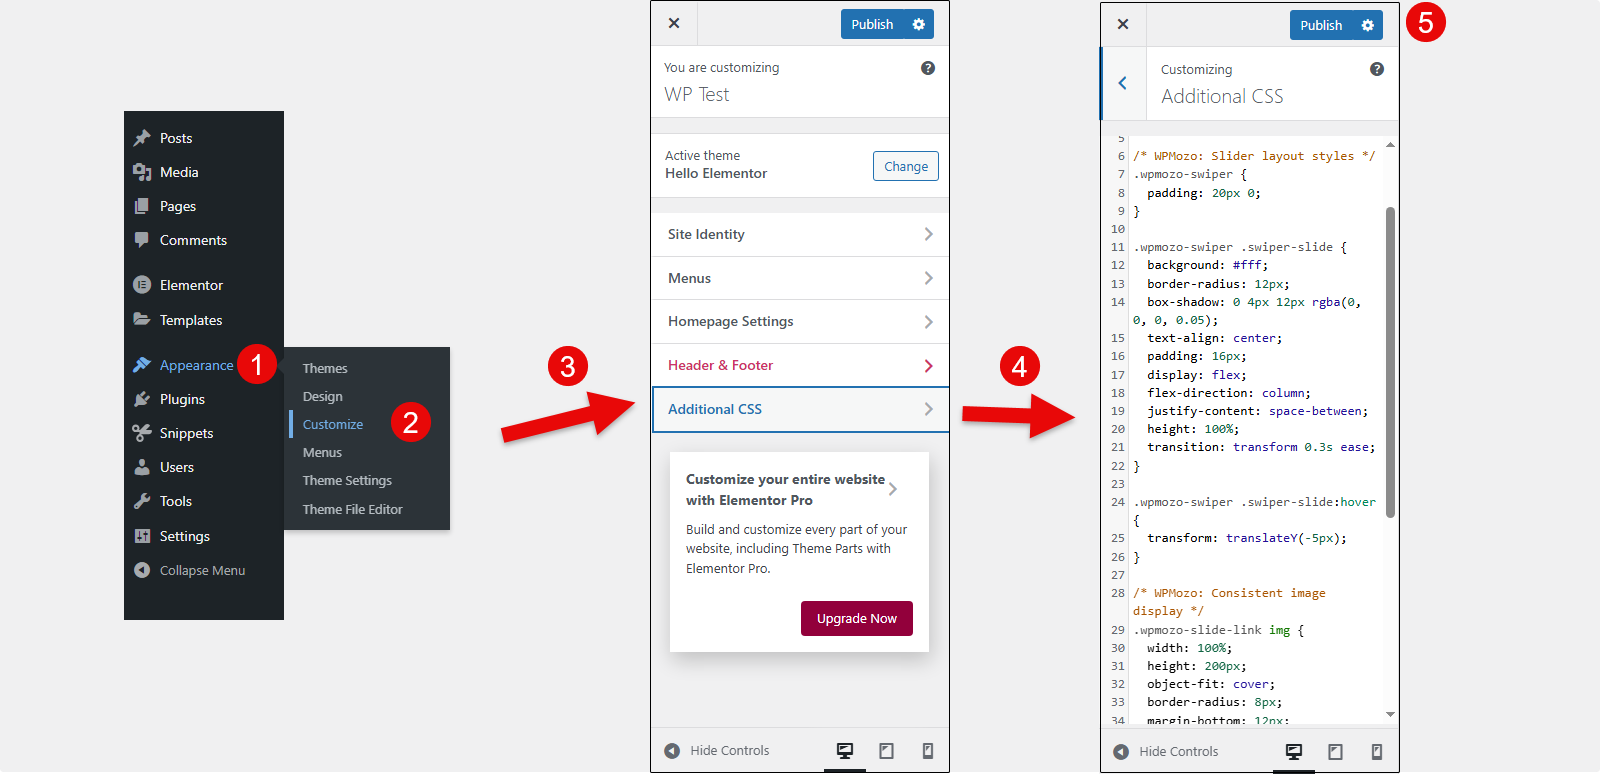
For that, go to Appearance → Customize → Additional CSS. Add the following CSS.
/* WPMozo: Slider layout styles */
.wpmozo-swiper {
  padding: 20px 0;
}

.wpmozo-swiper .swiper-slide {
  background: #fff;
  border-radius: 12px;
  box-shadow: 0 4px 12px rgba(0, 0, 0, 0.05);
  text-align: center;
  padding: 16px;
  display: flex;
  flex-direction: column;
  justify-content: space-between;
  height: 100%;
  transition: transform 0.3s ease;
}

.wpmozo-swiper .swiper-slide:hover {
  transform: translateY(-5px);
}

/* WPMozo: Consistent image display */
.wpmozo-slide-link img {
  width: 100%;
  height: 200px;
  object-fit: cover;
  border-radius: 8px;
  margin-bottom: 12px;
}

/* WPMozo: Title styling */
.wpmozo-slide-title {
  font-size: 18px;
  color: #333;
  margin: 0;
}

/* WPMozo: Uniform image height fix for post slider */
.wpmozo-slide-link img {
  height: 200px;
  width: 100%;
  object-fit: cover;
  border-radius: 8px;
}
Once you’ve added the CSS, click Publish.
If you’re using the default WordPress Themes such as Twenty Twenty-Five, you won’t find the Customize option. Therefore, in that case, to access the customizer, you can visit the following URL:
https://example.com/wp-admin/customize.phpReplace the example.com with your domain. You can also use a Custom CSS plugin, for example, Simple CSS.
Step 4: JS Initialization
The styling has been added, now what remains is adding the script for JS initialization when the post slider shortcode calls for it. For that, you can use Elementor’s Custom Code functionality.
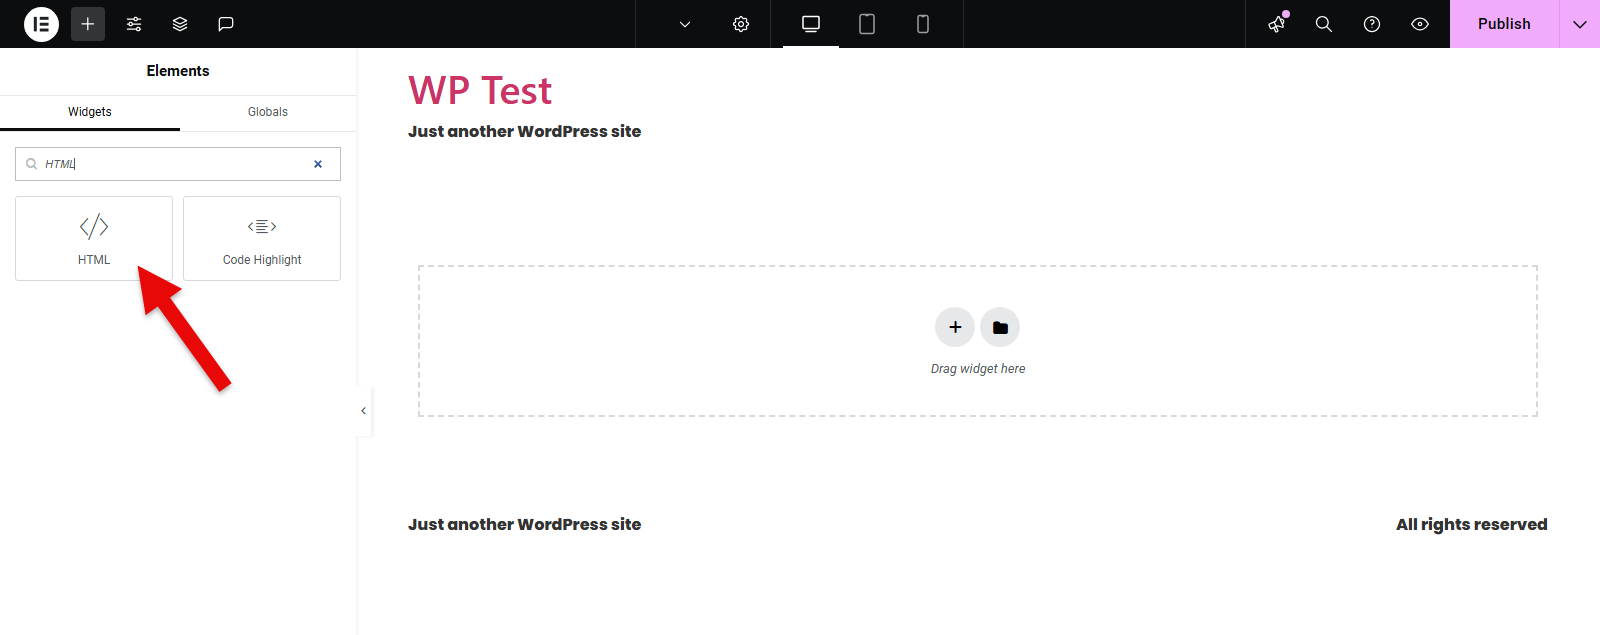
But, if you don’t want to run the script on every page, then in that case, simply add the following code in the HTML widget.
<!-- WPMozo: Swiper initialization -->
<script>
document.addEventListener("DOMContentLoaded", function () {
    new Swiper('.wpmozo-swiper', {
        slidesPerView: 3,
        spaceBetween: 20,
        loop: true,
        navigation: {
            nextEl: '.swiper-button-next',
            prevEl: '.swiper-button-prev',
        },
        breakpoints: {
            768: { slidesPerView: 2 },
            480: { slidesPerView: 1 },
        }
    });
});
</script>
Open the page, Edit with Elementor, go to the widget section, look for the HTML Code widget.
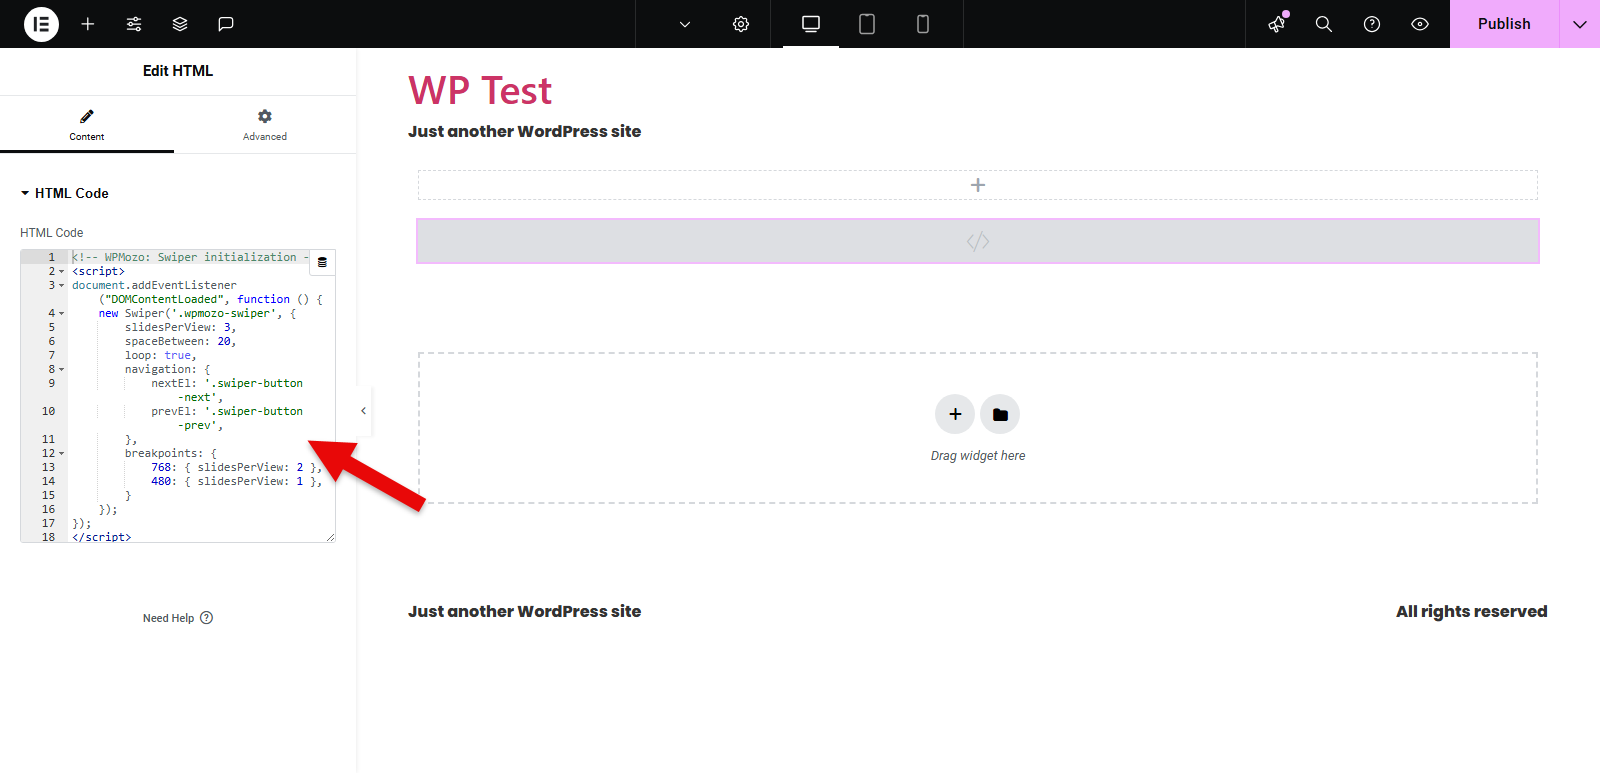
Insert it at the bottom of the page. Paste the code provided.
Step 5: Adding Post Slider Shortcode
Everything’s done. Now, you need to simply use the shortcode where you want to display the WordPress post slider on that particular page where you have added the JS.
Go to Widget Section → look for Shortcode → insert it on the page
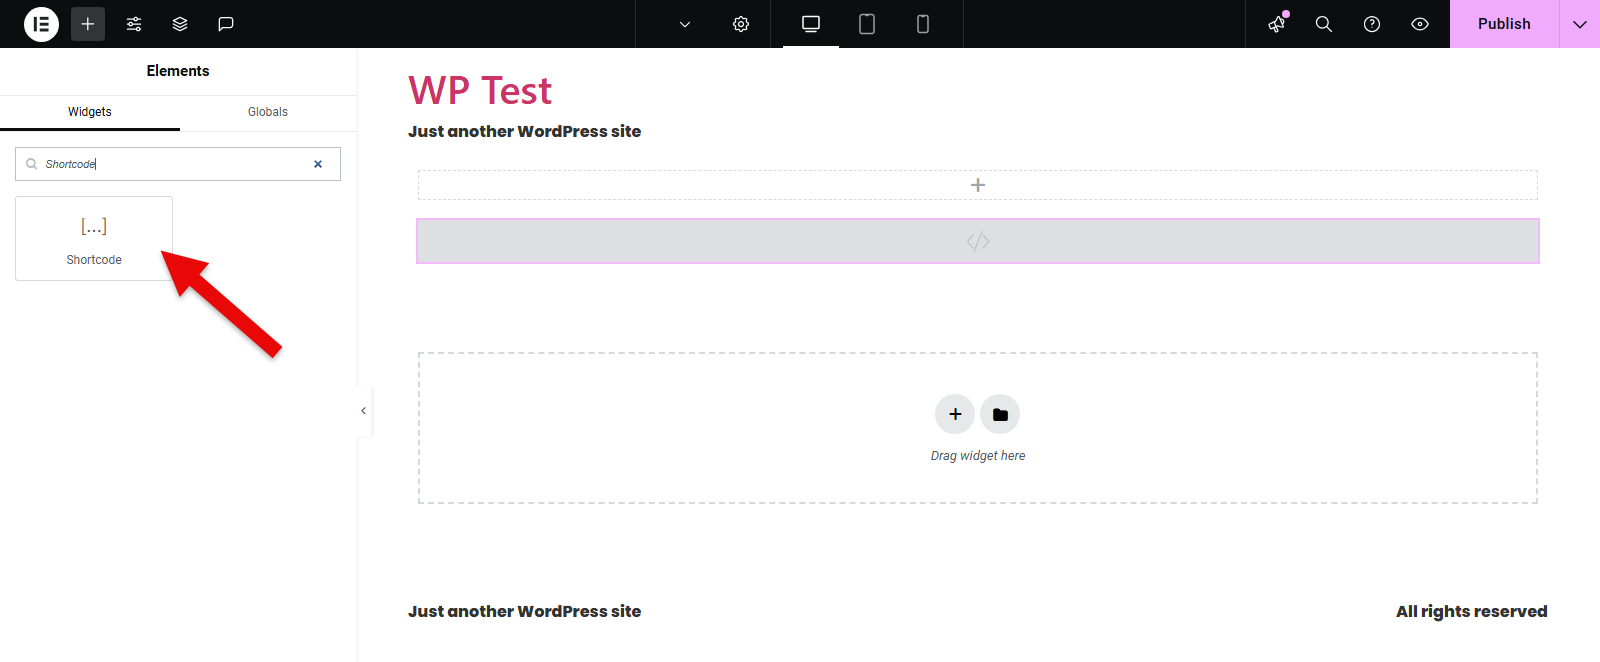
Once you’ve added the widget, paste the following shortcode:
[wpmozo_post_slider]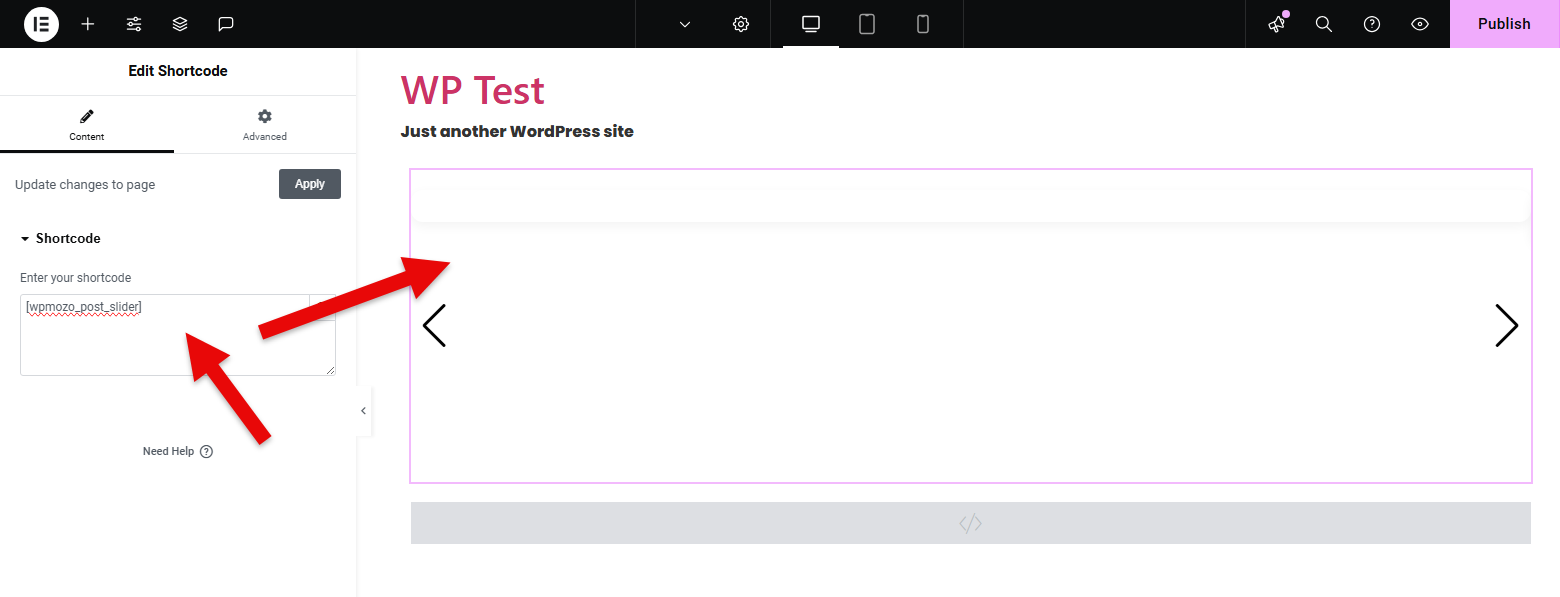
The Elementor post slider will not be visible on the backend. Therefore, visit the frontend, and you can find your post slider for WordPress created without using a plugin like the following:
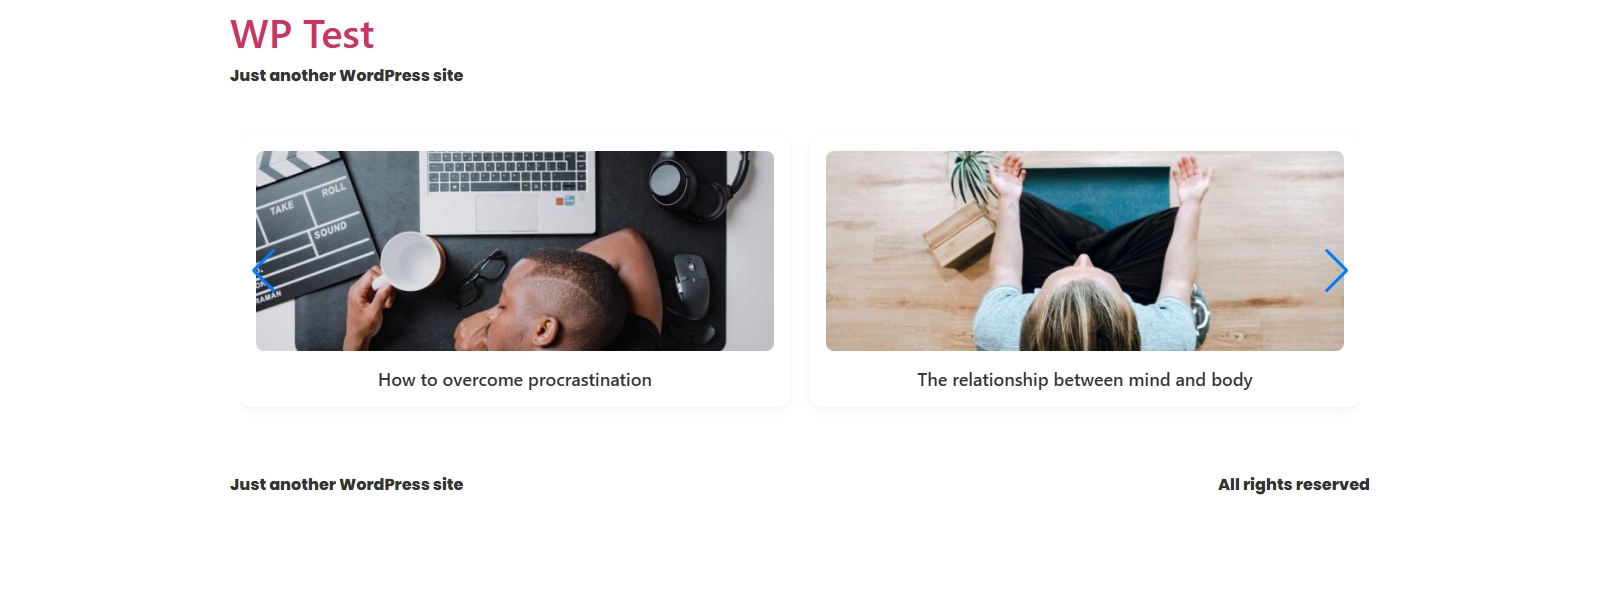
That’s it; you’ve done it successfully. When users click on the slides, they will be redirected to the respective post.
Frequently Asked Questions
How do I add a slider to my WordPress site?
To create a slider in WordPress, you can use Elementor with a post slider module, such as the WPMozo Advanced Blog Slider widget for Elementor. Additionally, you can try the custom codes if you don’t want to install any other plugin.
What is the difference between slider and carousel in WordPress?
Both slider and carousel are basically identical when it comes to displaying content on an interactive rotator. However, the slider allows you to view a single slide, whereas a carousel offers a wider view, enabling users to view more elements at once.
Which post slider is best for WordPress?
There is no single choice when it comes to creating a WordPress post carousel. However, if you’re using the Elementor page builder for WordPress, you can utilize the Advanced Blog Slider widget to create engaging and highly interactive post sliders.
Conclusion
So above, we looked at what a post slider is and why one should use it. In addition, we looked at two easy methods to create it in a WordPress website.
Both methods offer you a responsive post slider for WordPress, however, the “without plugin” method is limited when it comes to customization. And if you’re looking for something engaging and highly interactive, then you should go with the Advanced Blog Slider widget.
Because it’s easy to create the WordPress Elementor post slider with it, plus, you can apply different customizations, for example, slider layouts, custom post type support, showing/hiding elements, and choosing the number of posts to display. With all these, it becomes a preferred solution to create your WordPress post carousel that will engage the users at the same time motivate them to interact with it.
Therefore, try it today, and let me know what your experience was, and if you have any views or doubts, you can share that too in the comment section. I’d love to hear your thoughts.
Here is a categorized list of slider widgets for Elementor which are available in the plugin
Free Slider Widgets
- Advanced Blog Slider
- Instagram Feed Carousel
Paid Slider Widgets
- Logo Carousel
- Team Slider
- Timeline
- Product Carousel


0 Comments